General Options
Timeframe Options
Delivery Options
Pacing Options
General Options
Timeframe Options
Delivery Options
Retry Options
Pacing Options
General Options
Timeframe Options
Delivery Options
Retry Options
Pacing Options
General Options
Timeframe Options
Delivery Options
Retry Options
Pacing Options
Contents
Multi-channel Campaigns
Leverage both automated and agent-assisted outbound channels to proactively reach customers. With Genesys Engage cloud, your agents can make calls – manually or via an automatic dialer – or you can send automated messages via text, email, or outbound IVR.
You can initiate outreach in one channel and then expand to another channel if no response is received, and you can blend Interactions by leveraging more than one channel as part of a single customer dialog, including strategies such as scheduling a service call by phone, then sending a text-based reminder one day before the scheduled appointment.
Here's how you can set up a multi-channel campaign using Outbound for Genesys Engage cloud.
Channels
First, let's take a look at the available channels.
| Channel | Description | Example |
|---|---|---|
| Voice | Outbound IVR and automated alert messaging (Power GVP and Predictive GVP). |
|
| Dialer | Automatic dialer places calls (Progressive and Predictive). |
|
| Preview | Agents review customer records and then manually launch the call. |
|
| Text | One-way and interactive SMS text messaging. |
|
| Personalized and dynamic email messaging. |
|
Voice
Use the Voice channel to run an Outbound IVR campaign that sends automated messages and alerts to your contacts. You can run an Outbound IVR campaign in Power GVP mode, with no agents assigned to the campaign, or in Predictive GVP mode, where contacts are given the option to speak to an agent.
Dialer
Use the Dialer channel to run a campaign using a dialer that automatically dials and bridges calls to agents.
This channel enables you to run a campaign using Predictive dialing, which paces calls based on anticipated agent availability, or Progressive dialing, which places a call only when an agent is available. In addition, you can run a campaign in ASM mode, also called fast bridging, to optimize bridging time.
Learn more about the dialing modes here
Preview
Use the Preview channel if you don’t want to use an automatic dialer. Instead, agents preview each record and then manually launch the call.
Text
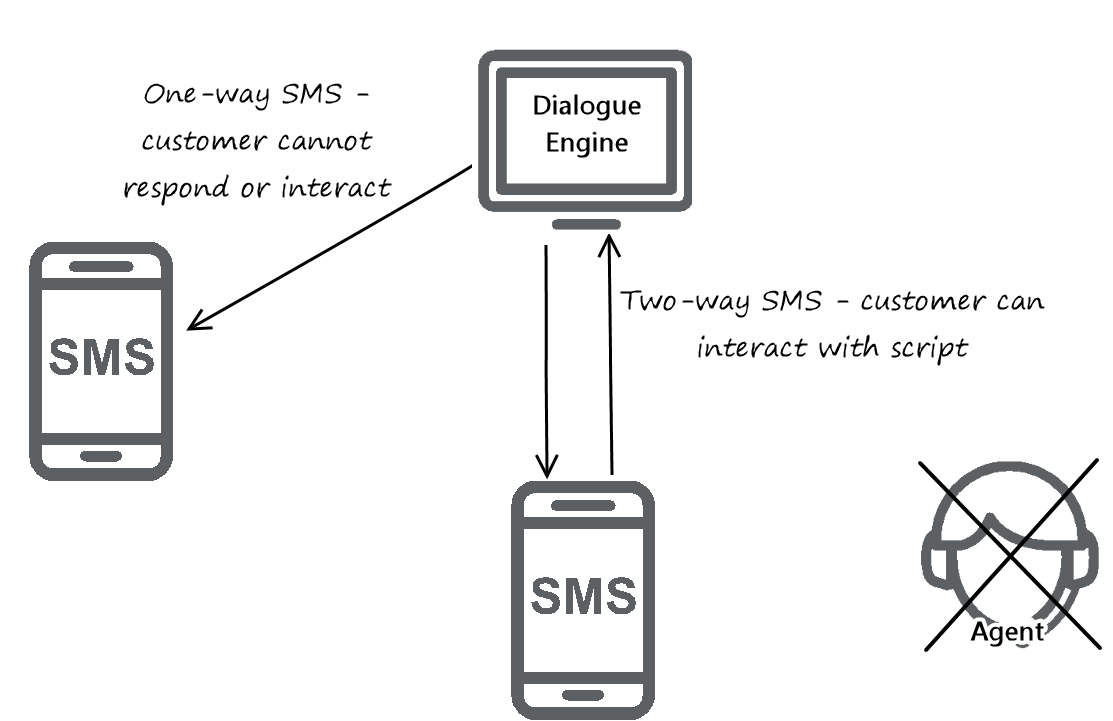
Use the Text channel to send one-way or two-way text messages to your contacts. With one-way messaging, you simply broadcast a message to every person on your contact list. In this scenario, contacts don’t respond to the scripted message. For example, a wireless provider could send payment reminders to customers who are more than 30 days behind on their bill. Customers are not asked to respond to the text.
If you’re running a campaign that requires a customer's response – for example a questionnaire or appointment confirmation – use two-way SMS. For example, a clothing retailer could invite customers to an exclusive in-store sales event and ask them to respond to the text with Y or N.
With this option, the script engages a dialog engine that looks for predefined keywords or short codes in the customer’s response. Interactions continue to take place between the script and the customer only; an agent is never involved.
Use the Email channel to send personalized and customized messages, including embedded links. With email, one-way broadcast is the only option. While custom REPLY TO addresses for direct responses are supported, auto-response (dialog engine) functionality is not supported.
For example, a hotel chain can email customers to announce an upcoming sale on its website. A customer can reply to the email but a dialog engine will not be engaged, and therefore interactions will not take place. The reply email will instead go to a specified mailbox.
Scripts for Text and Email
Unlike the Voice channel, which uses Designer for script and outbound IVR functionality, the Text and Email channels use Engage scripts.
A script is a file that combines the text, images and business rules, or set of instructions, sent out to a customer via a text message or Email.
Scripts can be very simple - involving only one-way communication with no interactive capabilities - or in the case of SMS, they can involve a dialog engine that enables interaction between the script and the customer.
Your account representative creates the script for you and can also edit the script and basic script attributes, such as response groups, message variables, and Email image resources.
Configure multi-channel campaigns
You can run a multi-channel, or multi-pass, campaign if you want to reach out to your customer using more than one channel or device. For example, in the first pass, you could use the Voice channel to send an automated payment reminder to your customers, via an outbound IVR. In the second pass, you could use the Text channel to send a personalized reminder message to the customers you didn’t reach in the first pass. In the third pass, you could use the Preview channel to have agents manually call the customers you didn’t reach in the first two passes.
To configure a multi-channel pass:
Specify a script
If you plan to send a text or email, you need to first specify the script that contains the message content. This script was created or uploaded on the Scripts tab.
To specify a script:
- On the Edit Campaign page, click the Outbound tab.
- In Outbound Options,select the script from the Script menu.
If your campaign won't include an Text or Email channel, you do not need to specify a valid script. Voice scripts are created in Designer.
Select the Pattern options
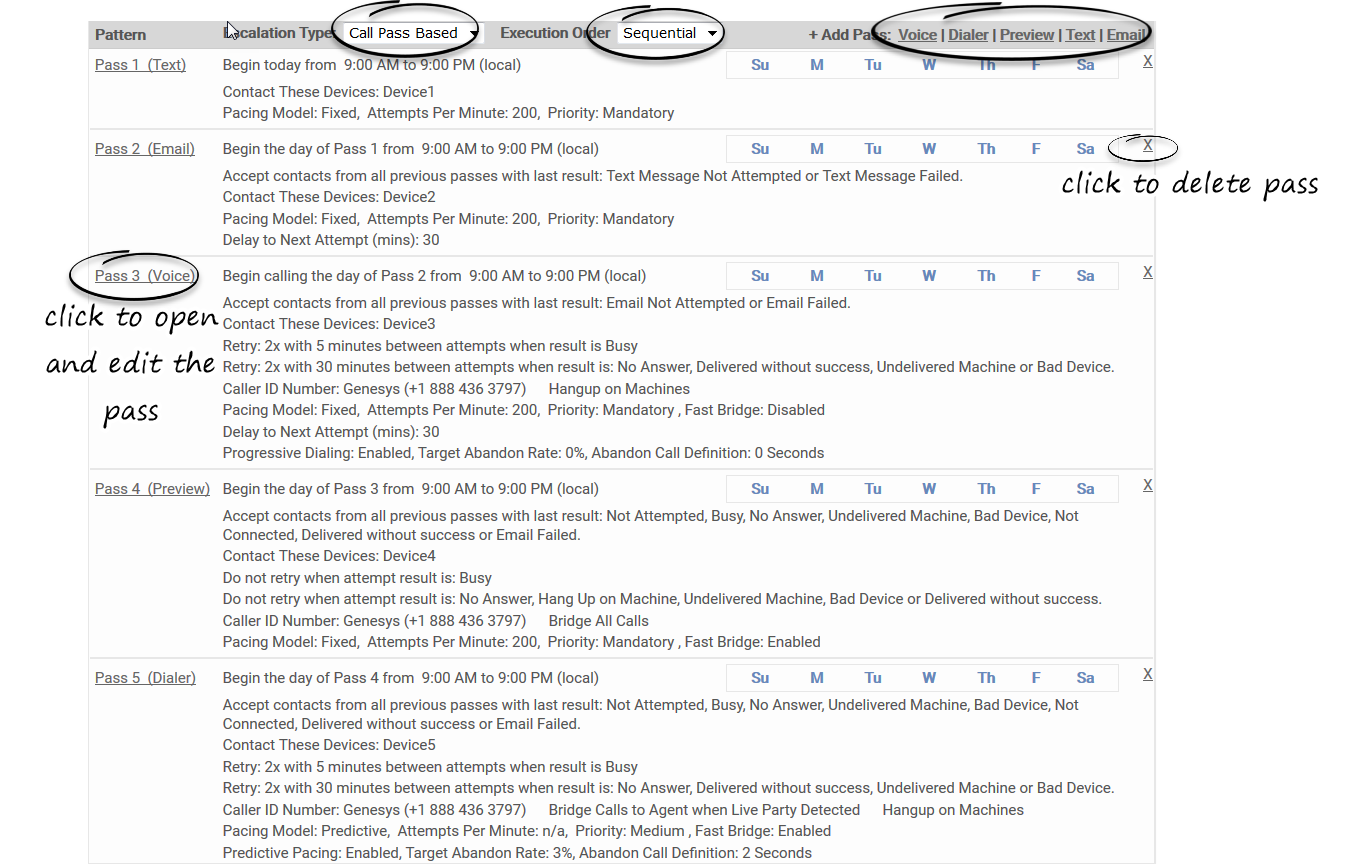
Define the call pattern by selecting the escalation type and execution order In the Pattern section of the Outbound tab.
Escalation Types are as follows:
- None - Select this option when escalation is not required.
- Contact Based - This option enables you to attempt multiple contact methods on each pass. Contact based escalation requires an input specification file that lists the order of escalation (from the Order field) and the conditions defining the escalation (from the Conditions field), and then a strategy is set to use those conditions. Whatever is listed in the input specification file as a condition must also be selected in the Retry Options for the pass.
Execution Order options are as follows:
- Sequential - Only one pass runs at a time. The pass with the earlier start time will run first. If passes have the same start time, the pass listed first in the Pattern section of the Outbound tab will run first.
- Parallel - Multiple passes are executed at the same time. For example, assume Pass1 is scheduled to dial from 9:00 AM to 11:00 AM (local time zone) and Pass2 is scheduled to dial from 10:30 AM to 12:00 PM (also local time zone). Any contact attempts made during Pass1 can be moved immediately to Pass2 and a second contact attempt made when Pass2 begins at 10:30 AM.
Define the passes
Now you can set up a multi-channel campaign by adding one pass at a time. A pass is basically a contact attempt that applies pre-defined treatments.
To add a pass, go to the Outbound tab of your campaign, and in the Pattern section, select the following:
Now apply the rules and conditions for each pass.
Configure the standard campaign filters, business rules, contact rules, and suppression rules as you normally would for a single-channel campaign.
Edit or delete a pass
Once you've defined a pass, a summary of the pass will appear in the Pattern section of the Outbound tab. To edit the pass, click the pass name to open the list of pass options. When you've finished editing, click Save Pass. The changes take effect immediately.
To delete a pass, click the corresponding X that appears next to the pass name and summary.


