
WFM E-mail Notifications
Set up e-mail notifications in Web for Supervisors to alert agents and supervisors about schedule changes, and status changes in trade and time-off requests.
This topic provides information about how to use the Notifications view in Workforce Management (WFM) Web for Supervisors to configure email notifications, by site, for the following types of events:
- Schedule trade status changes—Agents and supervisors who are affected by schedule trade proposals or responses can receive these notifications.
- Time-off request status changes—Agents and supervisors who are affected by time-off requests can receive these notifications.
- Schedule modifications—Agents who are affected by schedule changes can receive these notifications.
- Time-off bidding changes—Supervisors and agents who are affected by time-off bidding status changes can receive these notifications.
Preparing to send notifications
By default, WFM does not send out notifications to agents and supervisors. There are a few things you need to do before WFM sends them.
For example, agents and supervisors who are to receive email notifications must have their email addresses configured. These email addresses are stored as part of the Person object in the Genesys Configuration Database and are synchronized into WFM automatically.
Supervisors must have the appropriate security rights to configure notifications. See [[PEC-WFM/Current/Supervisor/CfgtnRlP|]] in the Workforce Management Web for Supervisors (Classic) Help.
Additionally, WFM must be set up properly and connected to a customer-supplied SMTP server. For assistance with this configuration, contact your Genesys Professional Services representative. After you complete these steps and the procedures below, WFM sends notifications of the selected type.
Finally, you must select at least one site to send notifications of a given type in the Associated Sites tab in Web for Supervisors Notifications view.
Rules for sending notifications
WFM uses specific rules for sending each of the four types of notifications, see in the [[PEC-WFM/Current/Supervisor/NtfcRls|]] in the Workforce Management Web for Supervisors (Classic) Help.
Users must have the appropriate security rights to receive notifications. See [[PEC-WFM/Current/Supervisor/NtfctnRlP|]] in the Workforce Management Web for Supervisors (Classic) Help.
Setting up e-mail notifications
To set up e-mail notifications, complete all of the procedures in this section.
Configuring WFM Daemon
Purpose: To configure the WFM Daemon Application object.Start of Procedure
- Configure the SMTP server settings in the WFM Daemon Application.
- See the [SMTP] configuration section and related options.
End of Procedure
Configuring a security role
Purpose: To create a user security role to access e-mail notifications.
Start of Procedure
- In WFM Web for Supervisors, select the Configuration > Roles view.
- In the Role pane, click New.
A new security role appears in the Role pane with a default name. - In the Role Privileges pane, change the Name of the role (if desired).
- In the list of Role Privileges, expand Notifications and check the boxes beside the privileges you want to assign to this role.
- Be sure to uncheck all privileges in the entire list that you do not want to assign to this role.
- Click Save.
End of Procedure
For a complete description of all privileges, see Role Privileges.
Assigning security roles to a users
Purpose: To assign a security role to a user, enabling access to e-mail notifications.
Start of Procedure
- In WFM Web for Supervisors, select the Configuration > Roles view.
- At the top of the Role Privileges pane, click Users, and choose one of the following:
- Click Assign Users to assign a WFM user to this role.
A new pane opens, containing a list of WFM users. - Click Import Genesys User to assign a Genesys user to this role.
A new pane opens, containing a list of Genesys users (in Genesys Administrator).
- New users are automatically granted access to all modules, objects, and sites.
- Click Assign Users to assign a WFM user to this role.
- Select the users you want to assign to this role and click Apply.
- In the Users pane, click Save Now.
End of Procedure
Adding e-mail addresses to the WFM Database
Purpose: To add Supervisor and Agent e-mail addresses to the WFM Database, so they can receive notifications.
Start of Procedure
- In Genesys Administrator, enter these e-mail addresses into the Supervisor and Agent person objects.
- After WFM synchronization the e-mail address will be available in the WFM Database.
End of Procedure
Enabling notifications in Web for Supervisors
Purpose: To configure the Web for Supervisors Application to enable notifications.
Start of Procedure
- In Web for Supervisors, select the Configuration > Notifications view.
All three supported e-mail notification types are listed in the left-side navigation pane. - Select the one that you want to enable and in the right-side pane, click the Targets tab.
- Check the sites for which you want to enable notifications. See the figure below.
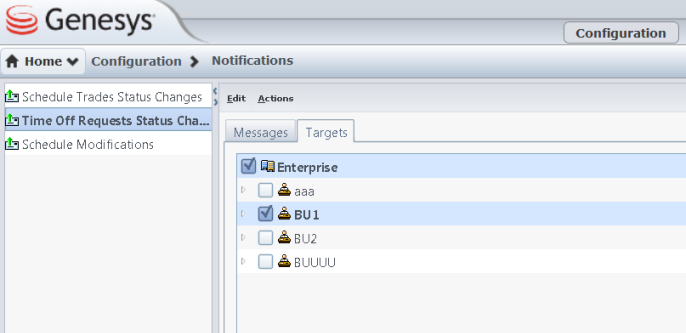
Figure: WFM Web Supervisor, with Notifications Selected - Use the Messages tab to configure the e-mail Subject and Message for all e-mail notifications of this type. You can change the text or keep the default.

End of Procedure
