
Provisioning the Click-to-Call-In scenario
This article describes how to provision Callback's Click-To-Call-In feature, which lets consumers initiate a call to your contact center directly from your mobile app.

Click-To-Call-In (Delayed) Push Notifications
Push Notifications are not used with the Click-To-Call-In (Immediate) scenario.
If you use the Click-To-Call-In (Delayed) scenario with your mobile app, then you must provision Push Notifications. Your mobile app sends a callback request when the consumer taps the button or link that you have provisioned for the Click-To-Call-In (Delayed) feature. The callback request includes the Push parameters. For information about the Push Notifications supported with Callback, see Callback Push Notifications. For a description of the Click-To-Call-In (Delayed) scenario, see Click-To-Call-In (Delayed) works.
Provisioning the Click-To-Call-In (Immediate) scenario
To provision the Click-to-Call-In (Immediate) scenario, you will work in both Callback and in Designer. You can do the work in the Callback UI before you do the work in Designer or after. Either way, the configuration in both must be completed before you can test your Click-To-Call-In (Immediate) scenario.
The Click-To-Call-In (Immediate) scenario uses the Genesys Engagement Services (GES) Call-In API.
For information about the callback-related APIs, see Genesys Multicloud CX REST APIs and tutorials for Callback.
Overview of the provisioning steps
You do not require a dedicated virtual queue for the Click-To-Call-In (Immediate) scenario. The consumer is simply calling into your contact center.
You must provision the following for the Click-To-Call-In (Immediate) scenario:
- In the Callback UI, provision the following:
- Click-To-Call-In groups: Required by the system to determine which telephone number is appropriate for a Click-To-Call-In request. The system also uses the group configuration to determine whether or not an access code is required when the consumer dials in.
- In the Designer UI, provision the following:
- A Click-to-Call-In Match application: This application must include the Click-to-Call-In Match Block. This Designer application must be of type default. During this part of the process, the system attempts to match a caller to a Call-In request based on data received with the request and data that the system provides in the response, such as the number that the caller dialed (the DNIS number), the access code (if required), and the caller's telephone number. If the attempt to match a caller to a Call-In request is successful and your Designer application is configured to route the call when a match is made, then the call is queued on hold like any other call to the contact center.
Provisioning the Click-To-Call-In (Delayed) scenario
To provision the Click-to-Call-In (Delayed) scenario, you will work in both Callback and in Designer. You can do the work in the Callback UI before you do the work in Designer or after. Either way, the configuration in both must be completed before you can test your Click-To-Call-In (Delayed) scenario.
The Click-To-Call-In (Delayed) scenario uses the following Genesys Engagement Services (GES) APIs:
- Callback
- Call-In
For information about callback-related APIs, see Genesys Multicloud CX REST APIs and tutorials for Callback.
Before you start
Before you start provisioning Designer applications for Click-To-Call-In (Delayed), create a virtual queue in Platform Administration for this purpose. You need to add the queue to the CALLBACK_SETTINGS data table and then configure it, so be sure to give it a name that helps to identify it; for example, ClickToCallInDelayed_VQ.
Overview of the provisioning steps
You must provision the following for the Click-To-Call-In (Delayed) scenario:
- In the Callback UI, provision the following:
- Push Notifications: Required for communicating information about the call-in to the consumer such as when the callback is ready, what number to call and – if required – what access code to enter.
- Click-to-Call-In groups: Required by the system to determine which telephone number is appropriate for a Click-To-Call-In request. The system also uses the group configuration to determine whether or not an access code is required when the consumer dials in.
- In the Designer UI, provision the following:
- A Callback application specifically for Click-To-Call-In (Delayed): Used to start the callback process. This Designer application must be of type Callback. During this part of the process, the call is queued in the Click-To-Call-In Delayed virtual queue.
- The Click-To-Call-In Delayed virtual queue in the CALLBACK_SETTINGS data table.
- A Click-to-Call-In Match application: Used when the customer calls the phone number that the system provided in a Push Notification. This Designer application must be of type default. During this part of the process, the system attempts to match the caller to an existing callback record and, if successful, routes the call to an available agent. For more information about the Click-to-Call-In Match block, see Click-to-Call-In Match Block.
Every environment is different and requires its own specific routing logic, error handling, and so on. That means that, in addition to the configuration described in this section, you must consider what customized configuration you require in the Designer applications and in the virtual queue used with the Click-To-Call-In (Delayed) scenario. This section describes only the basic configuration that is required in all environments to provision the Click-To-Call-In (Delayed) scenario in Designer.
Provision the Click-To-Call-In Delayed callback application
- In Designer, create a new application. Select Callback for the type.
- Add a Callback V2 block to the Initialize phase.
- In the properties of the Callback V2 block, select Customer dials in, rather than Business to customer under the Connect Customer tab.
- In all other regards, configure the application as required for your contact center.
- Save and publish your Click-To-Call-In (Delayed) Callback application.

Configure settings for the Click-To-Call-In Delayed Virtual Queue in the data table
- In Designer, navigate to Business Controls > Data Tables and open the CALLBACK_SETTINGS data table.
- If you have not yet done so, add the Click-To-Call-In Delayed virtual queue to the table; otherwise, find the queue in the table.
- Make sure that you configure all of the following settings in the data table for this queue, in addition to any other parameters that you choose to customize for your environment:
- Pushed Callback Expiry Time (minutes). This setting specifies how long the callback session stays alive after the system sends the initial Push Notification to the consumer. If the callback expires, any subsequent Call-In request related to that callback session will fail.
- Push Notification Threshold (minutes). This setting specifies when to send the CALLBACK_UPCOMING Push Notification to the consumer. For example, if you specify a value of 1, then when the Estimated Wait Time (EWT) on the queue drops below 1 minute, the system sends a CALLBACK_UPCOMING Push Notification to the consumer if conditions are favorable for the callback to proceed. For detailed information about the CALLBACK_UPCOMING Push Notification, including information about cases in which the system does not send this notice, see Callback Push Notifications.
- Call Direction. This must be set to USERORIGINATED.
- Callback Application. Select the Callback-type application that you created for the Click-To-Call-In (Delayed) scenario.
- The Callback Purge Time and the Business Hours that you specify in the CALLBACK_SETTINGS data table for the Click-To-Call-In Delayed virtual queue are applied to this queue just as they are applied to any other queue. Those two settings are relevant when the system must determine if the callback can be purged or not. In addition, Genesys recommends that you configure the Skill Expression for the virtual queue to ensure that the calls are routed to the agents who can best serve the consumers who are calling in.
- The callback will be purged at the end of the day based on the specified business hours, regardless of the Callback Purge Time status.
- Save and then publish your updated data table.
Provision the Click-to-Call-In Match application in Designer
In addition to the Callback-type Designer application, you also require a Click-To-Call-In Match application for the Click-To-Call-In (Delayed) scenario. When a Push Notification sends the number and optional access code to the consumer, then the consumer calls in. The Match application matches the caller to the original callback request. Based on the results of the matching attempt, the application either routes the call to an agent (successful match) or the call moves to the next block (no match). The routing is performed by a Route Call block.
The Match application must be a Default-type application. It can be used with multiple Click-to-Call-In Delayed virtual queues and multiple Click-to-Call-In Groups.
Sample Configuration
For the purposes of the following procedure, let's assume that consumers who are using the Click-To-Call-In feature are prompted to enter an access code. We’ll have the application perform the match only on the access code.
- In Designer, create an application of type Default.
- Click the Initialize phase and add the variables that you will use to store block outputs.
- We will add the following blocks to the Assisted Service phase to handle the call flow:
- User Input: This is required when you are using access codes with the Click-To-Call-In (Delayed) scenario. You configure this block to prompt the user to enter the access code.
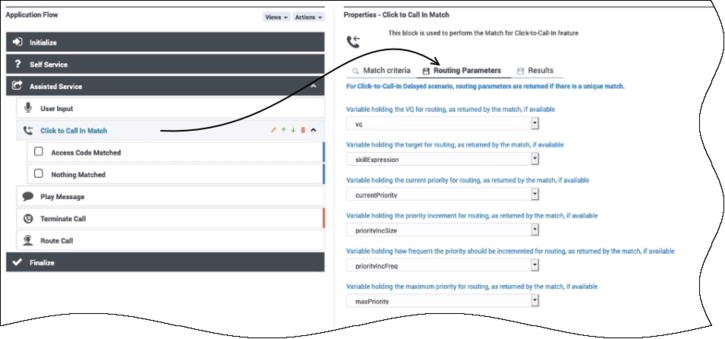
- Click-to-Call-In Match: In the Click To Call In Match block, on the Match criteria tab, select the option to use the access code that the consumer enters as the matching criterion.

- Make sure that you configure the parameters on the Routing Parameters tab. As with any application, consider the logic that needs to be configured to handle all outcomes appropriately for your contact center.
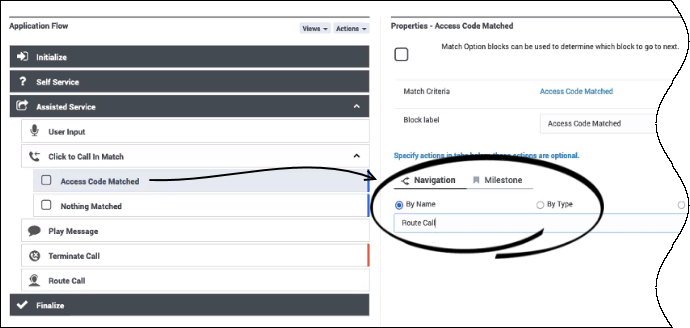
- If a match is made between the caller and an existing callback record, then the call needs to move to the Route Call block.
- Play Message: When the system can find no successful match for the caller or the caller is dropped from the Match block for any reason, then the Play Message block informs the caller that the system could not find their record.
- Terminate Call: When no match can be found between a caller and existing callback records, and the message in the Play Message block has finished playing, then the call drops to the Terminate Call block and the call ends.
- Route Call: When a caller matches a callback request that exists in the system, then the system routes the call based on the information in this block. The routing priorities, virtual queue, skill expressions, and so on are included in the Routing Parameters tab of the Click To Call In Match block. You must assign the variables used in the Routing Parameters tab to the corresponding fields in the Route Call block in order for the call to retain its priority from the original callback request.


