Managing and working with objects
Learn how to manage and work with eServices Manager objects such as categories, standard responses, field codes, and screening rules.
You can perform various operations to help you manage and work with eServices Manager objects such as categories, standard responses, field codes, and screening rules. For example, you can cut/copy/paste, import and export, and search for objects.
Cut/Copy/Paste objects
You can cut, copy, or paste categories as well as standard responses, field codes, and screening rules.
The general procedure is:
- Select the target object(s).
- Click
 and select an action (for example, Copy).
- When you cut an object, it disappears from its original location only after you paste it somewhere else—except that if you cut a category that has a linked screening rule, the screening rule remains in its original location.
- You can also delete any object by selecting it, then clicking
 .
. - Root category names must be unique across all languages.
- If you paste an object into a location that includes an object with the same name, the pasted object is renamed Copy_of_<name>.
Categories
You can cut, copy, or paste one category at a time.
- Click the category that you want to cut or copy.
- Click
 and select an action (for example, Copy).
 - Do one of the following:
- To paste inside a category: Click the target category, and then click
 and select Paste.
- ImportantYou cannot use the Paste option if you previously cut a source category and it is still selected.
- To paste to the root category: Click
 and select Paste to Root.
- To paste inside a category: Click the target category, and then click
Standard responses, field codes, and screening rules
You can cut, copy, or paste one or more objects at a time. See Important notes about screening rules for information pertaining only to screening rules.
- Click the check box beside each object that you want to cut or copy.
- TipYou can click the check box in the header row to select all objects in the table.
- Click
 and select an action (for example, Copy).
 - Do one of the following:
- For standard responses and screening rules: Go to the category into which you want to paste the objects. Click
 and select Paste.
 - For field codes: Click
 and select Paste.
- ImportantField codes are shared across all languages.
- For standard responses and screening rules: Go to the category into which you want to paste the objects. Click
Important notes about screening rules
Screening rules can be cut, copied, and pasted using the same method as standard responses and field codes. However, there are additional options and restrictions to consider:
- You cannot use the Paste option if you cut a screening rule and you are still in the same category. You must go to a different category to use the Paste option.
- The Paste as link option links a copied screening rule to a target category, but it does not create a separate copy of the screening rule. This is useful if you want to use a screening rule in multiple categories, but you still want to manage the rule from a central location.
- You cannot use the Paste as link option in the List view, or if you cut a screening rule in the List view and subsequently switched to the Tree view.
- You can use the Unlink from Category option (Tree view) or Unlink from all Categories option (List view) to unlink selected screening rule(s) from the category (Tree view) or all categories (List view).
Importing and exporting objects
You can export and import categories, standard responses, field codes, screening rules, training data objects, and models (training data objects and models are handled by Genesys Content Analyzer).
Use exported files as backups or to transfer objects between environments.
The import and export buttons are at the upper right of the eServices Manager window, next to the dropdowns for language, UCS, and tenant. Export is the down arrow, and Import is the up arrow.
Export
The process of exporting is simple. After you click the Export icon, a series of windows allows you to select:
- Root categories (and their associated category trees)
- Training Data Objects
- Models
- Screening rules
At the beginning, you decide whether the category tree(s) that you select will also include their associated Standard Responses and Field Codes.
The resulting file has the extension .kme.
Import a KME file
Clicking the Import icon takes you through these windows:
- Import - Select file and options. Click Select to navigate to the KME file you want to import. See below for explanations of the options Update screening rules and Create new UCS ids (selected by default).
- Import - Edit category names
- If the import file includes any category that has the same name as an existing category, eServices Manager asks you to rename the incoming category.
- Import - Process import file
- This simply shows the progress of the import process.
Note the following:
- The check box Create new UCS Ids controls whether the imported records receive new database IDs. Genesys strongly recommends that you leave this check box selected; otherwise, the imported records keep their old IDs and there is a risk of creating uniqueness conflicts. It is only safe to keep old IDs when you are importing into an empty database. One reason to keep the old IDs would be to preserve compatibility with non–eServices Manager components (such as a routing strategy) that need to refer to them.
- ImportantIf the Create new UCS Ids check box is cleared and an imported object comes in with an ID that is identical with an existing object’s ID, the import process cancels.
- The check box Update screening rules controls whether imported screening rules overwrite existing screening rules with the same name. If this check box is not selected, screening rules are treated like all other objects, as described in the preceding paragraph. If the check box is selected, screening rules are treated differently from all other objects: If the names match, the imported screening rule replaces the existing one.
- If an imported screening rule’s name does not match any existing rule, but its database ID happens to match that of an existing rule, then eServices Manager creates a new ID for the imported rule.
- If a root category being imported has the same name as an existing category, eServices Manager asks you to change the name of the category being imported.
- If other objects have the same name as existing objects, eServices Manager appends _<hms> to the name of the imported object. <hms> is a timestamp where h is the hour (using a 12-hour clock), m is the minutes, and s is the seconds. Each unit may be one or two digits; there is no padding. For example, if at 4:25:07 PM you import a screening rule called Sales, and there is also an existing rule called Sales, the new name of the imported rule is Sales_4257.
- ImportantThis adds between four and seven characters to the name of the object. You should be especially careful of this if any imported object’s name is more than 58 characters long: the added characters may produce a new name that violates the 64-character limit on names of eServices Manager objects. Importing may fail on objects with names that are too long.
- If a Training Data Object contains no training messages, it cannot be imported.
Import an Excel file
You can perform a bulk import of standard responses from Excel files, including .xls (Excel 1997-2003) and .xlsx. Other formats are not supported.
The Excel file must use the columns listed in the table below, and these columns must appear in the first row of the first worksheet. All other data is ignored.
| Column name | Description | Valid values | Default value | Comments |
|---|---|---|---|---|
| TheName | Populates in the Name field in the UI. | Any string | Mandatory | 128 chars max |
| Body | Populates the body text in the General tab. Uses plaintext characters only. | Any string | Empty string | unlimited |
| StructuredBody | Populates the body text in the HTML tab. Uses plaintext characters and HTML. | Any string | Empty string | unlimited |
| Description | Populates the Description field in the UI. | Any string | Empty string | 254 chars max |
| Subject | Populates the Subject field in the UI. | Any string | Empty string | 512 chars max |
| MimeType | Defines the mime type of the standard response. | Not verified during the import process. Can be left blank. | Empty string | 256 chars max |
| StartDate | Populates the Start Date field in the Properties tab. | Cell value must be of type DATE in Excel. | NULL | |
| ModifiedDate | Populates the Modified Date field in the Properties tab. | Cell value must be of type DATE in Excel. | Current time | |
| ExpirationDate | Populates the Expiration Date field in the Properties tab. | NeverExpire or cell value of type DATE in Excel. | NULL |
The following example shows a valid table with data:
| TheName | Description | Subject | Body | StructuredBody | MimeType | StartDate | ModifiedDate | ExpirationDate |
|---|---|---|---|---|---|---|---|---|
| Sales followup | Sent to customers who request contact from Sales | Thank you for contacting us | Thank you for contacting your company. We are happy to assist you with your order. |
- Columns can appear in any order.
- Default values are assigned if a cell value is missing.
- The following rules apply to dates:
- If both StartDate and ExpirationDate are empty, eServices Manager assigns StartDate to current date and ExpirationDate to NeverExpire.
- If StartDate is empty and ExpirationDate is not empty, eServices Manager assigns StartDate a value equal to 30 days before ExpirationDate.
- If StartDate is not empty and ExpirationDate is empty, eServices Manager sets ExpirationDate to NeverExpire.
- An error message appears if eServices Manager fails to process one or more standard responses. You can check the GAX logs for more details about the cause of the error.
- eServices Manager assumes that all date properties in your UCS environment are stored in the GMT time zone. These properties are always converted to the local time zone by eServices Manager. However, when importing date properties from an Excel file, dates are not converted to local time. For consistency, Genesys recommends you specify dates in the GMT time zone.
To import the Excel file using eServices Manager:
- In the Standard Responses tab, select a category into which the standard responses will be imported.
- Click
 .
. - Select the Excel file to import.
- Click Next.
- A prompt appears to state whether the import was successful or not. If not successful, the prompt states how many errors were encountered. You can check the GAX logs for more information on the cause of the error(s).
- Click Finish.
Search
You can search for categories, standard responses, field codes, and screening rules, either by name or by specifying various parameters and properties. Some searches also allow the use of regular expressions.
Search for categories
You can search for categories in the Standard Responses or Screening Rules tabs.
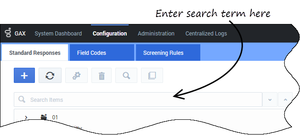
Click the search bar and enter a search term to search the list of categories.
Search for standard responses
In the Standard Responses tab, select a category and click ![]() to search for one or more standard responses.
to search for one or more standard responses.
A dialog box appears so you can enter parameters for the search. You can define various parameters for the search by selecting a tab above the search field. In the graphic below, no tabs have a search parameter, as shown by the 0 beside each tab name.
After you define a search parameter in a tab, the value changes to show the number of active search parameters in the tab. For example, in the graphic below, the Text tab has a value of 1, meaning it has one search parameter, but all other tabs have a value of 0, meaning these tabs do not have search parameters.
After you define one or more search parameters, click Find to begin the search. The Results section appears at the bottom of your screen.
Search for field codes
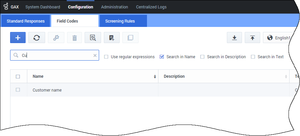
In the Field Codes tab, click ![]() to start a search. Enter a search term in the provided field. You can also specify whether you want to look for the search term in field code names, descriptions, or text. You can also use regular expressions.
to start a search. Enter a search term in the provided field. You can also specify whether you want to look for the search term in field code names, descriptions, or text. You can also use regular expressions.
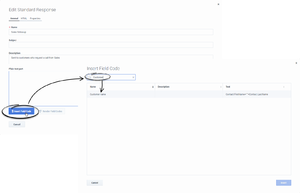
You can also search when inserting a field code into a standard response.
Search for custom variables
You can search for custom variables when you are viewing the Custom Variables list.
Search for screening rules
In the Screening Rules tab, select a category and click ![]() to search for one or more screening rules.
to search for one or more screening rules.
A dialog box appears so you can enter a search term. You can select or de-select check boxes to specify whether you want to search in the name or pattern of screening rules. You can also use regular expressions.
After you define one or more search parameters, click Find to begin the search. The Results section appears at the bottom of your screen.


