Predictive Routing Block
If your site is enabled for Genesys Predictive Routing, you can use the Predictive Routing block to route an interaction to the agent with the highest likelihood of a successful outcome.
The Predictive Routing block enables a Designer application to retrieve a list of agents that are best equipped to handle a specific type of call and then route the call to the agent with the highest likelihood of a successful outcome.
Typically, you would add this block when you want to improve routing metrics for an application that is using traditional (or "prescriptive") routing methods and has an established amount of historical data that can be used for generating accurate predictors and models.
How it works
Genesys Predictive Routing (GPR) uses machine learning to analyze your accumulated history of agent, customer, and call data to generate scores for each available agent that indicate probable outcomes for incoming calls. Using these scores, you can ensure that calls are routed to agents with the highest likelihood of producing a satisfactory result.
When you add the Predictive Routing block to an application, you can select a Predictor from the list of Predictors that Designer retrieves from GPR. The Predictor indicates the metric you want to optimize (such as first-contact resolution, sales conversion, and so on). The Predictor also specifies which customer and agent qualities (or features) have the most impact on the chosen metric.
When a call arrives, Designer retrieves a list of currently-available agents (ranked according to the parameters specified in the Predictor), and then routes the call to the best available match. Designer continues to periodically retrieve these lists of agents for the duration of the session—even if the application has moved on from the Predictive Routing block to the next routing block—until the call is finally routed or the session ends. If the "predicted" outcome differs from the actual outcome, Predictive Routing "learns" from this result, improving the future accuracy of its predictions.
For more information about setting up Predictors, see Creating and updating Predictors in the Genesys Predictive Routing Help.
Using this block
This block can be placed in the Assisted Service phase of an application. For the block to take effect, you'll also need to enable predictive routing in the application settings.
Call Routing tab
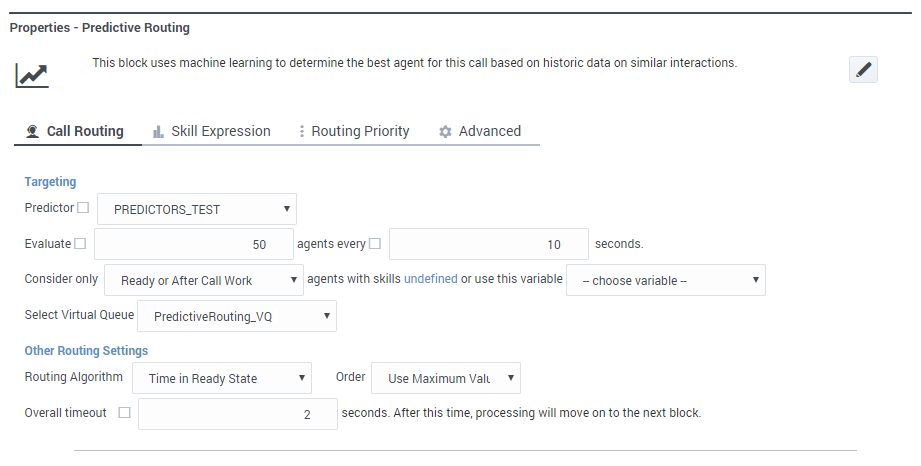
In the Targeting section, select the Predictor you want Designer to use. You can also choose to specify this value using a variable.
In the Evaluate field, enter the number of agents to submit as a batch for routing, and how often to submit each batch. For example, you might choose to submit a batch of 50 agents every 10 seconds.
You can then specify additional criteria to be used when evaluating possible agents, such as their state or skills, and select the virtual queue for routing.
In the Other Routing Settings section, you can specify which routing algorithm to use and the block timeout value.
Skill Expression tab
Use this tab to specify a skill expression for the Predictive Routing block. The skill expression consists of a list of skills for which you must individually set an operator and an integer value.
For more information about setting up skill expressions, see the Skill Expression settings for the Route Call block.
Routing Priority tab
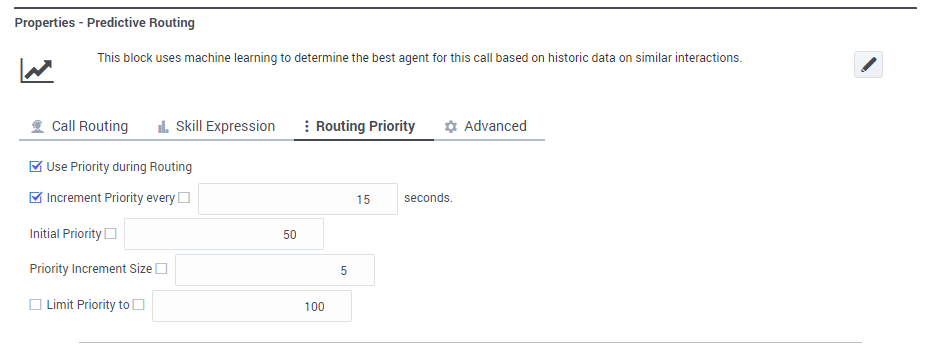
For information about these settings, see the Routing Priority settings for the Route Call block.
Advanced tab
Greetings section
Enable the check box beside Customer Greeting and/or Agent Greeting to play an audio file to that person when the interaction is connected.
For more information, see the Advanced tab settings for the Route Call block.
Extensions section
Click Add Extension Data to add an extension as a key-value pair to this block. The value type can be a string or integer.
For more information, see the Advanced tab settings for the Route Call block.
Predictive Settings section
If desired, you can specify key-value pairs that will provide additional context to the prediction service.
- Place a Start Treatment block and a Self Service module ahead of this block to provide a treatment to play during routing.
- In the settings for the Start Treatment block, disable the Is Synced option so that Designer will start the treatment and then immediately move on to the next block while the treatment keeps playing. This ensures that the same treatment continues for any prescriptive routing blocks that follow.


