
Create and test screening rules
Create, manage, and test screening rules that you can use to screen messages.
The step by step procedure for creating a Screening Rule is quite simple. The power of Screening Rules lies in the many ways you can configure them. We'll start with the high-level procedure, then drill down as needed into more detailed explanations of the various parameters.
This page contains the following sets of instructions:
- The high-level steps
- Configuring a Screening Rule
- Assign categories and remove category assignments
- Test a Screening Rule
- Finding an existing Screening Rule
The high-level steps
Note that the order of these steps matters!
- Start on the eServices Manager browser window. Select the correct:
- Tenant
- UCS Server
- Language
- On the Navigator drop-down menu, select Screening Rules.
- On the Category Tree, check the boxes for the categories this Screening Rule should apply to.
- Click New.
- Select Screening Rule.
- After configuring the Screening Rule—which will be explained shortly—click Save. The new Screening Rule appears in the Category Tree under the selected Root Category.
- To edit a Screening Rule, highlight it in the Category Tree and then make the desired changes. Don't forget to click Save when you are done.

Configuring a Screening Rule
Configuring a Screening Rule is mostly done on the Main tab.

When you name your Rule, remember that you can use only permitted characters in object names.
Check the Enabled check box to make this Rule available when you add a Screen object to a routing strategy.

Once a strategy includes a Screen object that uses a particular Screening Rule, the strategy will continue to use the Rule whether it is disabled or enabled.
Do you need to use the Order text box?
- If the Screening Rule is used in a Multiscreen routing object in which All rules is selected, use the Order text box to specify where in the sequence of rules this particular one should be applied.
- In other cases, the Order text box is unused.

Do you need to screen the addresses the email is sent to?
- If so, in the Use these addresses area, select an address from the left-hand window, then click Add to copy it to the right-hand window. You can add as many addresses as you need. If the address you need isn't there yet, you can
- Directly type an address in the right-hand window.
- Define additional addresses in the EmailAccounts configuration database object:
- GAX: Configuration > Routing/eServices > Business Attribute Values > Business Attributes > EmailAccounts > Attribute Values
- Config Manager: Tenant > Business Attributes > EmailAccounts > Attribute Values

- GAX: Configuration > Routing/eServices > Business Attribute Values > Business Attributes > EmailAccounts > Attribute Values
- If you don't need to screen addresses, leave this section empty.

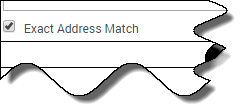
Does it matter if the address is exact?
- If so, select the Exact address match box. The screening rule looks for messages having that exact address as a destination. For example, xyz@domainname.com matches xyz@domainname.com but not abc.xyz@domainname.com. This match is not case sensitive.
- If not, clear the Exact address match box. Then the rule looks for messages having that address as a substring of their destination address. For example, xyz@domainname.com matches abc.xyz@domainname.com and xyz@domainname.com.

Do you want to screen for the exact POP mailbox the email is sent to?
- If so, select Screen mailbox to make the rule match the POP box from which the e-mail entered the eServices system, rather than the To field of the e-mail itself. The difference is that each e-mail enters the system from exactly one mailbox, while the To field can contain multiple addresses.
- ImportantFor this feature to work as expected, the E-mail Server enable-same-mail-from-mailboxes option must be set to true. With this setting, E-mail Server creates a separate interaction for each address in the To field (that is, for each mailbox that it pulls the e-mail from when it creates the interaction).

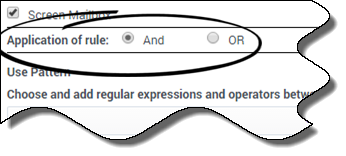
How to use the AND and OR radio buttons
- AND
- Choosing AND makes eServices Manager use both the addresses selected in Use these addresses and match the pattern defined in Use Pattern.
- OR
- Choosing OR makes eServices Manager us either the addresses selected in Use these addresses or match the pattern defined in Use Pattern.

How to configure the Use Pattern area
This is the section where you can get really specific about what the Screening Rule should match. The Plug-in includes a pattern builder that offers the choice of each function type in all possible forms, with and without optional arguments, for a total of eight, as shown below.

The drop-down lists in the Use Pattern are contain regular expressions (functions) and operators you can select to create your Rule. Select the regular expression you want, and then click Add. The expression appears in the text box. Do the same to add operators. You can also enter text manually.

After you select an expression and click Add, you must put text between the quotation marks. More specifically, you must:
- For Find, put text between the empty quotation marks.
- For RegExFind and RegExMatch, substitute your desired text for regular expression and/or key.
What message sections should the Screening Rule apply to?
Use the check boxes to have the Screening Rule apply to the message body, subject, header, or any combination. You must select at least one.

If you check multiple boxes, the Screening Rule can behave in one of two ways. See Email sections to screen for an explanation.
Assign categories and remove category assignments
You must select a category from the Category Tree to create a Screening Rule. However, you can remove or add to the categories associated with the rule after you create it.
Click the Categories tab to open the Choose a Category dialog box.

When an interaction matches this screening rule, it receives a category name and a confidence level. The confidence level indicates that the system is X percent confident that this interaction belongs in this category. X percent is the Relevancy value you set here.

Choose the desired categories and then click Save.
Service Categories
When using the eServices Manager interface, it is possible to create screening rules that are not associated with any category. In eServices Manager, any such screening rules are assigned to a category called <tenant><language>; for example, <AcmeProducts><English>.
You can add rules to an existing Service Category in any of the following ways:
- By using a rule (created in eServices Manager) that has no associated category
- By removing all categories from an existing rule.
- By deleting a category that has a rule associated with only that category.
After any of these, click Refresh to see the rule appear in the Service Category.
Other details about Service Categories:
- Rules under the service category can be cut and pasted under other categories. This deletes the rule from the Service Category and associates it with the new category. However, you cannot copy rules from a Service Category.
- You cannot paste a rule into a Service Category.
- You cannot cut, copy, or paste the Service Category itself.
- If you delete a Service Category, you also delete all of the rules associated with it and they cannot be recovered.
Test a Screening Rule
You will be testing your Screening Rule against some specially created text to see if it works as desired.
- Click the Test tab to start testing.
- Select a Classification Server from the drop-down list.
- Choose a test message from the list of those already created or click Add to create a new one.
- Click Test.
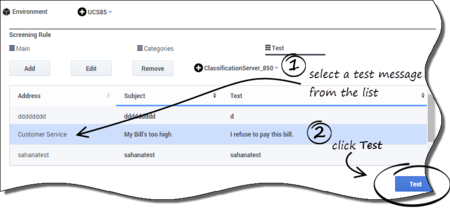
- If your test message fulfills the constraints you created for your rule, you will receive a detailed message indicating success.

- If you get a Rule Not Matched message, check the message for clues to the problem. If necessary, analyze your Screening Rule step by step to determine what needs to be edited to make it work the way you want.


Finding an existing Screening Rule
To search for a Screening Rule, make sure Screening Rules is selected in the Navigator drop-down list. Then start typing in the name of the rule in the Search field. The matching names are highlighted as you begin typing.

Next steps
- Learn more about how screening rules work:
