Provisioning Callback in Designer
Callback is provisioned with Designer. To create and configure Callback services, Designer includes a set of blocks dedicated to Callback. This article provides information about how to provision a basic callback scenario in Designer. For information about the supported callback scenarios, see Callback Scenarios. For information about provisioning the Click-To-Call-In scenario in Designer, see Provisioning the Click-to-Call-In scenario.
Before you start
Before you provision Callback in Designer, make sure that the following objects are created in Platform Administration and ready for use:
- A Callback Administrator.
- Route Points to be used for Inbound strategies that offer Callback.
- Route Points to be used for Outbound strategies, if Callback calls to consumers will be handled by separate Outbound strategies.
- Virtual Queues to store callbacks. Genesys recommends that you use three queues for callbacks. For more information about the virtual queues, see Provision the callback virtual queues.
- At least one agent who will process Callbacks.
Provision the callback virtual queues
In addition to an Inbound virtual queue, Genesys recommends that you have two additional virtual queues for callback reporting purposes. That means that you will have the following three queues for callbacks:
- Inbound virtual queue
- Callback virtual queue
- Outbound virtual queue
Genesys recommends that you use the following naming conventions for the queues:
- Inbound virtual queue: <VQ_name>_VQ
For example, Sales_VQ - Callback virtual queue: <VQ_ name>_VQ_CB
For example, Sales_VQ_CB - Callback outbound virtual queue: <VQ_name>_VQ_CB_OUT
For example, Sales_VQ_CB_OUT
You might see the term service or service name in callback-related applications, Widgets, APIs, and in the Callback UI. The service, in this context, is a virtual queue. The service name, therefore, refers to the name of the virtual queue. For example, on the Callback page in the UI, the Service Name column identifies, by name, the virtual queue associated with each callback.
Having all three callback-related virtual queues provides the following functionality:
- For each call type, the system can keep track of and compare Estimated Wait Time (EWT) and other important queue statistics separately.
- You can configure both historical and real-time reporting. While the Inbound and Callback virtual queues collect statistics such as EWT and which calls accept the callback offer and which calls reject it, the Outbound virtual queue collects data for outbound interactions such as how long the customer had to wait for an agent to connect during the callback attempt.
After you create the virtual queues that will be used in your callback scenario, you must provision applications and Callback services in Designer. The virtual queues that you have created for callback functionality will be required to complete the Designer application and services provisioning.
Provisioning your first callback scenario in Designer
The following Callback provisioning workflow assumes that you have already completed the configuration described in the Before you start section, above.
- Provision Callback for the inbound strategy. For information, see Create your Designer Applications and Provision a Designer Application to Offer Callback Through the IVR.
- Provision Callback for the outbound strategy. For information, see Create your Designer Applications and Provision the Designer Callback Application.
- Provision Business Hours for Callback.
- Provision the Callback services in Designer.
- Test your Callback scenario configuration.
Create your Designer applications
The following table provides information about the types of Designer applications that you require for each supported callback scenario. Create the Designer applications after you have created the Inbound, Callback, and Outbound virtual queues and before you provision the Callback services.
| Callback Scenario | Designer Application Type |
|---|---|
| In-Queue Callback | Default + Callback |
| Scheduled Callback | Default + Callback |
| Web Callback | Callback |
The following procedures show you how to provision Designer applications for Callback. The Default-type Designer application provides the Callback offer to a customer waiting in a queue; for example, in a scenario where the customer is connected to an IVR. The Callback-type Designer application provides the Callback attempt for scheduled and web callback scenarios.
Provision a Designer application to offer callback through the IVR
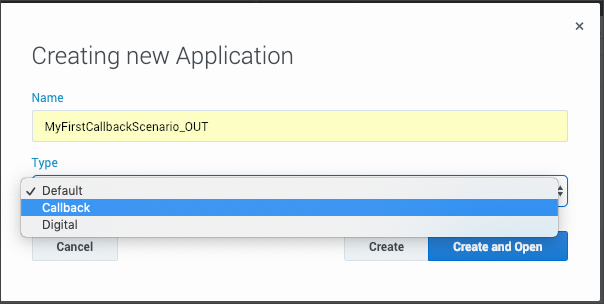
In Designer, add a new application. The application type must be Default. This application is used to offer callback through the IVR.
In Designer, select your Default-type application.
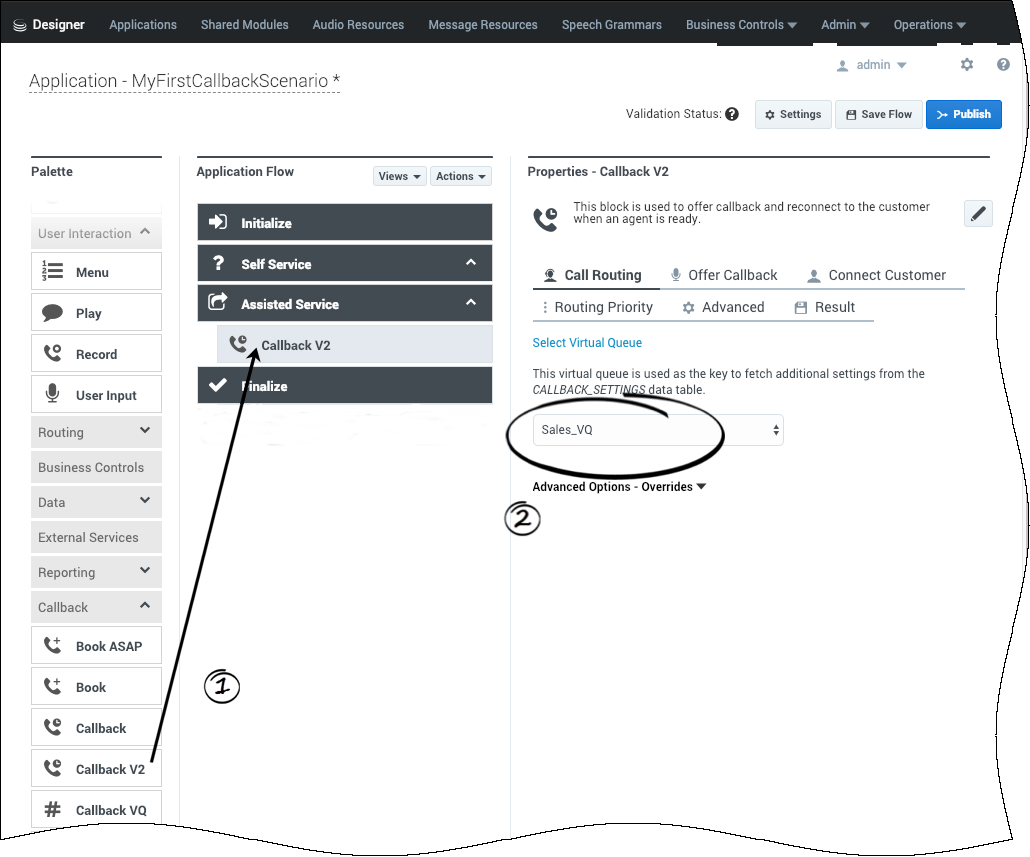
Scroll the Palette list to reach the Callback items. Drag and drop a Callback V2 block into the Assisted Service phase of your application.
In the properties panel, under Call Routing, select the Inbound virtual queue that you configured for Callback.
For additional information about the Callback V2 block properties, see the Designer documentation.Provision the Designer callback application
This application type is used for setting up outbound callbacks (voice calls only). Digital interactions are not supported.
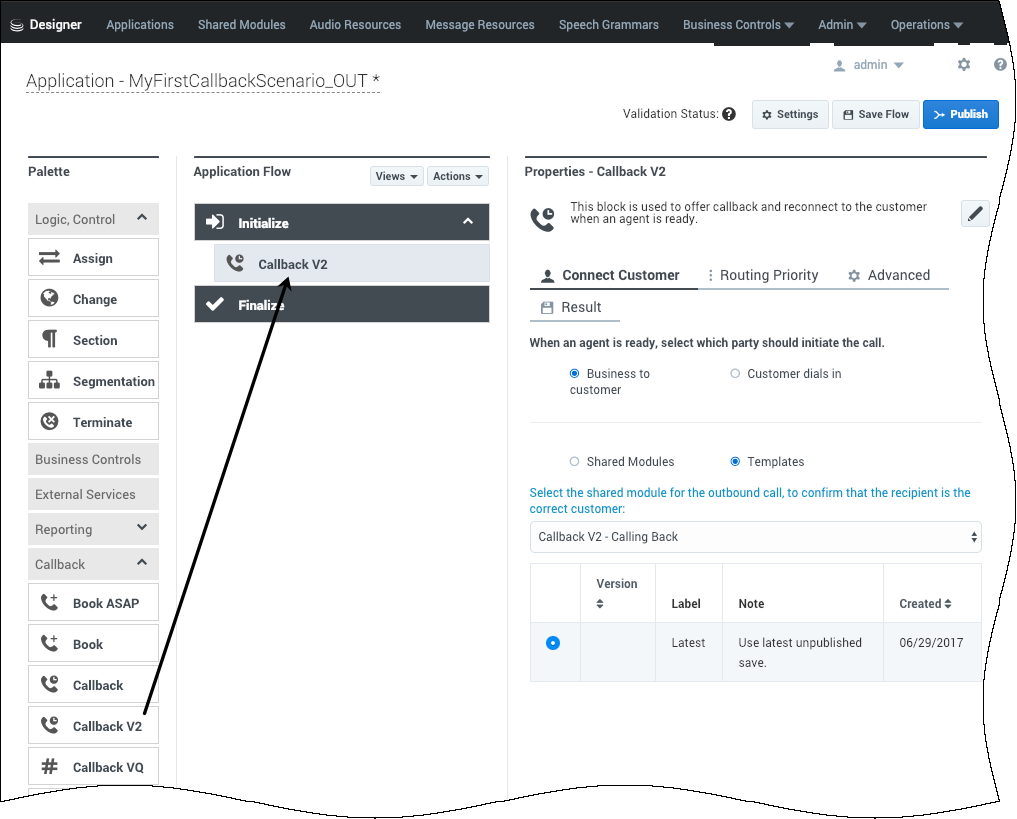
In Designer, select your Callback-type application.
Scroll the Palette list to reach the Callback items. Then drag and drop a Callback V2 item into the Initialize section of your application. For information about the Callback V2 block properties, see the Designer documentation.
Provision business hours for Callback
In Designer, you must configure the Business Hours object, including the timezone, before you configure the CALLBACK_SETTINGS data table. The time zone that you configure is used for scheduled callbacks. You cannot save the CALLBACK_SETTINGS data table before the business hours are configured.
For information about configuring your business hours in Designer, see Business Hours in the Designer documentation.
Provision the callback services
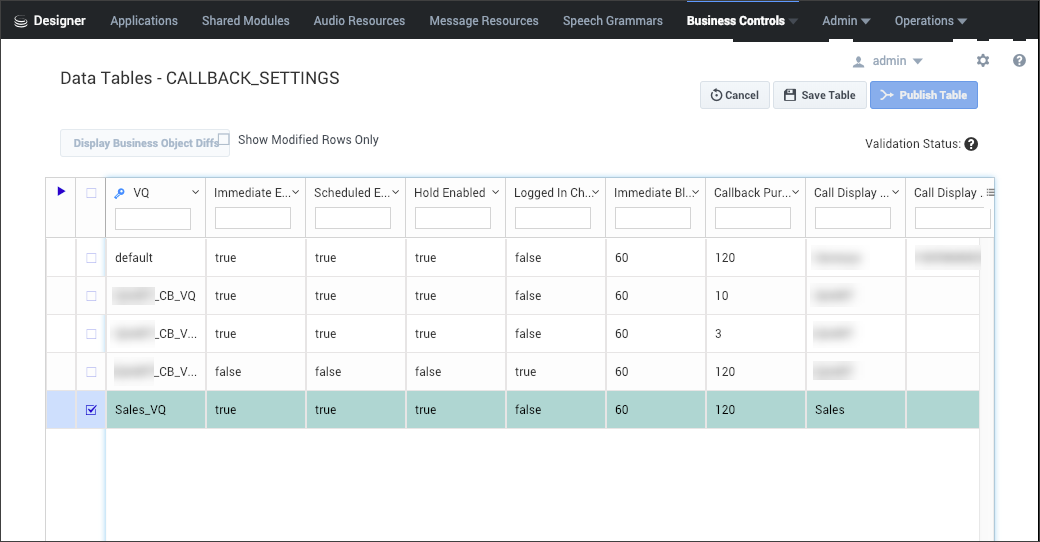
The configuration parameters for callback services are stored in the Designer CALLBACK_SETTINGS data table. For detailed information about the CALLBACK_SETTINGS table, see Callback Settings Data Table in the Designer documentation.
You must make sure that the following prerequisites are completed before you add your queue to the CALLBACK_SETTINGS table:
- You must create the Callback-type Designer application before you can edit the CALLBACK_SETTINGS data table.
- You must configure the business hours, including the time zone, before making the following updates to the CALLBACK_SETTINGS data table. You cannot save the data table before the business hours are configured.
- The virtual queues that you will use for callback functionality must be created and saved in Platform Administration.
Adding a Callback virtual queue to the CALLBACK_SETTINGS data table
The default VQ row in the CALLBACK_SETTINGS table must include a valid Designer Callback-type application, a valid Business Hours object, and a semantically-correct skill expression.
In the row in which you are configuring the Inbound virtual queue, select your Designer Callback-type application in the Callback Application column of the table. In the figure, this is the Sales_VQ row of the table.If you defined Callback skills for Callback agents, you can use this as a condition for the Inbound virtual queue.
For Callback-type applications, you must specify the routing point in the Routing Point column. The routing point for Callback-type applications is required for Callback to be fully functional. Outbound calls can sometimes fail if this is not configured.
Testing your callback scenario
Now you can test the in-queue Callback scenario. Call the phone number that is assigned to the Designer Default-type application and accept an in-queue callback for an external phone number on which you can receive calls. If an agent with a matching skill is already logged in to the voice channel in Agent Workspace, you will receive a phone call on the external phone number. Once you have accepted the callback on the external phone, the call will be connected to the logged-in agent.
To test Scheduled callback, call the phone number that is assigned to the Default-type application and choose Scheduled Callback. Listen carefully to the prompt. If it is using default settings, then it will ask you to specify a day and time for the callback based on the Pacific time zone. Also pay close attention to the actual date and time that you booked before accepting, especially if you have entered a time intended to be on the current day; the system might have offered you a time slot that is a week later. The outbound call experience is identical to the in-queue callback scenario.
To test web callback, see Managing Callbacks for information about creating a callback in the Callback UI, or Genesys Multicloud CX REST APIs and Tutorials for Callback for information about creating a callback using the REST API.


