Outbound Solutions
The Outbound solution is a fully customizable Cloud solution that enables you to set up, run, and fine-tune your Outbound campaigns.
Through a series of Genesys Engage cloud products, you can define your routing application, set up a campaign and sub-campaign, apply compliance rules, and monitor and assess your campaign through real-time and historical reports.
And you can do all of this in four stages:
Stage 1—Configuring Outbound routing
Stage 2—Setting up a campaign
Stage 3—Dialing and call handling
Stage 4—Monitoring a campaign
Stage 1—Configuring Outbound routing
Genesys will configure Outbound routing for you! Here’s what we’ll do:
We’ll create and configure the Routing Point DN, the Virtual Queue DN, and the agent groups using Platform Administrator. Then, we’ll head to Designer to tie it all together.
If you’re new to Designer, here’s all you need to know: It’s a powerful yet easy-to-use web-based tool for developing IVR and Routing applications that run on the Genesys platform.
And here’s what we’ll do with it: Basically, we’ll create the Outbound routing application so that you can route calls to agents. We’ll drag and drop blocks from a menu (we call it a Palette) into one of the four phases that define your IVR (we call it the Application Flow), and then we'll choose from a few routing options. We'll publish it and then hand it off to you.
After that, you can pop into the applications at any time to tweak the settings. Here are a few instructions:
Want to learn more about Designer or Platform Administration?
Stage 2—Setting up a campaign
OK, now it’s time to head to Engage to set up your campaign. Let’s cover a few basics first.
First – the difference between a campaign and a sub-campaign.
Think of a campaign as the foundation of a house – the starting point. Every inch of the house is built in reference to it and depends on it in order to stand above ground.
And now think of a sub-campaign as the house.
Simple as that: a campaign is the foundation that the sub-campaign depends on. The campaign holds the core information – like compliance rules, strategies, templates, etc. – that the sub-campaign needs in order to run.
It's also important to know that if you're running a sales campaign with more than 15 agents assigned to the campaign, you need to run it in ASM mode with Predictive dialing. This is the only way you can meet the 2-second connect standard enforced by regulatory bodies such as Ofcom and FTC. In other words, when the system detects a voice on the line, it will bridge the call to an agent within two seconds. We’ll talk a bit more about that later on.
Campaigns
Now, let’s set up a campaign. Basically, your Engage tasks are broken down into three components:
- Contacts and contact lists
- Compliance
- Campaign configuration
Contacts and contact lists
Think of a contact list as a phone book. Page by page, it displays the contact information of everyone in a particular group or community. That contact information could contain a name, phone number, email address, home address, or an ID number.
When you pick up a phone book and say “I want to call every person in this book,” those people become part of your Outbound sub-campaign. And that’s exactly what happens when you select a contact list within Engage.
Before you tell the system to start calling those people, however, you can do a few things with your list:
- Create or import a contact list and contacts—create or import a new list or append to an existing one
- Edit or delete a list—except for any list named ‘Unassigned’
- Export or Download a list—as a CSV file
- Filter a list—specify the name, description, and selection rules and definitions
- Generate a report of a list— specify output options such as FTP destination, file name format, specification file, and compression and security options.
- Edit contacts—the changes affect new sub-campaigns only, not those currently running or scheduled to run
- Delete contacts—permanently removes them from the list
After you’ve imported a list, you can go to the Lists tab on the main menu of the Campaigns page and do any of the following:
- Apply list rules—to split a list into smaller lists by quantity, percentage, field, or custom criteria
- Import specification files—to tell the system how to structure your data
- Perform a contact search—to search for a single contact, by name, from within the contact lists
Learn more about contacts and contact lists here
Compliance
Now choose the people you’ll exclude from your calling campaigns – both running and future campaigns. You do this for two reasons: to adhere to industry standards and regulations set out by FTC and OFCOM, and to honor your customers’ requests.
Choose Compliance from the main menu of the Campaigns page and you’ll see two options: Compliance Tools and Contact Suppression Lists.
Compliance tools
This is where you’ll make the exclusions based on geographical rules. The Do Not Contact Location Rule enables you to suppress contact attempts to listed locations using specified channels.
Contact suppression lists
Think of it as another phone book, but consisting of people you should never call.
Here’s what you can do with a suppression list:
- Create a new suppression list – specify the list name, channels (Voice, Text, Email), expiry date (if any), and the type of list (Device or Client ID).
- Import a suppression list—specify a file format, a destination for your contacts (create new list or append to an existing one), and the suppression list attributes you specify when you create a new list.
- Add contacts to a suppression list—enter the list of client IDs or devices, depending on the list type.
- Append contacts to an existing suppression list—choose Append to List from the options
- Clear contacts from a suppression list—you clear the contacts but the list attributes—such as Type, Channels and Expiration—remain visible
- Edit or delete a suppression list
- Export a suppression list, to Desktop or to FTP—a CSV text file is retrieved from the database that contains all records
More on compliance tools:
More on contact suppression lists:
Campaign configuration
Campaign configuration is easier than it sounds. Basically, you’ll go through a series of options and choose the ones that work best for your campaign.
The starting point is the Campaigns page – you’ll land there when you log into the Account Manager. It’s where you’ll find details about the status of your campaigns, and it’s where you’ll set up a new campaign and create and run a new sub-campaign.
The Campaigns tab on the main menu includes links to the pages where you’ll define some of the important campaign settings:
Click the Campaigns option from the menu to define some of the foundational stuff:
- Create the campaign template—enter the name, description, time frame, start and end date (if applicable) and the On Demand Strategy.
- Define the campaign strategy—select a pre-defined one or add a new one.
- Select Outbound Options—specify the script, agent group, contact order, timezone source, and constrain pass times.
- Select filtering and suppression options—specify phone number options, list exclusion options, contact suppression lists, and Do Not Contact location rules.
- Select pattern options—specify the escalation type and execution order.
- Choose a channel— select the channel/s you want to use: Voice, Dialer, Preview, Text, or Email. Note: if you choose a Text or Email channel,, you must specify a valid text or email script. See Scripts for more information.
- Select pass options—specify general, time frame, delivery, retry, and pacing options, where applicable.
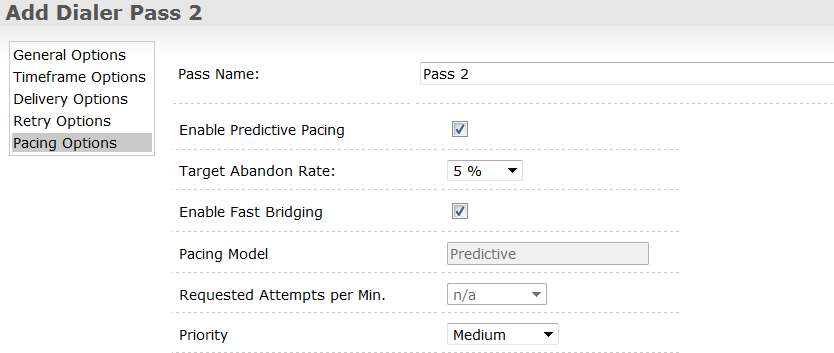
This is where you’ll specify the dialing mode and switching mode. For example, if you're running a sales campaign and using an automatic dialer, and you have more than 15 agents assigned to the campaign, you should enable Predictive dialing in ASM mode:
- Click the Outbound tab
- In the Pattern Options section select the Dialer pass option
- Select Pacing Options
- Check the box next to Enable predictive pacing
- Check the box next to Enable fast bridging
Remember, doing this is the only way you can meet the 2-second connect standard required by FTC and OFCOM regulations (you’ll learn how that happens in the next stage). Go here to learn more about Outbound dialing modes.
Now you can move onto these options – all available from the Campaigns tab on the main menu:
- Add, edit, change, or delete Caller ID numbers
- Set AutoManage Rules—set alert issues, contact center issues, text messaging or Email issues.
- View or disable a contact order—choose from a list of previously defined contact order strategies
- Copy enterprise campaigns—do this if you want the campaign to match or be similar to an existing campaign
- Strategies—edit an existing strategy or add a new one
Sub-campaigns
OK, you’ve done all you need to do to lay your foundation – or set up your campaign. Now go ahead and create and send an Outbound sub-campaign by doing this:
- Specify the sub-campaign information—the campaign it belongs to, contact list, list name, script, and agent group
- Choose from the available options—filtering and suppression options, contact order, timezone source, and an email address for summary reports
Need to know more?
Stage 3—Dialing and bridging to an agent
Dialing
Once your campaign is running in ASM mode with Predictive dialing, our platform can intelligently bridge a call to an agent within two seconds of detecting a voice. This is how it happens:
First, it checks the routing application before it dials out. It wants to know what agent group is assigned to the campaign and it wants to check all other parameters that specify how it should route the call once it detects a voice.
And then, it reserves an agent. By doing this, it commits the agent to a call once the agent completes all other queued-up calls.
Then it starts dialing.
Call handling
And now here’s where your agents come in.
Once a new campaign starts, the assigned agents get a notification via Agent Desktop. When an agent is Ready and reserved the phone rings, and the agent waits while the system dials a number. When the system detects a voice, the reserved agent hears a beep and is then connected to the customer.
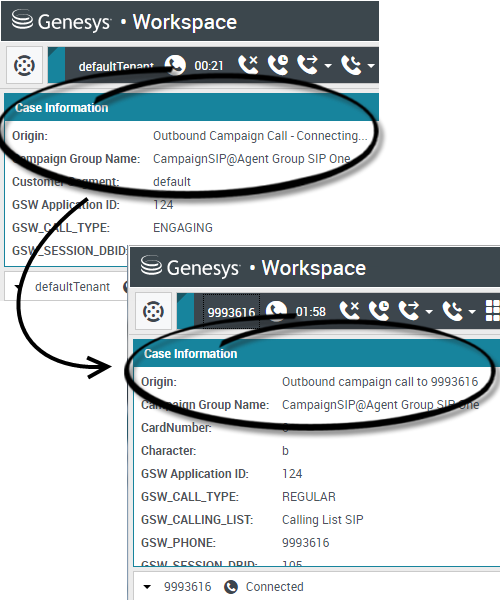
In the meantime, in Agent Desktop, the agent sees a pop-up notification, and in the call Case Information areas, the Origin of the call is Outbound Campaign Call - Connecting...
As soon as the customer answers the phone and the call is connected, the Origin of the call changes to Outbound campaign call to <name or number of contact>. The agent might see information about the call in the Case Information area – such as campaign call information, the call status, and call actions.
Note: In some environments, an agent might not be connected to the Outbound call until after the contact has answered the phone. In this case, the agent will not see that the Origin of the call is Outbound Campaign Call - Connecting....; instead it will immediately show the name and or number of the contact.
Learn more here:
Stage 4—Monitoring a campaign
You’ve set up and run your campaign and sub-campaigns. You now need to monitor the status of an ongoing campaign or look at the results of a campaign that has ended. This is where Genesys reporting tools come in.
Real-time reports
To monitor the status of an ongoing campaign in real-time, you have two options: the Engage dashboard and Genesys Pulse. Use the Engage Dashboard for a snapshot of call results, and use Genesys Pulse to generate in-depth reports about Agent activity.
Engage dashboard
Go to the Campaigns page in Engage and you’ll see that results of each call are updated in real-time on the dashboard:
- Filtered—The number of contacts filtered from the list.
- Delivered—The number of successful contact attempts.
- Retrying or Failed— The number of contacts being retried or with a current failure status.
- Not Attempted —The number of contacts remaining to be attempted.
- Done—The total number of contact attempts made.
- Remain—The number of contact attempts remaining to be made.
Genesys Pulse
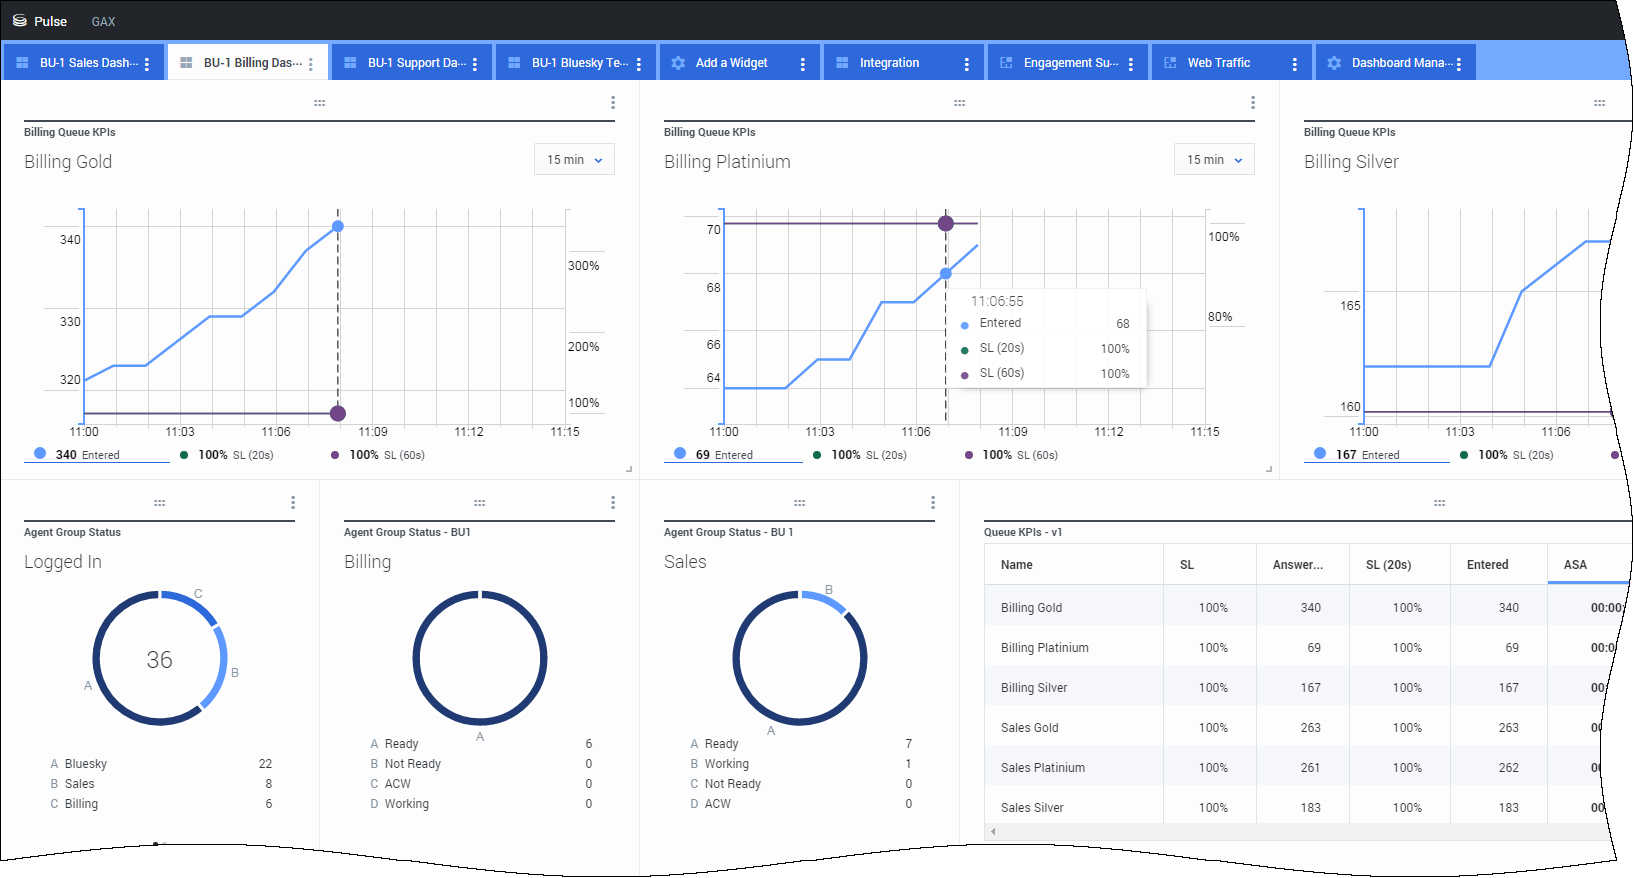
Now go to Genesys Pulse (Real-Time Reporting) if you need more than just a snapshot of attempted calls. For your Outbound campaigns, refer to Genesys Pulse when you need a close look at Agent activity. If you’re not familiar with the application, here’s what it is, briefly:
It’s a plug-in application that provides real-time reports of a contact center’s statistics. You have a dashboard where you’ll see widgets that display the data you specified in the form of a grid, KPI, line chart, or list.
Basically, you'll add a report widget to your dashboard, choose a template or define your own, select objects and statistics, and specify default settings – like the name, refresh rate, and type of widget. And then you can save and download your report as a CSV file.
There’s also something called an IFRAME widget – this takes content from an external URL and displays it on your Genesys Pulse dashboard.
For more detailed instructions, go here:
Real-time Reporting help
Historical reports
Now you want to retrieve statistics of a campaign that has ended. OK, you have two options:
- Engage
- Genesys CX Insights
Engage
Through the Reports tab in Account Manager, you can run account, campaign, and sub-campaign summary and detail reports.
- Account reports provide a record of what happened across all campaigns in your account for the selected time period.
- Campaign reports provide a record of what happened over an entire campaign or for a range of dates within a campaign. The reports include combined information from all sub-campaigns that were run under the campaign. You can generate the reports for an entire campaign, a specified time period, or as an incremental report.
- Sub-campaign reports provide a record of what happened for a single sub-campaign. You can generate the reports for an entire sub-campaign or for the previous day's sub-campaign activity.
For more information, including a description of each available report, visit the Reports section of the documentation.
Genesys CX Insights
Genesys CX Insights uses data stored in Genesys Info Mart, and presents it in readable reports. There are several Outbound Engagement Reports:
Campaign Callbacks Summary report — displays a summary of information about callback activity, including the total number of callbacks processed by the contact center, broken down into the total number scheduled, missed, and completed for each day of the reporting period. Personal callbacks are distinguished from nonpersonal ones. The report's design internally filters the dataset to return Outbound voice-only interactions. Use this report to understand the frequency with which Callback was used in your Outbound campaigns, and the overall Callback success rates.
Campaign Summary report— summarizes key metrics, such as Accepted and Not Accepted, that illustrate the disposition of contact attempts associated with Outbound campaigns. The report also examines call-progress detection (CPD) efficiency. The report internally filters the dataset to return Outbound voice-only interactions. Use this report to understand the disposition of Outbound campaign contact dialing attempts; whether calls connected, were dropped, or failed (together with the reason for failure).
Contact List Effectiveness report—provides detailed information about the number of contact attempts that were generated by an Outbound campaign, the ratio of attempts that resulted in the detection of a special information tone (SIT), and a breakdown of the call results of those SIT-detected attempts for the selected calling list. The report internally filters the dataset to return Outbound voice only interactions. Use this report to determine which calling lists are working efficiently, and which need to be adjusted. The report contrasts, for each list, the number of outbound call attempts to the number of times the call failed to connect (a SIT tone was detected).
Agent Outbound Campaign report—provides total and average durations of call-handling activities (including Handle Time, Wrap Time, Preview Time, Engage Time, and Hold Time) for agents who participate in outbound campaigns. Use this report in conjunction with the reports in the Outbound Campaign folder to understand agent performance in your outbound campaigns, by reviewing total and average durations of call handling activities (including Handle Time, Wrap Time, Preview Time, Engage Time, and Hold Time) for each agent.
For more information, see:


