Recording certificate management
The Genesys recording solution requires proper management of public and private keys used to encrypt voice and screen recordings. This page describes the process for generating and installing the public and private keys.
The Genesys recording solution requires proper management of public and private keys used to encrypt voice and screen recordings. The public key is stored in a certificate file and is used to encrypt a unique session key that is then used to encrypt each media file. The public key must be provisioned for voice recordings and for screen recordings. The private key is stored securely on a protected server and is used to help decrypt each media file (voice or screen) for playback.
Protect your keys!
- It is your responsibility to store your private keys and certificates, including the expired ones. Genesys will not be able to re-apply any of your keys or certificates in the event of a catastrophic Genesys site failure. In this case, you will need to re-apply any previously created keys. Therefore, keep these keys somewhere safe and reliable for future use.
- Furthermore, if you are taking advantage of the Recording Cloud Backup Service utility, you will need to have these keys and certificates available in order to listen to the recordings once they have been moved to your own site.
Please contact your Genesys Professional if you have any questions.
Certificate requirements
Before you can encrypt certificates for voice and screen recordings, you must generate the following keys and certificates:
- Generate a recording private key in .pem format.
2048-bit RSA (or higher). Align encryption strength requirements with your IT Security. - Generate a self-signed recording certificate (also known as a public key) in .pem X.509 RSA format. The certificate validity period will determine when the next certificate should be generated for renewal.
- Note: It is the customer's responsibility to track this, install a new key and certificate prior to expiry and contact Genesys to help provision the new key and certificate before the expiration date.
Generating a self-signed certificate key pair using OpenSSL
The following OpenSSL commands generate a private key and then use the private key to generate a self-signed certificate:
openssl genrsa -out tenant.key 2048

openssl req -new -x509 -key tenant.key -out tenant.pem -days validity_period -subj "/CN=common_name/C=Country/ST=State/O=Organization"
Example:
openssl genrsa -out tenant.key 2048

openssl req -new -x509 -key tenant.key -out tenant.pem -days 3650 -subj "/CN=Genesys Recording/C=US/ST=California/O=Genesys"
Refer to the following table for DN field descriptions and sample values:
| DN Field | Description | Example |
|---|---|---|
| Common Name (CN) | The name of your recording solution. | Genesys Recording |
| Country (C) | A two-letter country code. | US |
| State or Province (ST) | The full state or province where your organization is legally located. | California |
| Organization (O) | The exact legal name of your organization. Do not abbreviate your organization name. | Genesys |
As a result of this command, the following two files are created:
- tenant.key—the private key (PEM format) that is used to decrypt the recordings. It must be kept safe and should not be shared.
- tenant.pem—a self-signed recording certificate and the public key.
If your deployment is hosted on Azure, you must perform an extra step to convert the private key (see the next section).
Convert the private key (Azure only)
This step applies only to deployments hosted on Azure. Perform the following step to convert the private key (tenant.key) to a new format that can be used in Agent Setup:openssl pkcs8 -topk8 -inform pem -in tenant.key -outform pem -nocrypt -out private.pemThis command converts the private key that you generated earlier (tenant.key) to a new file (private.pem) that can be uploaded and managed using Agent Setup. Thus, your private and public key files for Agent Setup are created as follows:
- tenant.pem—a self-signed recording certificate and the public key.
- private.pem—the private key (PEM format) that is used to decrypt the recordings. It must be kept safe and should not be shared.
When the keys are ready, follow the steps in Upload recording certificates (Azure).
Uploading/installing certificates to encrypt your voice recordings
Depending on your cloud hosting platform, follow the steps described in Upload recording certificates (AWS) or Upload recording certificates (Azure).
Upload recording certificates (AWS)
- Verify that you have Administrator privileges.ImportantThe Platform Administration section of the Genesys Portal is the tool that should be used to manage recording certificates (public keys), and private keys.
- Select Administration > Certificates.
- Click Upload.
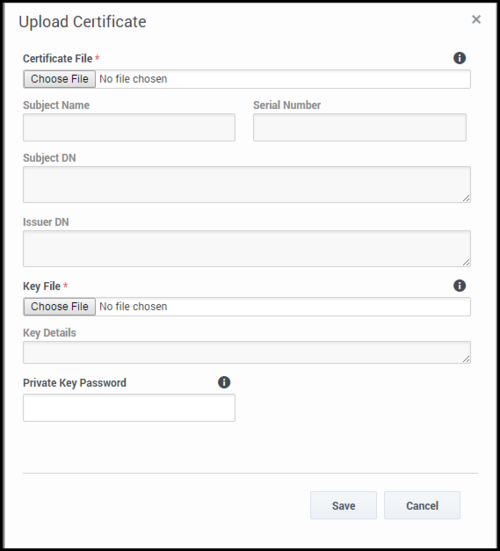
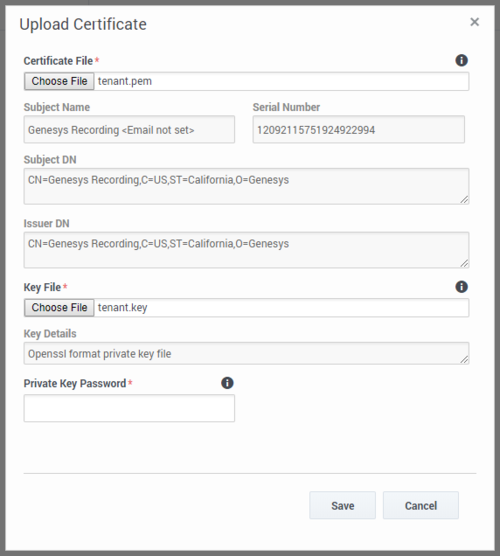
- In the Upload Certificate panel, under Certificate File, click Choose File.
- Select the recording certificate file (PEM file).
- The Subject Name, Serial Number, Subject DN, and Issuer DN fields automatically populate.
- In the Key File section, click Choose File.
- Select the private key file.
- Leave the Private Key Password field empty.
- Click Save. Both public and private keys are stored in a secure keystore file dedicated to your tenant.
- After uploading the self-signed recording certificate you must contact your Genesys Professional and ask them to have the certificate assigned to your IVR profile. You will be asked for a copy of the Self-Signed Recording Certificate. You do not need to provide them your private key.
- If you upload and/or delete recording certificates in one Platform Administration session, these changes are not reflected in another Platform Administration session. You must log out and log in again to the second Platform Administration session.
- In the Certificate Administration section, there is an option to Delete certificates. Do not delete any certificates without first discussing this with your Genesys Professional, since there may be adverse side-effects of doing this (for example, not being able to playback recordings). Even if a certificate is expired, it will need to remain in the system so that older recordings can be played back.
Upload recording certificates (Azure)
The public and private keys are stored in a certificate file and are used to encrypt a unique session key that is then used to encrypt each media file. These keys must be provisioned for voice recordings. To learn how to generate the public and private keys, see Certificate requirements.
- In Agent Setup, under the Contact Center Settings tab, go to Keys Management and select Keys.
- Click Upload Certificate, and then click the browse icon (
 ) to locate and select the recording file on your local machine.
- ImportantCertificate files must be in Privacy Enhanced Mail (PEM) format.
- Click Save. Agent Setup validates the format and stores the uploaded certificate file in the tenant "record" GVP IVR Profile (in the GVP Config Server) and then displays the Key and Alias.
Provisioning certificates for screen recording
Perform the following steps to configure encryption for screen recordings, only after completing the Uploading/installing certificates to encrypt your voice recordings procedure. If you have not purchased screen recording services, you may skip this step.
Screen Recording Certificates list
The Screen Recording Certificates page enables you to manage the certificates for screen recording encryption.
Assigning Screen Recording Certificates
To assign a new certificate:
- In the header, go to Administration > Screen Recording Certificates.
- On the Screen Recording Certificates panel, click Add.
- From the Select Certificate window, perform one of the following actions:
- Select the check box next to the appropriate certificate, and click Add.
- Click Cancel to discard any changes.
- Perform one of the following actions:
- Click the Save button to accept the changes.
- Click the Cancel button to discard the changes.
Removing Screen Recording Certificates
To remove a Recording Certificate, perform the following actions:
- In the header, go to Administration > Screen Recording Certificates.
- On the Screen Recording Certificates panel, select the check box next to the certificate that you want to remove.
- Click Remove.
- Perform one of the following actions:
- Click the Save button to accept the changes.
- Click the Cancel button to discard the changes.
- If you remove a certificate from the Screen Recording Certificates, you will turn off encryption, and screen recordings will no longer be encrypted. Do not remove any certificates without first discussing this with your Genesys Professional.
- The modifications to encryption settings described in this document only affect future recordings and do not change the encrypted status of old recordings.


