Outbound Dialing Modes
When you configure your Outbound campaign, you'll need to choose a dialing mode that best suits your campaign. The dialing mode you choose will depend on the type of campaign, the number of agents assigned to the campaign, and legal requirements. Read the article below or watch the videos to learn about the dialing modes and Outbound IVR modes available in Genesys Engage cloud.
Contents
The first video provides an overview of the dialing modes available in Genesys Engage cloud, while the second video walks you through four unique business scenarios and identifies the best dialing mode in each scenario and campaign.
Dialing Modes
The table gives a brief overview of each dialing mode. You can find more details, including instructions for enabling, in the sections below the table.
| Dialing Mode | Description |
|---|---|
| Predictive (Automatic) |
|
| Progressive (Automatic) |
|
| Preview (Manual) |
|
Predictive
Predictive is an automatic dialing mode, which means the dialer automatically dials phone numbers and then bridges the answered calls to agents. This is the fastest among all the dialing modes because the automatic dialer uses an algorithm to predict agent availability and call results so that it can safely dial multiple phone numbers for each available agent.
Because of this constant rate of dialing and connecting, agent idle time is reduced, and the dialer can run through the contact list much quicker than it could in any other mode.
This constant rate of dialing can also increase the risk of exceeding the target abandoned rate - defined as the percentage of dropped, or abandoned, calls resulting from the system making more calls than there are available agents - so you should use Predictive only in campaigns with at least 15 agents to ensure there are always enough agents available to accept the bridged calls. If you have fewer than 15 agents, you should consider Progressive.
Progressive
Progressive is also an automatic dialing mode, meaning the dialer automatically dials phone numbers and bridges the answered calls to agents. In Progressive mode, the dialer places only one call for every one available agent. For example, if six agents are available, the system dials six phone numbers.
This guarantees that there’s an available agent for every contact who picks up the phone, so there’s no risk of exceeding the 3% allowable call abandoned rate set out by federal regulations.
Use Progressive if you have fewer than 15 agents assigned to a campaign.
Switching Modes: ASM and Transfer
When a campaign using an automatic dialer runs in Active Switching Matrix (ASM) mode, the system does two things before it dials out: it looks at the routing parameters so that it knows how to route the call when it detects a voice on the line, and it reserves an agent up front. By doing this work up front, it can safely bridge the call to an agent within two seconds after detecting a voice on the line, as required by federal regulations.
When a campaign runs in Transfer mode, the system waits until it has a contact on the line before it checks the routing parameters and looks for an agent. Because this process will always take longer than two seconds, it’s not recommended in sales or telemarketing campaigns that are bound by federal regulations.
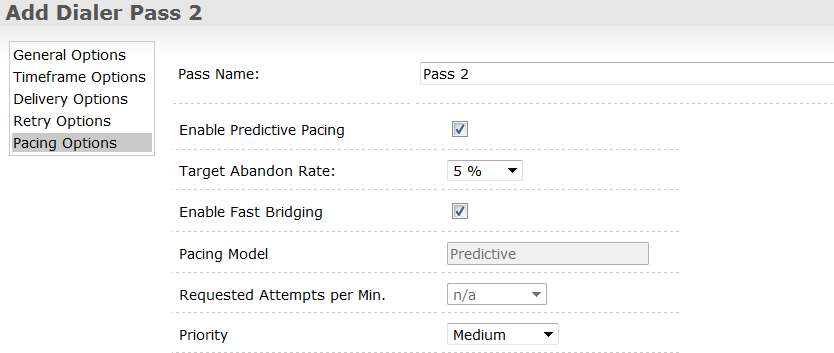
To enable Progressive or Predictive dialing:
- On the Outbound tab, go to Pattern Options and select Dialer Pass
- Select Pacing Options
- Check the box next to Enable Predictive Pacing to enable Predictive dialing or leave it unchecked to enable Progressive dialing
- Check the box next to Enable Fast Bridging to run the campaign in ASM mode. If you don't check the box next to Enable Fast Bridging, the campaign will run in Transfer mode.
Preview
Preview dialing is a manual dialing mode, where an agent requests one or several records from the system, previews each record, and dials the contacts manually.
Outbound IVR
Outbound IVR dialing enables you to play personalized and interactive automated messages to your contacts. All processing of these outbound calls is handled by Designer.
The table gives a brief overview of each Outbound IVR mode. You can find more details, including instructions for enabling, in the sections below the table.
| IVR Mode | Description |
|---|---|
| Power GVP |
|
| Predictive GVP |
|
Power GVP
With Power GVP, messages can be personalized for each contact and they can be interactive (For example, Press 1 to take the survey). Agents are not involved in these campaigns, so contacts are never given the option to speak to one. When the message ends or when the contact completes an interaction, the call ends.
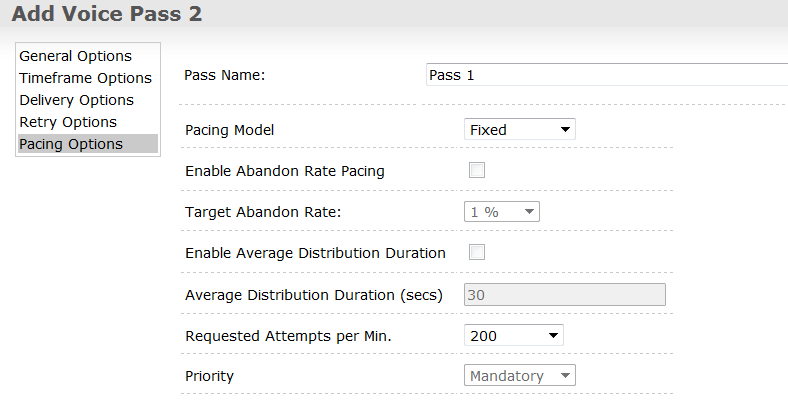
Power GVP uses a Fixed pacing model, which enables you to specify a number of contact attempts per minute.
To enable Power GVP:
- On the Outbound tab, go to Pattern Options and select Voice Pass
- In Pacing Options, specify the following:
- Pass Name
- Pacing Model: Fixed
- Requested Attempts per Min: Specify a number
- Priority: Mandatory
Predictive GVP
Predictive GVP is similar to Power GVP, but with this mode, a contact is given the option to speak to an agent (For example, Press 1 to speak to an agent).
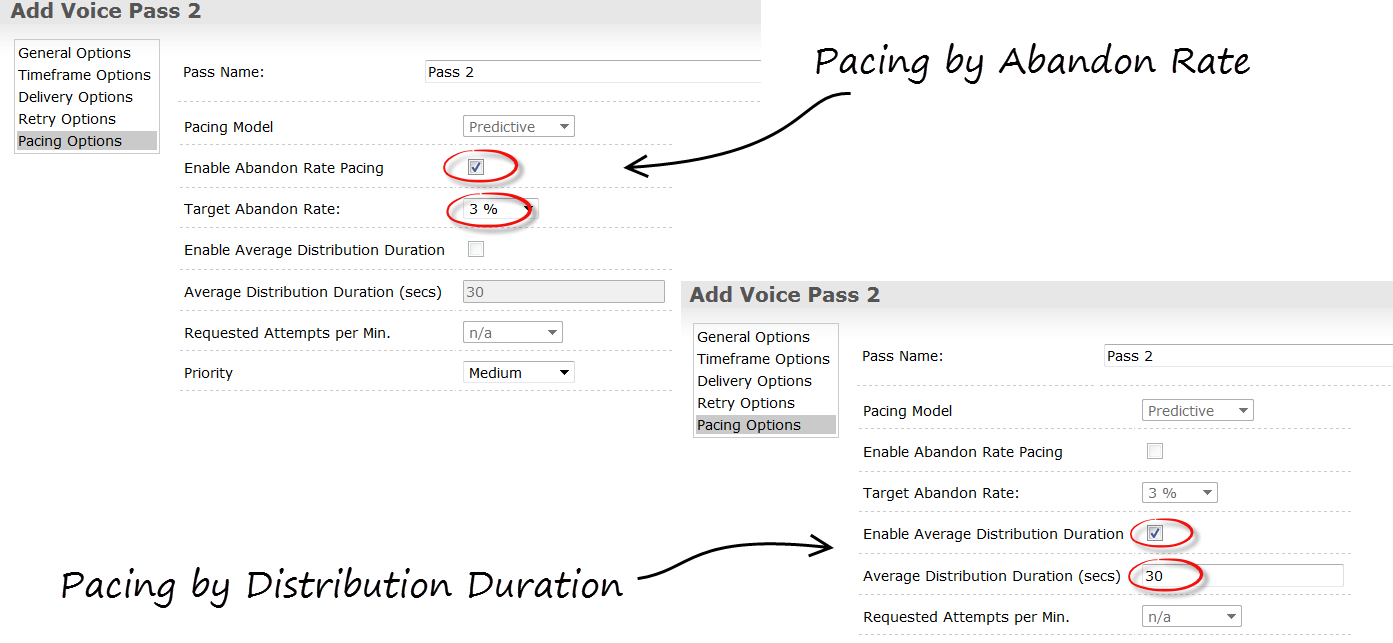
Predictive GVP can run in either ASM mode or Transfer mode. and you can select pacing options based on either the Target Abandon Rate or the Average Distribution Duration.
Use Account Manager to enable the dialing mode and use Designer to set the routing parameters.
To enable Predictive GVP based on Target Abandon Rate, specify the following in Pacing Options:
- Pass Name:
- Pacing Model: Predictive
- Check Abandon Rate Pacing
- Target Abandon Rate: 3%
- Priority: Medium
To enable Predictive GVP based on Average Distribution Duration, specify the following in Pacing Options:
- Pass Name:
- Pacing Model: Predictive
- Click Average Distribution Duration
- Average Distribution Duration (secs): 30 (for example)
- Priority: Medium


