Adding and removing Language Packs
Use the following procedures to manually add and remove Workspace Language Packs after you have deployed Workspace.
Contents
Notes about upgrading Language Packs when you upgrade Workspace:
Upgrade from DVD
- When you upgrade Workspace from DVD, only the application is upgraded
- All language packs that were install using an older version will not be upgraded—You must manually upgrade each language pack by using the same procedure that was used to install the original language packs; during install, the wizard will detect the older language packs and enable you to choose which ones to upgrade
Upgrade from Language Pack IP
- Open the folder containing the language pack
- Follow the standard procedure to add a language pack to workspace
Adding a Language Pack to Workspace using Interactive mode
Language packs (localized content for Workspace) are not always released at the same time as the English version of Workspace, and new language packs are added as demanded by Genesys' customers.
Language packs are available as part of the Genesys International DVD/IP. If you are installing a new release of Workspace from an International DVD/IP, use the standard ClickOnce, Developer, and Non-ClickOnce procedures in the other tabs of this topic.
Watch video: How to add a language pack to an already deployed Workspace Desktop Edition 8.5.1:
Use the following procedure to add a language pack to your existing Workspace deployment.
Procedure
Installing a Workspace Language Pack on an existing Workspace deployment or ClickOnce package
Purpose: To install a Workspace language pack on your existing Workspace deployment on a client desktop or on an existing ClickOnce package.
Prerequisites
Workspace must already be installed using one of the following deployment types:
Start
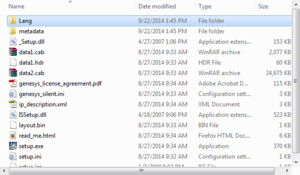
- If you are deploying from the Workspace Desktop Edition DVD, open the Lang folder (refer to the Lang (Language) folder in the Workspace Install Package figure). If you are installing from a language specific IP, go to Step 3.
- The Lang folder contains folders named with three-letter language codes. These folders contain the language specific language pack installers (refer to the Three letter language-code folders in the Lang folder figure). Open the folder that contains the language installer that you want to use.
- Double-click the setup.exe file to launch the language pack installer.
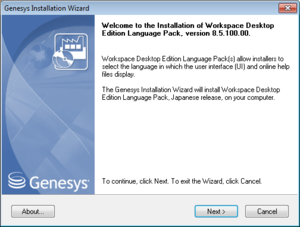
The Genesys Installation Wizard launches and the Welcome panel is displayed.
- On the Welcome panel, do one of the following:
- Click Next to begin the installation procedure.
- Click Cancel to exit the Genesys Installation Wizard.
- Click About to open the Workspace Desktop Edition ReadMe file in your default browser.
If you clicked Next, the installer searches for instances of the Workspace application installed on your computer and displays a list of installations in the Select Installed Application panel from which you can choose.
- On the Select Installed Application panel, do one of the following:
- Select the application to which you want to add a language pack and click Next to begin the installation procedure.
- Click Cancel to exit the Genesys Installation Wizard.
- Click Back to return to the splash screen.
If you clicked Next, the Ready to Install panel is displayed.
- In the Ready to Install panel, do one of the following:
- Click Install to install the language pack.
- Click Cancel to exit the Genesys Installation Wizard.
- Click Back to return to the Select Installed Application panel.
If you clicked Next the update is installed and the Installation Complete panel is displayed.
- Click Finish to close the Installation Complete panel and complete the installation.
- Depending on whether you are updating an existing installation or adding a language pack to a ClickOnce package, do one of the following:
- If you are adding a language to an existing non-ClickOnce installation, launch Workspace and select the new language from the Login view Language drop-down menu.
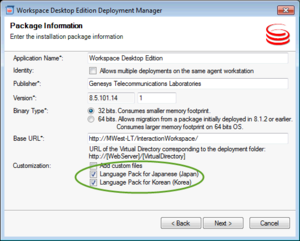
- If you are adding a language pack to a ClickOnce installation, launch Workspace Desktop Edition Deployment Manager (InteractionWorkspaceDeploymentManager.exe). In the Package Information panel, select the installed language packs that you want to add to your ClickOnce package, then complete the deployment.
End
Adding Language Pack to Workspace using Silent mode
To install Language Pack to Workspace in Silent mode, use the Installation Wizard Silent arguments as follows:
- Update the genesys_silent.ini file by making the following modifications:
- Add the path to the Workspace Desktop Edition directory. For example, InstallPath=C:\Program Files (x86)\GCTI\Workspace Desktop Edition.
- If you are installing/upgrading Language Pack for Workspace, specify the version, build number before the installation:
- Specify whether Genesys Softphone starts automatically when Windows starts by using the Startup=<Std or Auto> parameter.
- Mode= <FirstInstall or Upgrade of Language Pack on this box>
- IPVersion= <current (before upgrade) version of Language Pack on this box>
- IPBuildNumber= <current (before upgrade) build number of Language Pack on this box>
- Execute the following command:
setup.exe /s /z"-s 'FullPathToGenesysSilentConfigurationFile' -sl 'FullPathToGenesysSilentResultFile' -t 'FullPathToGenesysSilentInstallationListingFile'" where:- /s specifies that the installation is running in InstallShield Silent Mode.
- /z passes the Genesys Silent mode silent parameters to the installation.
- -s specifies the full path to the silent configuration file. The <Full path to Genesys Silent Configuration file> is optional. If the <Full path to Genesys Silent Configuration file> parameter is not specified, the installation uses the genesys_silent.ini file in the same directory where the setup.exe file is located.
ImportantEnclose the value of the <Full path to Genesys Silent Configuration file> parameter by apostrophes (') if the parameter contains white symbols.
- -sl specifies the full path to the installation results file. If the <Full path to Genesys Installation Result file> parameter is not specified, the installation creates the genesys_install_result.log file in the <System TEMP folder> directory.
ImportantEnclose the value of the <Full path to Genesys Installation Result file> parameter in apostrophes (') if the parameter contains white space characters.
- -t specifies the full path to the installation listing file for debugging. The <Full path to Genesys Installation listing file> parameter is optional and should be used for silent installation debugging purposes.
ImportantEnclose the value of the <Full path to Genesys Installation listing file> parameter in apostrophes (') if the parameter contains white space characters.
The InstallShield setup.exe installer requires that:
- There is no space between the /z argument and quotation mark. For example, /z"-s" is valid, while /z "-s" is not valid.
- There is a space between the -s,-sl parameters and quotation mark. For example, /z"-s c:\temp\genesys_silent.ini" is valid, while /z "-sc:\temp\genesys_silent.ini" is not valid.
For example,
setup.exe /s /z"-s 'C:\8.5.144.00\windows\b1\ip\genesys_silent.ini' -sl 'C:\temp\silent_setup.log' -t 'C:\temp\Genesys_LP_Installation.log'".
- After executing this command, verify that Language Pack to Workspace is installed in the C:\<Workspace Desktop Edition Directory>, and that the silent_setup.log file has been created in the C:\temp\ directory.
Troubleshooting
If you see that error message in silent_setup.log:
[Result]
ResultCode=-1
Error=Required parameter <Parent IP GUID parameter is not defined.> is wrong.\nError was detected by lpScenarioFirstBeforeBegin().
Please check that InstallPath parameter is correct in silent configuration file.
No backslash (\) symbol should be in the end of the full path to the installation directory. For example, InstallPath=C:\Program Files (x86)\GCTI\Workspace Desktop Edition
For information about silent language pack installation, see the Installing Workspace Desktop Edition in Silent mode for Windows.
Removing a Language Pack From Workspace after Deployment
For non-ClickOnce deployments, use Add/Remove Programs to select which Language Packs you want to remove from your workstation.
For ClickOnce deployments, run Workspace Deployment Manager and de-select language packs in the Package Information panel and push new ClickOnce package to your web server.


