Installing plug-ins for workspace
Workspace enables you to install optional plug-ins for Workspace. Plug-ins, such as eServices Social Media interaction handling, are available as separate IPs that you install from a separate CD/DVD.
If you deploy a plug-in as part of a ClickOnce deployment, the behavior of the ClickOnce download depends on the privileges that are assigned to the agent who is logging in. If the agent is granted the privilege to execute a plug-in, the plug-in is downloaded as part of the deployment.
The Procedure: Installing plug-ins for Workspace is a general procedure that describes how to install plug-ins for Workspace. The documentation for your plug-in provides specific information about how to install and deploy your plug-in.
Consult the documentation that comes with your plug-in for specific information about how to install and provision your plug-in.
Before you install your plug-in, you must provision it in Genesys Administrator Extension (refer to the Genesys Administrator Extension documentation for more information) in the same way that you provision Workspace.
Workspace plug-ins come with <Plug-In Name>.apd and <Plug-In Name>.xml (privileges) files, both of type Workspace. Upload the <Plug-In Name>.apd file and attach the <Plug-In Name>.xml file to create the <Plug-In Name> Template.
The Workspace application object is created based on the Workspace Template.
When you provision the Privileges that are assigned to a Role, the list of Privileges that are available for the Workspace application type combine the privileges that are specified in the Workspace.xml and <Plug-In Name>.xml files.
Procedure
Installing plug-ins for Interaction Workspace
Purpose:
To install plug-ins for Workspace on your web server, an agent workstation, or a development workstation.
Prerequisites
- .NET Framework 4.5
- Installation of the Workspace application by using one of the following procedures:
- Deploying The ClickOnce Application On Your Web Server. Choose this option if you want to deploy Workspace as a ClickOnce application. Install the plug-ins after you install the Workspace application on your server, but before you run the Workspace Deployment Manager.
- Installing The Developer Toolkit. Choose this option if you want to deploy the Workspace developer package. Refer to About Workspace Extension Samples and Deploying and Executing the Extension Samples for information about reorganizing files to enable the debugging of samples with plug-ins.
- Installing The Workspace Application. Choose this option if you want to deploy a non-ClickOnce version of Workspace.
Start
- On your desktop, open the disc that contains the plug-in IP or the plug-in IP and double-click the Setup.exe file.
You might be asked to reboot your system to delete or rename certain system files before the Installation Wizard runs.
The Genesys Installation Wizard launches and the Welcome panel is displayed.
- On the Welcome panel, do one of the following:
- Click Next to begin the installation procedure.
- Click Cancel to exit the Genesys Installation Wizard.
- Click About to open the plug-in ReadMe in your default browser.
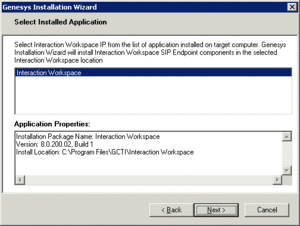
If you clicked Next, the Select Installed Application panel is displayed (see the Figure - Select Installed Application Panel of the Genesys Installation Wizard).
- The Select Installed Application panel enables you to select the Workspace application instance to which you want to add the plug-in.
The Genesys Installation Wizard searches the target computer for an installed version of Workspace. Select the version of Workspace in the location in which you want plug-in to be installed.
The Application Properties pane displays the name, version, and location of the selected Workspace application (see the Figure - Select Installed Application Panel of the Genesys Installation Wizard).
- After you have selected the version of Workspace that you want to use with the plug-in, do one of the following:
- Click Next to proceed to the next panel.
- Click Cancel to exit the Genesys Installation Wizard.
- Click Back to return to the previous panel.
- On the Ready to Install panel do one of the following:
- Click Install to install the plug-in on your web server, development workstation, or agent workstation.
- Click Back to return to the Select Installed Application panel.
- Click Cancel to exit the Genesys Installation Wizard.
- Click Finish to exit the Genesys Installation Wizard.
Plug-in files are copied into the target installation directory of the original Workspace deployment.
After the plug-in application is installed on the agent or developer workstation, or after it is downloaded by the ClickOnce application (see Deploying The ClickOnce Application On Your Web Server), and after the agent is granted permission to use the application, agents must login Workspace on a Place that is associated with a SIP DN to use the plug-in with Workspace. The plug-in process is started automatically when Workspace application is being initialized.
End
Next Steps
- (Optional) If you are deploying Workspace as a ClickOnce application on your web server, go to the Procedure: Deploying The ClickOnce Application On Your Web Server. When the Workspace Deployment Manager Package Information pane is displayed, you can specify that your plug-in is installed with the ClickOnce package.
- (Optional) If you are deploying Workspace for development purposes, go to About Workspace Extension Samples.
- Installation is complete. You can provision the plug-in functionality. Refer to the documentation that accompanies your plug-in IP.

