
Contents
Composer Quick Start
The information below is intended to be a Quick Start for routing strategy development with Genesys Composer. A routing strategy is comprised of one or more routing workflows. Regardless of the version of Composer you have installed, this Quick Start (which reflects the Composer 8.1.2 interface) will help you get started using Composer.
The goal of this Quick Start is to:
- Create a simple routing strategy workflow that will distribute an inbound call to an agent.
- Add attached data to this workflow that will be popped when the call is delivered to the agent desktop.
- Route the call to a preferred agent and if the agent is not available then expand the agent pool.
The steps below assume you have already installed a Genesys environment and have configured an Orchestration Solution, which includes Workspace Desktop Edition, Interaction Server, Composer, and Orchestration Server.
Creating a Sample Workflow
- In Workspace Desktop Edition (or "Interaction Workspace"), log in and make agents Ready). This example uses 04 Agent KSippo, and 05 Agent KMilburn. Also make Ready the customer phone. This example uses the Pat Thompson customer phone.
- Click the Eclipse icon on your desktop to open Genesys Composer.
- Ensure that Genesys Composer is connected to Configuration Server. The current status of the connection to Configuration Server is displayed in the lower right of Composer.
TipWhen you set up your Configuration Database (Configuration Server), you define certain database objects, such as agents (Persons), Agent Groups, Skills, and so on. These objects can be defined in Configuration Manager or in Genesys Administrator. When you use Composer to create SCXML-based routing strategies executed by Orchestration Server (and Universal Routing Server), there is a button to connect to Configuration Server. When creating a routing workflow in Composer, those Configuration Database objects will be available in the Composer workflow building blocks that use them. For example, you might be creating a workflow that routes to an Agent Group and using Composer’s Target block. The Agent Group you defined in the Configuration Database would be available for selection in the Target block.
- If Composer indicates Disconnected from Configuration Server, then select Configuration Server from the main toolbar and click Connect.
- Enter the appropriate connection information and click Next.
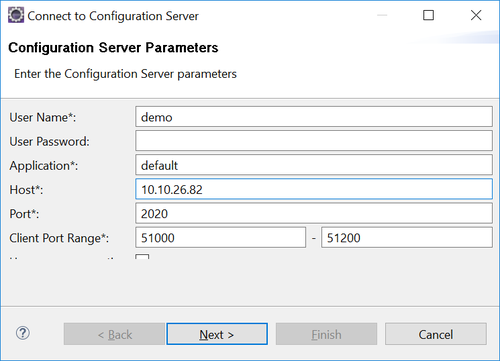
- Select the tenant, such as Environment, or the name of another tenant (business entity).
- Within Composer, create a new Project: File > New > Java Composer Project.
- Give the Project a name, for example, MySample.
- Ensure that Integrated Voice and Route is selected.
- Click Finish.
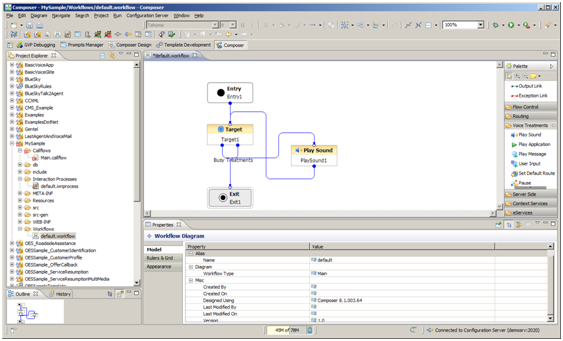
- Go to the new Project folder that you was just created (MySample) and open the Main workflow and default workflow.
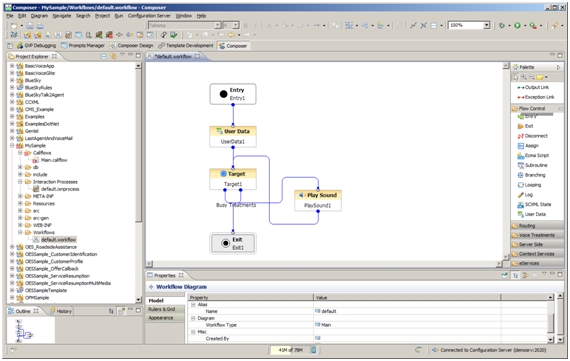
Upon selecting the default.workflow a blank workflow palette will appear. - Within the .workflow, drag and drop an Entry block, Target block, and Exit block from the palette of blocks onto the workspace. Make sure you are working within .workflow and not the .callflow (used for GVP voice self-service applications).
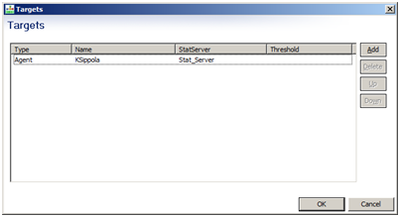
- Go to the Target block and select the Targets property. This is done by selecting: Target > Properties > Target Selection > Targets on the far right. Upon selecting the Targets property, a new Targets box will appear:
- Within the Target block, select Add and enter the following:
- Type: Agent Group
- Name: SIP Group
- Stat Server: Stat_Server
TipIf you are connected to Configuration Server, you are able to directly pull information from Configuration Server to populate the options. You are not required to be connected to Configuration Server to perform development as Composer allows you to perform development offline and then connect and validate against Configuration Server at a later time. - In the Target block set the Timeout property to 99.
- Click the main toolbar buttons to validate your workflow and then generate the code.
TipTo validate the workflow and generate the code, the focus must be within the palette where the workflow is being designed. To validate you can enter Alt+V. Or you can validate by right clicking the default.workflow from the Project Explorer window and selecting Validate from the main toolbar. Code can be generated by entering Alt+G or clicking on the Generate button on the main toolbar.
- Go to the Interaction Processes folder in the left Project Explorer. Right-click on the interaction process diagram file (default.ixnprocess) and perform a similar process to validate and generate the code validate the default interaction process diagram.
- Right-click on the interaction process diagram file (default.ixnprocess) and select Publish to Configuration Server. You should receive a message that the interaction process diagram was validated and published to Configuration Server.
TipAn SCXML-based workflow is first invoked by the interaction process diagram. If you open the interaction process folder, you will see that there is a workflow named defaultworkflow. This workflow in turn points to the actual workflow that you just created, which is in the Location/Resource property of the Workflow block. If you change the name or have multiple workflows, you need to ensure that the appropriate association is maintained.
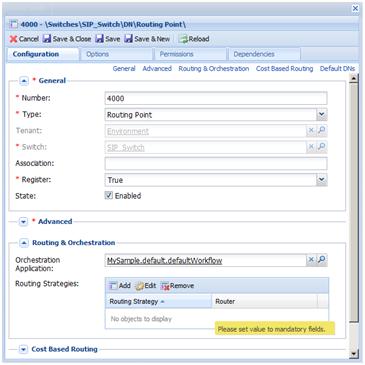
- Assuming this routing strategy only contains one workflow, you are now ready to "provision" the new workflow. Within Genesys Administrator, provision a new DN on the SIP_Switch
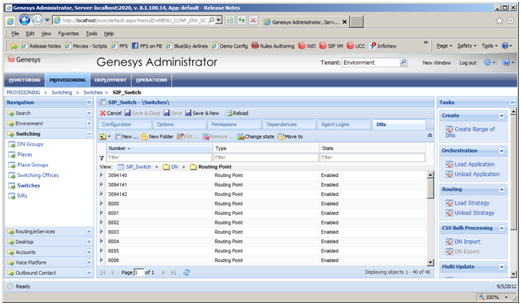
Example: Number: 4000 Type: Routing Point
- Under Routing > Orchestration (see below), select the workflow that was just created: MySample.default.defaultWorkflow.
- Confirm that your routing strategy works:
- Make your agents Not Ready.
- Place a call from the customer phone to 4000. Note: We do not yet have a treatment so the caller will not hear any initial treatment.
- Make KSippola Ready.
- Confirm that the call is delivered to the available agent and they receive a screen pop.

Add a Treatment
Add a simple queue treatment that the caller will hear while waiting for an available agent.
- Utilizing the existing workflow, select the Target block. In the properties under Route Target, set Use Treatments to true.
- Add a Play Sound block from the Voice Treatment icons palette. Connect the Busy Treatments from the Target block to the Play Sound block. Connect the output from the Play Sound block to look back to the Target block.
- Within the Play Sound block set the Resource property to play back the badon_hold.wav file, which is already present on the Demo Server.
- Proceed to validate the code, generate the code, and then place a call back into to your Routing Point with all agents in a Not Ready state. Confirm that queue music is received by the caller.
Attaching Data
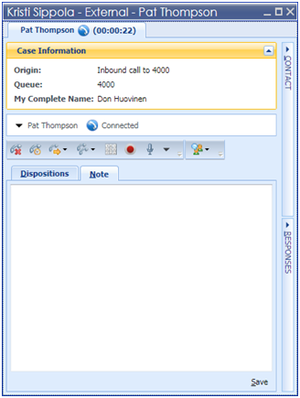
Add attached data to this strategy that will be popped when the call is delivered to the agent desktop. In this example you will need to add your name as a value for one of the appropriate keys and ensure that it is popped to the Interaction Workspace desktop.
- Utilizing the existing workflow that was just created add a User Data block from the palette in between the Entry and Target blocks.
- In the Assign property of the User Data block configure an appropriate key and value where the value is your name; for example, Don Huovinen.
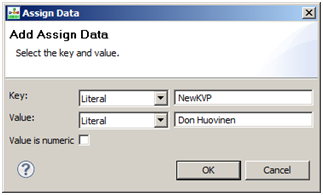
While we are attaching data using this block you must also ensure that the new key; NewKVP in the example shown above, will appear properly in Interaction Workspace. - Validate your workflow and then generate the code.
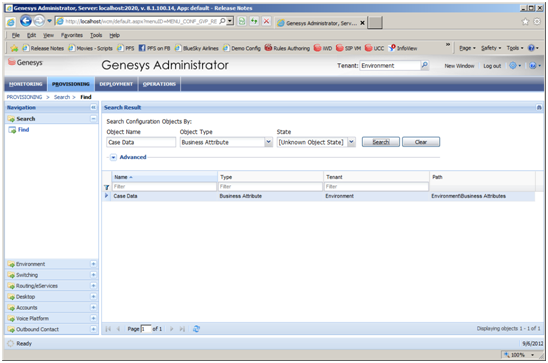
- Modify the settings of Interaction Workspace to display the key-value pair ,which we just added, in our case the key is ”NewKVP” and we want this displayed in Workspace as ”My Complete Name”. Within Interaction Workspace, the key-value pairs that will be displayed are based on the keys that are listed in the CaseData Business Attribute so we need to add ”NewKVP” as one of the values in the CaseData business attribute for this KVP to be properly displayed in Interaction Workspace. This can be done by searching for the Case Data business attribute.
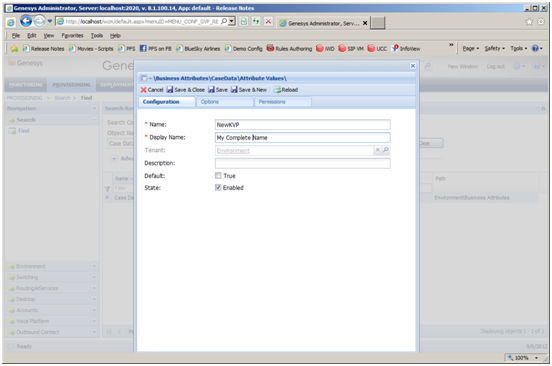
- Then double-click on Case Data, select the Attribute Values tab, and then select to Add a new attribute. The Name will be the name of the key (NewKVP) and the Display Name is the name we want displayed in Interaction Workspace.
- Make your agents Not Ready.
- Place a call from the customer phone to 4000. The caller should hear music.
- Make the agent Ready.
- Confirm that the call is delivered to the available agent and they receive a screen pop.
Routing to a Preferred Agent (Add Flexibility)
Provide routing to a preferred (last handling) agent and if that agent is not available within the defined threshold expand the pool of available agents so that the call can be successfully delivered.
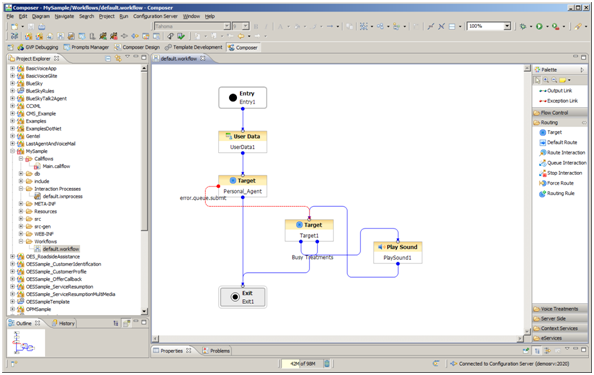
- Using the existing routing workflow, add a new Target block from the palette in between the UserData block and existing Target blocks.
- Within the new Target block label it ”Personal_Agent” and set the Target block to target KSippola.
- Type: Agent
- Name: KSippola
- StatServer: Stat_Server
- Set the Timeout property of the block to 15.

- Set the Exceptions property to capture an exception of error.queue.submit
- Within the workspace, connect the error.queue.submit exception from the new Target block you just added to the previous SIP group target block that you already have. Connect the normal outlink from this new Target block to the existing Exit block. A example flow is provided below.
- Validate your workflow and then generate the code.
- Test that your routing and logic works as desired:
- Make KSippola and KMilburn ready.
- Place a call from the customer phone to 4000.
- Confirm that the call is delivered to KSippola and he receives a screen pop.
- Make KSippola NotReady
- Place a call from the customer phone to 4000.
- Confirm that the caller waits and after the timeout the set of targeted agents has been expanded the call is delivered to KMilburn.
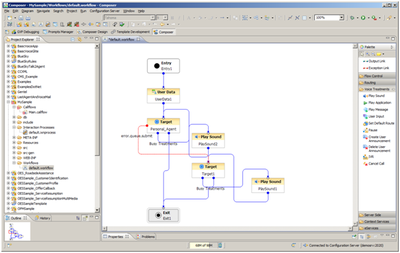
Note: The prior example is a scenario that shows target expansion, but can be improved if another different treatment is provided while the caller is waiting for their personal agent. As the target expansion occurs, you could also change the treatment to provide an audible queue position. An example is callflow is shown below.
- Validate your workflow, Generate the code and then proceed to place a call to show the new scenario:
- Make KSippola Not Ready and KMilburn Ready.
- Place a call from the customer phone to 4000.
- Confirm that the caller waits and after the timeout the set of targeted agents has been expanded the call is delivered to KMilburn.
Summary of Example Workflow
- This example workflow strategy could represent a "last agent routing" approach or preferred/personal agent routing. If the preferred destination is not available, you could expand the target list so that you have 1) optimal routing and 2) do so within the context of desired service levels. As the target group is expanded, you not just moving from A to B when expanded. The workflow is now looking at the A + B. You coulde alternatively just overflow to B if desired through the Target Selection properly (Clear Targets = True).
- You could also place a subsequent call, wait until the timeout and then make KSippola available showing that KSippola is still part of the target group and will receive the call. Technically KSippola is a subset of SIP agents therefore you really don’t have the A+B as described previously as A is a member of B but the A+B target expansion discussed previously is still valid.
- When attaching User Data. you can utilize any key name you want. However. you need to make the necessary changes in Interaction Workspace to display the desired attached data. The workspace will utilize attached data present in the call such as the caller ID to look up information from Universal Contact Server and use the information obtained from UCS for the screen pop in Contact area.
- Interaction Workspace may take a long time to start. This is becasue the Interaction Workspace agents are configured for a number of interaction channels such as e-mail, SMS, chat, and so on. Therefore, when Workspace starts, it attempts to connect to Interaction Server. If Interaction Server is unavailable, then each channel will be attempted sequentially and need to time out before proceeding to the subsequent channel.


