Working with Database Blocks
Contents
- 1 Working with Database Blocks
- 1.1 Database Connection Profiles
- 1.2 Creating/Editing a Connection Profile
- 1.3 Preview Connection Strings
- 1.4 Using the Query Builder
- 1.5 Specifying Custom Queries
- 1.6 Stored Procedure Helper
- 1.7 Setting up a Stored Procedure Call
- 1.8 Password Encryption
- 1.9 Limitations and Workarounds
- 1.10 Oracle Client Setup for IIS
- 1.11 Working with Oracle 12c R2 from Composer .NET projects
This page contains general information on working with the Database blocks.
Database Connection Profiles
Before you can connect to a database in your application, you need to define a database connection profile that will maintain all information necessary to connect to a particular instance of a database.
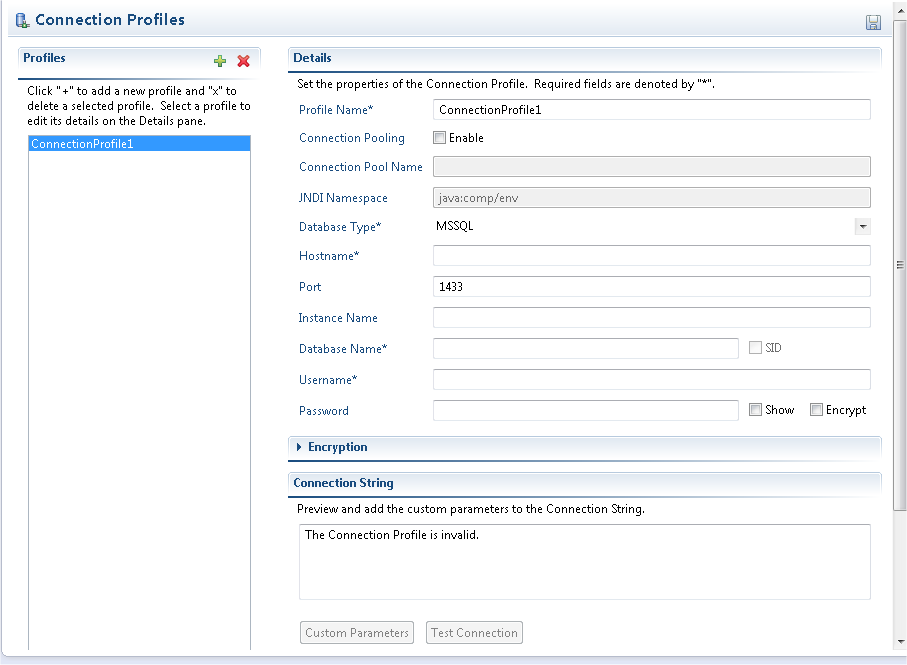
The DB Data block requires that you specify the name of a connection profile in its properties so that it can use that information to connect to the database at runtime. Multiple connections profiles can be defined in one Project and these profiles can be shared by multiple DB Data blocks even if they are in different callflows. A connection profile consists of the basic information required to connect to a database. The information provided in a connection profile includes the following:
- Profile Name. The internal name that Composer uses to identify connections uniquely.
- Connection Pooling. Select to enable connection pooling, which maintains a set of database connections that can be reused for requests to databases. You can use this feature to enhance performance by avoiding time-consuming re-establishment of connections to databases.
- Connection Pool Name. Specify a Java Naming and Directory Interface (JNDI) name for the pooled data source. Composer applications can use any JNDI data source exposed by the web server. The .war files exported by Composer contain configuration files to support connection pooling with JBoss and WebSphere; other configuration changes to the web application may be required for other web servers.
- JNDI Namespace. Starting with 8.1.410.14, Composer introduces the JNDI Namespace option for Java Composer Projects. The default value is java:comp/env. You can edit this value to match your web server/database requirements. Fore example, you can use JBoss Connection Pooling with MSSQL and Oracle databases for both callflows and workflows.
- Database Type. The type of database from the list of supported databases
- Hostname. The host on which the database server is running. In case of Database Cluster, Virtual IP/Cluster Alias/SCAN Name is specified here.
- Port. The TCP port on which the database server is listening for connections. The most commonly used defaults for supported database types are pre-populated by Composer. If your database server uses custom ports, you will need to specify them here.
- Instance Name. The MSSQL Instance that need to connect in SQL Server. Port will take precedence if specified. This field is disabled when Database Type is selected as ORACLE.
- Database Name. The name of the database/catalog for SQLServer and the SID in case of Oracle.
- SID. The check box to specify if value provided in "Database Name" is SID. This check box is disabled when "Database Type" is MSSQL
- Username. The username that should be used to access the database
- Password. The password that should be used to access the database
- Encrypt. Select the encrypt the password.
- Show. Select to show the password
- Custom Parameters. The supported custom parameters can be included in connection string along with other parameters. To define custom parameters click the "Custom Parameters" button. In the dialog opened add the parameter name and value, in the order that need to be appended to connection string.
Note: Starting with 8.1.410.14, you can use the DB Data block Connection String property to dynamically access the database at runtime and override the Connection Profile settings in the block.
Configuration for Database Cluster:
- For MSSQL Cluster, Virtual IP/Cluster Alias is specified in Hostname field of Connection Profile. To connect to particular named instance in cluster, Instance parameter is configured.
- For ORACLE Cluster, Cluster Alias/SCAN Name is specified in Hostname field of Connection Profile.
Additionally, to enable TAF functionality in ORACLE clusters, connection pool is created similar to pooling capability in other application servers. Connection pool can be created as the example below (This need to be added in Tomcat server.xml present in Composer installed path) <Resource name="jdbc/oraclePooled" auth="Container"
       type="com.mchange.v2.c3p0.ComboPooledDataSource"
      factory="org.apache.naming.factory.BeanFactory"
      driverClass="oracle.jdbc.driver.OracleDriver"
      user="scott"
      password="tiger" jdbcUrl="jdbc:oracle:oci:@(DESCRIPTION=(LOAD_BALANCE=on)(FAILOVER=on)
      (ADDRESS=(PROTOCOL=tcp)(HOST=172.21.184.70)(PORT=1521))(ADDRESS=(PROTOCOL=tcp)
      (HOST=172.21.184.71)(PORT=1521))(CONNECT_DATA=(SERVICE_NAME=rac.genesyslab.com)
      (FAILOVER_MODE=(TYPE=session)(METHOD=basic))))" />
Encryption:
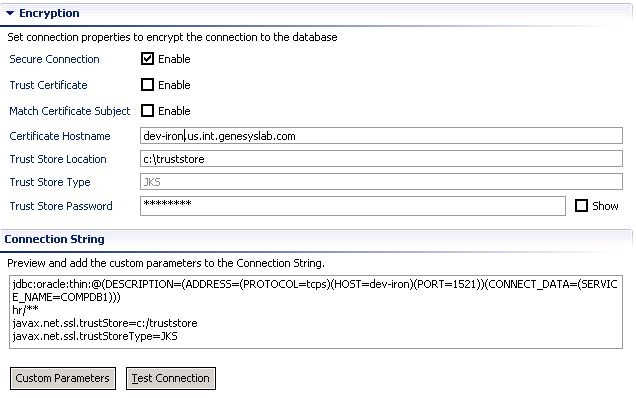
Parameters under "Encryption" tab allows you to configure SSL encryption and server authentication for Database connections made during Design time (Query Builder, Stored Procedure) and Runtime. When security is enabled, SSL encryption is used for all data sent between composer and SQLServer, if the SQL server has a certificate installed.
To establish a Secure Database connection from Composer, following parameters are to be configured under encryption tab:
- Secure Connection. Enabling this check box will make all connections from Composer to Database Server encrypted with a choice of server authentication
- Trust Certificate. Enabling "Secure Connection" and "Trust Certificate" will be sufficient to establish SSL Connection. When "Trust Certificate" is disabled, other optional attributes are enabled to validate server certificate,
- Match Certificate Subject. This is enabled in order to force the matching of the certificate subject available in Server Certificate and client's trusted copy.
- Certificate Hostname. This parameter is specified in case the client certificate carries a different subject name than the server certificate and user wishes to ignore the difference by providing the subject name expected in the server certificate explicitly.
- Trust Store Location. Location where the Trust Store file is present. The trust store file contains all the certificates trusted by the client, including the certificate that the server uses to autheticate itself.
- Trust Store Type. JKS truststore is supported when Database Type is ORACLE. This parameter is not editable. This is not applicable when Database Type is MSSQL
- Trust Store Password. Password to access the trust store.
Certificate configuration for Secure Connection:
- For Java Composer Projects, when "Secure Connection" is enabled and "Trust Certificate" is disabled, certificates are placed in "TrustStore Location" specified in connection profile.
- For .NET Composer Projects Design time (i.e. for Query Builder and Stored Procedure Builder), certificates are placed in "TrustStore Location" specified in connection profile.
- For .NET Composer Projects Runtime and MSSQL database, certificates are installed in "Certificate Windows Snap-In" accessed from MMC console in Windows.
- For .NET Composer Projects Runtime and ORACLE database, certificates are installed in Oracle wallet both in client and server. tnsnames.ora configuration will have service name with TCPS protocol. Example is given below.
SSLTEST =
  (DESCRIPTION =
  (ADDRESS_LIST =
    (ADDRESS = (PROTOCOL = TCPS)(HOST = dev-rose.us.int.genesyslab.com)(PORT = 2484))
  )
  (CONNECT_DATA =
    (SERVER = DEDICATED)
    (SERVICE_NAME = SSLTEST)
  )
)
Notes:
To establish a connection profile, you must be working with a Project file that was upgraded to Composer 8.0.2 or higher from an earlier Composer release. Connection profiles are not available in Projects created using Composer 8.0. They become available after the Project is upgraded. The method for specifying additional pooling parameters varies based on the database being used and the Project type. Java Composer Projects use the c3p0 library for both SQLServer and Oracle databases. Otherwise, in the case of Oracle databases, Composer uses the c3p0 library and the library exposes its own configuration parameters for pooling via an XML file. In case of SQLServer, additional pooling parameters can be specified in the connection string.
Creating/Editing a Connection Profile
To create (or edit) a connection profile:
- Select the Project for which you are creating a connection profile in the Project Explorer, and expand your project folder set.
- Expand the db folder.
- Double-click the connection.properties file. The Connection Profiles view opens.
- To create a new profile, click the Add Profile
 icon in the Profiles pane. (If you wish to edit an existing profile, you can select an existing profile in the Profiles pane.)
 - In the Details pane, enter (or update) the appropriate information in each field (fields containing the * character are required).
- Click the Save Profile
 icon in the upper-right of the Connection Profiles window. You must save the profile in order for it to be available for selection in the Select Connection Profile dialog box.
 - Test the connection profile by clicking the Test Connection button to connect to the database.
- The message Database connection was successful indicates your connection profile successfully connected to the intended database.
- The message Database connection failed followed by additional details indicates a problem with your connection profile. Update the profile, save it, and test it again.
Note: For information on creating the configuration for the connection pool on the application server side, see Connection Pooling.
Preview Connection Strings
The connection to the database with the specified parameters in the connection profile can be previewed and tested in the Connection profile editor. In case of Java project as the design and runtime connections use JDBC connection , JDBC connection string is available to preview and test. In case of Dotnet projects as the design time uses JDBC connection and runtime uses OLEDB connection, both strings are available to preview and test. Note: The Dotnet project must be deployed correctly in IIS to preview the OLEDB connection string. The parameters apart from ones explicitly collected in the editor can be added using the custom parameters dialog which takes the parameters as a name value pair.
Using the Query Builder
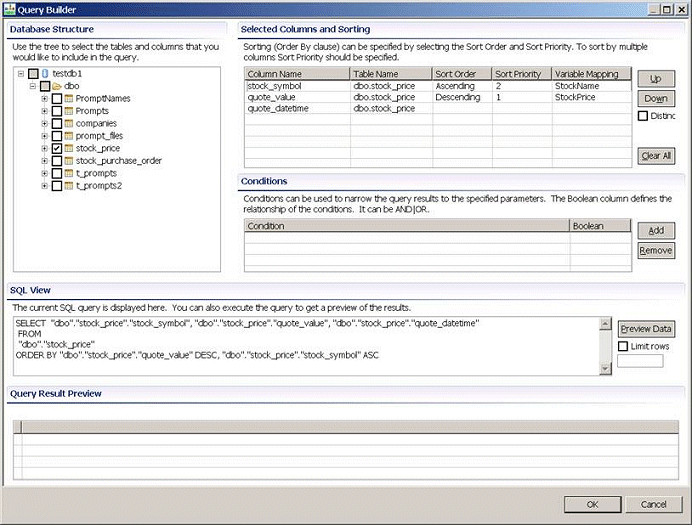
The Composer Query Builder provides a visual method of building a database query without the need to type SQL code. The Query Builder is accessed through the Query Type property in the DB Data block. It can be used for both voice callflows and routing workflows. Note: The Query Builder can only be accessed when a valid connection profile has been created and selected in the Connection Profile property of the DB Data block. The Query Builder with an example query is shown below.
Building a Database Query
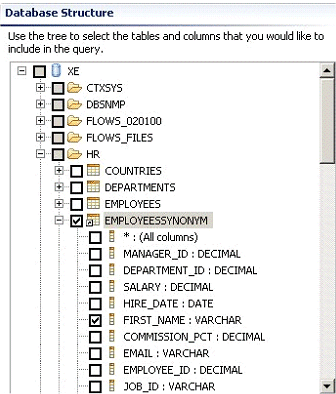
The Query Builder opens when Composer is successfully able to connect to the database specified in your connection profile. Any schemas, tables (and table synonyms) and columns of the database accessible from the specified user account are shown in hierarchical format in the Database Structure pane of the Query Builder. In the example below, EMPLOYEESSYNONYM is a table synonym.
Note: MSSQLServer table synonyms are read from the system table sys.synonyms. Oracle table synonyms are read from the system table user_synonyms. To build a query:
- Specify which table columns are returned as query results.
- Select the tables and columns to include in your query by checking appropriate items in the Database Structure pane. Expand table entries to see the columns. To select all columns in a table, select the appropriate (All columns) check box under the appropriate table.
- Selected columns and tables appear in the Selected Columns pane. To alter the order in which selected columns are returned in query results, use the Up and Down buttons to reorder columns within the list.
- To specify the order in which query results should be sorted, click the Sort Order field for a column and select a Sort option (ascending or descending). This will automatically fill in the Sort Order, which indicates the sequence in which multiple sort criteria will be applied. It is possible to sort by multiple columns and you can change the sorting sequence by clicking on the Sort Priority column. For example, you might sort a query of names by last name and then sort by first name for those people with the same last name. In that case, last name has Sort Order 1, and first name has Sort Order 2.
Note: The order in which columns appear in the Selected Columns list does not affect the sort order.
- To specify the variables into which the column values need to be copied, click the Variable Mapping field for a column and select a variable. If a variable is specified for a column, DB Data block execution will result in the column values of the first record being copied into the specified variable. If more than one record is returned by the query, then use the Looping Common Block along with the DB Data block to iterate over records and populate the variables specified for the columns.
- Specify filter criteria. In the Conditions pane, you build the search or filter criteria to identify the data you want to retrieve from the database. You can can specify multiple conditions.
- Click Add to create a new condition. A new row will be added to the Conditions list. Click the Condition column, and then click the
 to open the Condition Builder.
 - Select a column from the Select Column drop-down list which the search condition will operate on.
- Select the operator (=, <>, <, >, and so on) from the Operator drop-down list. This operator will be used to compare the specified column with the value specified in the next step.</li>
- In the Value field, type or select your value for the condition depending on the value type option:
- Column Reference: a table column that you can select from a drop-down list. This option will compare the two selected columns based on the specified operator.
- Application Variable: a variable defined in your application that can be selected from a drop-down list. At runtime the current value of the selected variable will be used for comparing the column’s value based on the specified operator.
- Custom Value: a value that is not validated by the query builder and is added directly to the query. It can be used to specify SQL functions or more complex expression.
- Literal: a value that is interpreted as a string or a number. Type in the literal value. The value will be enclosed in quotes automatically if it is a string. If the literal value represents a number, you will need to enclose it in quotes depending on the data type of the selected column. This option will compare the selected column’s value to the specified literal using the specified operator.
- Click OK to complete the condition.
- Using the above steps, you can define multiple conditions. These conditions can be combined using logical operators to further refine your search criteria. You can select AND or OR in the Boolean field to specify the logical operator.
- Test your query.
- To test the query, you can click the Preview Data button. This executes the query against the appropriate database. If the database tables contain data and if any records match the specified conditions, they will be displayed in the Query Results Preview pane. A message will also show the number of records returned as a result of the query.
- If you expect that the number of matching records will be large and want to preview a subset of returned data, click the Limit Rows check box and enter a numeric value to limit the number of returned results.
Note: The message will now show the number of records displayed rather than the actual number of matching records. The query results preview is shown in the Query Result pane.
- Click OK to save your query and update the DB Data block with the new query. If you click Cancel, all changes are discarded and no changes are made to the DB Data block.
Specifying Custom Queries
The DB Data block can use queries specified in a SQL (.sql) file in your Project instead of a query created using the Query Builder. To use a custom query:
- Create a .sql file in your db folder and specify the filename in the Query File property of the DB Data block. Make sure that the operation type is SQLScriptFile. Composer will read this file at runtime and use it to query the specified database.
The ability to use custom queries is useful in cases where the SQL query is already created using other tools, or if the query uses features not supported by the Visual Query Builder. The next topic describes limitations of the query builder.
Application Variables
You can use Application variables in custom query files as part of the SQL statement. To use a variable, include its name within curly braces without the AppState. prefix. For example, the following statement uses varname1 and varname2. Their values will be substituted at the time the DB Data block queries the database. SELECT name_of_function({varname1}, {varname2}) from dual Results of the query are stored in a variable as a two-dimensional JSON array. This data can then be accessed via a Looping Common Block or via scripting in the Assign or ECMAScript block. For example, if the database result set looks like this in tabular form:
| Vegetables | Animals |
| lettuce | chicken |
| broccoli | lion |
The JSON for the result will look like this: {"db_result":[["lettuce", "chicken"], ["broccoli", "lion"]],"db_result_columns":["vegetables", "animals"]} Note: An example of custom queries is in the Database Stocks Template application.
Stored Procedure Helper
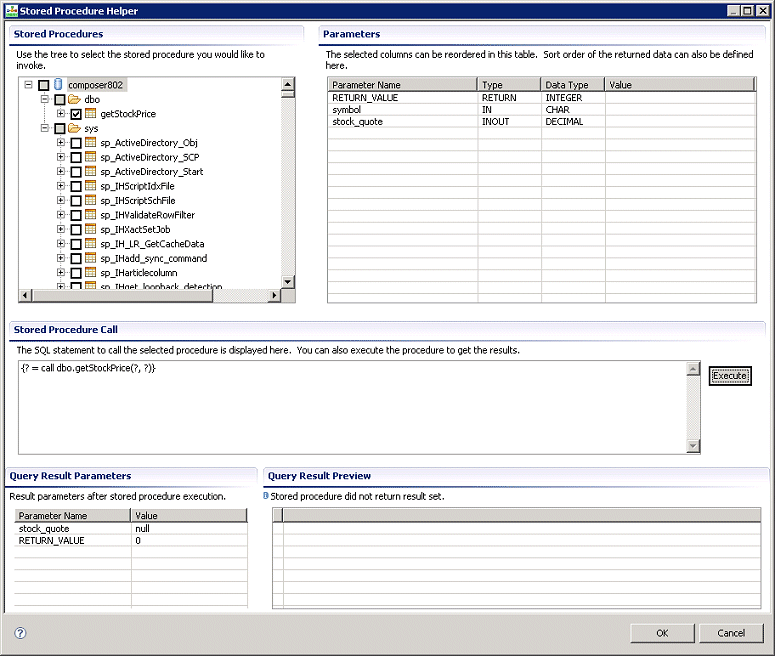
If you select StoredProcedure for the Query Type property in the DB Data Block, you can click the ![]() button on the property row to open the Stored Procedure Helper dialog box. Here you can select a stored procedure, execute it, and get query results. A completed example is shown below.
button on the property row to open the Stored Procedure Helper dialog box. Here you can select a stored procedure, execute it, and get query results. A completed example is shown below.
Setting up a Stored Procedure Call
The Stored Procedure Helper opens when Composer is successfully able to connect to the database specified in your connection profile. Any stored procedures in the database accessible from the specified user account are shown in hierarchical format in the Database Structure pane of the Stored Procedure Helper. To set up a stored procedure call:
- Specify which stored procedure should be executed.
- Select the stored procedure to execute by checking appropriate item in the Database Structure pane.
- Parameters and Return Value appear in the Parameters pane. Specify the value (application variable) for each of the parameter into which the output value is stored after the stored procedure has executed.
- To test the stored procedure, click the Execute button. This executes the stored procedure in the appropriate database. If the stored procedure returns any records, they are displayed in the Query Results Preview pane. Any output values are displayed in the Query Result Parameters pane. A message shows the number of records returned as a result of the query.
- Click OK to save your query and update the DB Data block with the new query. If you click Cancel, all changes are discarded and no changes are made to the DB Data block.
Note: Composer does not support the REF CURSOR return type in a stored procedure.
Password Encryption
Composer can now encrypt the database connection profile passwords so that they are not written in the clear to the connection.properties file.
Encryption Key
In order to enable encryption, you must first create an encryption key. Composer requires a 128-bit (16 bytes) key, in hex-encoded format. This can be randomly generated by the OpenSSL tool, using the following command line:
$ openssl rand -hex 16 75b8ec9a3ce60a21c4f94236a1b55fb2
Any random source will do. Another example is http://www.random.org/cgi-bin/randbyte?nbytes=16&format=h (With this example, you will have to remove the spaces in the output.)
Save the encryption key to a text file. Note that this file should be securely stored, so that it can only be read by the Composer process and the backend Tomcat/IIS processes.
Configuring Composer Preferences
In the Composer > Security preference page, set the Encryption Key Location preference to point to the encryption key file created in the previous step.
Encrypting the Database Connection Profile Password
In the Connection Profile Editor, next to the Password field, enable the Encrypt checkbox. Now, when you save the Connection Profile, the password will be scrambled in the connection.properties file.
Enabling Decryption in the Backend
When the application runs, the application server will need to be able to decrypt the password so that it can connect to the database. For this, the application needs to be configured with the location of the encryption key file.
Java Composer Projects
If it doesn't already exist, create the file WEB-INF/composer.properties inside the project. Inside the file, enter the following line:
composerEncryptionKey=C:\\secrets\\encryption-key.txt
(Note that the backslashes here must be escaped.)
.NET Composer Projects
Edit the web.config file's appSettings entry:
<appSettings>
   <add key="composerEncryptionKey" value="C:\secrets\encryption-key.txt" />
 ...
</appSettings>
(Backslashes here are fine.)
Limitations and Workarounds
The Query Builder supports creating SELECT statements. The following is a list of limitations along with suggested workarounds:
- INSERT, UPDATE, and DELETE statements cannot be created using the Query Builder. Advanced SQL features, such as outer joins, subqueries, and unions are also not supported. A custom query can be used to overcome these limitations.
- if you rename a DB Data block, its corresponding SQL statement file in the db folder will not be updated and will not be valid until you generate code again.
- For details on SQL datatypes supported by Composer, see Supported SQL Datatypes.
Oracle Client Setup for IIS
To set up an Oracle client for Internet Information Services:
- Install the Oracle client components on the application server.
- Create a tnsnames.ora file in the C:\oracle\ora81\network\ADMIN folder where C:\oracle is the installation folder of Oracle client components.
- Add the following lines to tnsnames.ora where COMPDB1 is any alias of choice, XYZ is the Oracle server, COMPOSER is the Service Name as configured on the Oracle listener (server). After doing this, you should be able to connect to Oracle using sqlplus user/pwd@COMPDB1 as the command at the command prompt.
COMPDB1 = (DESCRIPTION = (ADDRESS_LIST = (ADDRESS = (PROTOCOL = TCP)(HOST = XYZ.us.int.genesyslab.com)(PORT = 1521)) ) (CONNECT_DATA = (SERVICE_NAME = COMPOSER) ) )
- Create a System DSN using the Data Sources (ODBC) under Administrative Tools.
- Make sure that Data Source Name specified above is exactly same as the Database Name specified in the Composer database connection profile and TNS Service Name is the same as the alias in step 3.
- Click Test Connection in the database connection profile. The connection should be successful and the Composer VXML application should be able to connect to the database.
Steps 4, 5 and 6 can be avoided if the alias used in the tnsnames.ora file is same as the database name specified in Composer.
Working with Oracle 12c R2 from Composer .NET projects
Starting with release 8.1.450.20, Composer supports Oracle 12c R2. Perform the following steps to work with Oracle 12c R2 from Composer .NET projects:
- Download and install the Oracle 12c client. An Oracle 12c client is required to connect to an Oracle 12c database (the Oracle 12c client can be either 32-bit or 64-bit).
- Register the ORAOLEDB.ORACLE DLL file on the client machine as follows:
- Open the Command Prompt in administrator mode on the client machine.
- Browse to the Oracle Client installed path and identify the OraOLEDB12.dll file.
- Execute the command, C:\Windows\System32\regsvr32.exe OraOLEDB12.dll, to register the OraOLEDB12.dll file.
- Oracle 12c client bitness and IIS bitness configuration must match. Both must be either 32-bit or 64-bit.
- Navigate to IIS Manager > Application Pools.
- Click the advanced settings of the pool used by the project (usually DefaultAppPool).
- Use the Enable 32-bit Application option to adjust IIS bitness as required.

