
Contents
Workbench Installation - Windows - Primary Node
The Workbench installation files will be contained in the Genesys My Portal obtained downloaded compressed file.
Review this link for details on downloading Workbench: Downloading Workbench
- Workbench requires the installation of a Primary Node at each and every Data-Center.
- The Workbench Primary Node must be installed prior to installing Workbench Additional Nodes.
- Workbench ships with its own pre-bundled Java distribution, OpenJDK11; all Workbench components will be configured through the installation to use this Java distribution and should not affect any other components that may be installed on the host.
- The Workbench installation uses the Ant Installer component, if during the Workbench installation a Network Account install is selected, the Ant Installer prints the username and password details to the "ant.install.log" file. Genesys therefore recommends, post installation, at a minimum the "ant.install.log" file be manually edited and the password be masked/deleted.
- Use an Administrator level account when running the Workbench install.bat file.
- Genesys does not recommend installation of its components via Microsoft Remote Desktop
- If the Workbench installation is cancelled mid completion, please ensure the Workbench install directory is cleaned/purged prior to attempting another install
- Workbench uses the Hostname for component configuration
- Please ensure hostname resolution between Workbench and Engage Hosts is accurate and robust
- If the Workbench Hosts have multiple NIC's, please ensure the Hostname resolves to the desired IP Address prior to Workbench installation
Please use the following steps to install Workbench 9.x.xxx.xx.
- Extract the downloaded Workbench_9.x.xxx.xx_WINDOWS.zip compressed zip file.
- Navigate into the Workbench_9.x.xxx.xx_WINDOWS\ip\windows folder.
- Extract the Workbench_9.x.xxx.xx_Installer_Windows.zip compressed zip file.
- Navigate into the Workbench_9.x.xxx.xx_Installer_Windows folder.
- Open a Command/Powershell Console As Administrator and run install.bat.
- Click Next on the Genesys Care Workbench 9.x screen to start the Workbench installation.
- Review and if in agreement, click Accept to the Genesys Terms and Conditions to continue.
- Select New Installation on the Installation Mode screen
- Select the Installation Type
- The next Workbench Installation Type screen contains multiple Workbench installation options; Workbench contains multiple components:
- Workbench IO
- Workbench Agent
- Workbench Elasticsearch
- Workbench Kibana
- Workbench Logstash
- Workbench Heartbeat
- Workbench ZooKeeper.
- Select Primary Node (given we're installing the first, Primary, Workbench node/components).
- Next, choose between the Default or Custom installation type.
- For the Default type, the respective Workbench component default (including binaries, paths, config, ports etc) options will be used.
- Or, if required, you can change these default options (paths, config, ports etc) by selecting a Custom install.
- The next Workbench Installation Type screen contains multiple Workbench installation options; Workbench contains multiple components:
- The Workbench Primary Node installation must/will include ALL of the Workbench components above
- Therefore if/when Primary Node is selected, ALL mandatory Workbench Primary components above will be installed on the host.
- For High Availability (HA), you can install additional Workbench application nodes/components
- The installation of additional Workbench components has been covered in the section "Workbench Installation - Windows - Additional Node".
- Provide the Workbench Data-Center name (i.e. "EMEA" or "LATAM" or "Chicago" - do NOT use "default")
- Workbench Data-Centers is a logical concept to categorize and optimize the respective Workbench Hosts, Applications and ingested data for event distribution, visualization context and filtering purposes
- Each Workbench host, and the respective applications within that host, are assigned to a Data-Center, this is mandatory
- Note: The Data-Center name is case-sensitive, limited to a maximum of 10, Alphanumeric and underscore characters only.
- The next Base Workbench Properties screen provides basic information that is relevant to all Workbench components
- This is required irrespective of whether the installation is Primary or Additional and if Default or Custom was chosen.
- Provide the Workbench Home Location folder where Workbench components will be installed (i.e. "C:\Program Files\Workbench_9.x.xxx.xx").
- Review the network Hostname - this should be accessible/resolvable within the domain
- Based on the Planning/Sizing section, enter the Total number of Workbench Elasticsearch Nodes to be used by the Workbench solution.
- The default 3 Elasticsearch Node value is correct even if a 1 x Workbench stand-alone architecture is being deployed; this enables future expansion if/when needed.
- The next Primary Components To Be Installed screen lists the Workbench components that will be installed for the Primary Node
- ALL the Workbench components to be installed are selected by default, since these are mandatory
- The next PureEngage (PE) Configuration Server (CS) Settings screen relates to the Workbench to Genesys Engage integration:
- Provide the Genesys Engage Configuration Server Hostname/IP address
- Provide the Genesys Engage Configuration Server Port (i.e. 2020)
- Provide the Genesys Engage Workbench Server Application Name (i.e. "WB9IO")
- Provide the Genesys Engage Workbench Client Application Name (i.e. "WB9Client")
- The next Genesys Engage Solution Control Server and Message Server Settings screen enables selection of the Genesys Engage Solution Control Server (SCS) and Message Server (MS) applications to which Workbench will connect.
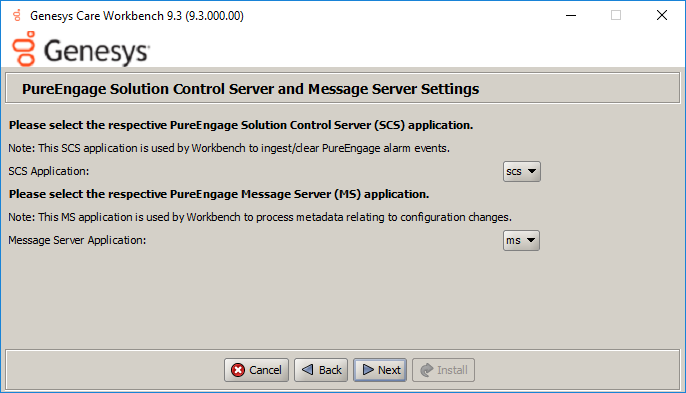
Select the relevant Genesys Engage SCS and MS applications, based on the associated Configuration Server from the previous screen, for Workbench to connect to and click Next. - The next Service Account Settings screen enables the selection of either System or Network Account.
The Workbench components are installed and executed as Services. Select either Local System Account or a Network Account; if Network Account is selected, provide the Username and Password to be used.

Once complete, click Next. - With all the workbench options now configured, press Install to start the Workbench installation process.


Once you’ve selected the appropriate options, click Next.

Once the Data-Center name has been entered, click Next.

Once all required information is added, click Next.

Press Next to continue.

Once complete, verify the settings, click Next.


When the Workbench installation completes the dialog below will be presented.

Click OK and Exit to close the installation dialogs.
Workbench Login
Navigate to http://<WORKBENCH_HOST>:8181 to login (Engage CME credentials) to Workbench.
On initial Workbench login you'll be presented with the Workbench "Home Dashboard".
- The <WORKBENCH_PORT> (default 8181) can be changed via the custom installation.
Workbench Primary Node/Host - Windows Services
The Workbench Primary Node/Host will contain the following Windows Services:
- Genesys Workbench.IO 9.x.xxx.xx
- Genesys Workbench Elasticsearch 9.x.xxx.xx
- Genesys Workbench ZooKeeper 9.x.xxx.xx
- Genesys Workbench Kibana 9.x.xxx.xx
- Genesys Workbench Logstash 9.x.xxx.xx
- Genesys Workbench Metricbeat 9.x.xxx.xx
- Genesys Workbench Agent 9.x.xxx.xx
- Genesys Workbench Heartbeat 9.x.xxx.xx
Stopping/Starting Workbench
To stop Workbench, stop the Workbench Services in this order:
- Genesys Workbench.IO 9.x.xxx.xx
- Genesys Workbench Kibana 9.x.xxx.xx
- Genesys Workbench Metricbeat 9.x.xxx.xx
- Genesys Workbench Elasticsearch 9.x.xxx.xx
- Genesys Workbench ZooKeeper 9.x.xxx.xx
- Genesys Workbench Agent 9.x.xxx.xx
- Genesys Workbench Logstash 9.x.xxx.xx
- Genesys Workbench Heartbeat 9.x.xxx.xx
To start Workbench, start the Workbench Services in this order.
- Genesys Workbench.IO 9.x.xxx.xx
- Genesys Workbench Elasticsearch 9.x.xxx.xx
- Genesys Workbench ZooKeeper 9.x.xxx.xx
- Genesys Workbench Kibana 9.x.xxx.xx
- Genesys Workbench Logstash 9.x.xxx.xx
- Genesys Workbench Metricbeat 9.x.xxx.xx
- Genesys Workbench Agent 9.x.xxx.xx
- Genesys Workbench Heartbeat 9.x.xxx.xx