Contents
Uninstalling AD
This section details the steps required to uninstall Workbench Anomaly Detection and all associated components.
Important
- Please note, this process will permanently remove any AD (and associated) Services and all files including data, logs, etc.
- If any data in the AD installation folder is required for archival purposes, please ensure it is saved at a separate location prior to running the AD uninstallation script(s).
- The process will leave the original configuration file generated for the settings used to install AD, which can be shared with Genesys Customer Care, if related to an installation issue.
- The complete process requires removing the AD application/host objects and configurations from Workbench as per instructions in the section "Removing Application Files from Windows Operating System" and "Removing Application Files from Linux Operating System", followed by removing the AD files as per instructions in the sections "Removing Application Objects through UI”.
Removing AD Application files from Windows Operating Systems
The following steps will allow you to uninstall AD in Windows.
- Browse to the AD home installation folder (e.g., "C:\Program Files\Workbench_AD_9.x.xxx.xx")
- Open a Command/Powershell Console as an Administrator from this location (ensure the current directory in the prompt is the one identified in step 1).
- Execute the uninstall.bat file.
- Remove any remaining files/folders from and including the AD home installation folder.
- This completes the AD Windows uninstallation process.
Removing AD Application files from Linux Operating Systems
The following steps will allow you to uninstall AD on Linux.
- Using a Linux Terminal, cd (change directory) to the AD home installation folder (e.g., /opt/Genesys/Workbench_AD_9.x.xxx.xx)
- Execute ./uninstall.sh as a user (not root) with Administrator permissions.
- Remove any remaining files/folders from and including the AD home installation folder.
- This completes the AD Linux uninstallation process.
Remove AD Application Objects
The instructions below apply to both Windows and Linux installations and are required to remove the configuration of the AD applications and the host where AD is installed.
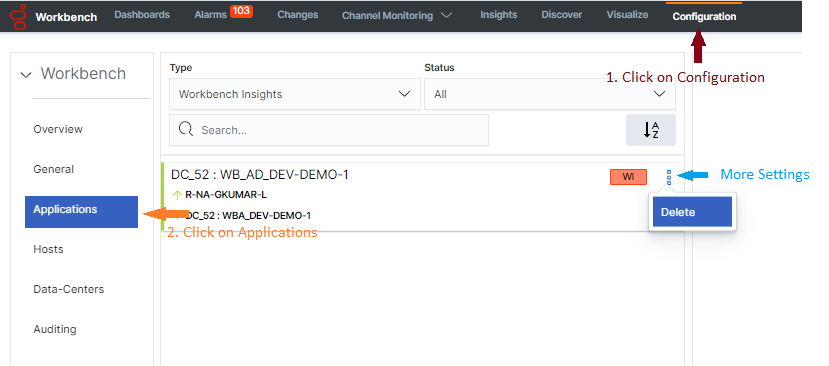
- Log into Workbench
- Via the top menu bar - navigate to Configuration
- Select Applications
- Identify the AD Application(s) to be deleted
*by scrolling through the list of all WB Applications
*or by filtering for "Workbench Insights" Objects - For each AD Application to be deleted, click the vertical ellipsis icon to the right of the AD application, then click on Delete
- Check the Impact(s) Understood and Accepted checkbox
- Click Delete if you wish to continue and the selected AD Application Object and associated configuration data will be permanently deleted
Removing the AD Host(s)
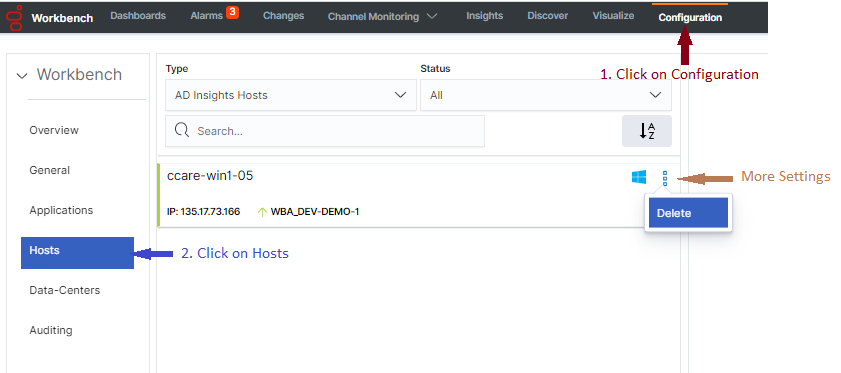
- Log into Workbench
- Via the top menu bar - navigate to Configuration
- Select Hosts
- Identify the AD Host(s) to be deleted
*by scrolling through the list of all WB Hosts
*or by filtering for "AD Insights Hosts" Objects - For each AD Host to be deleted, click the vertical ellipsis icon to the right of the AD Host, then click on Delete
- Check the Impact(s) Understood and Accepted checkbox
- Click Delete if you wish to continue and the selected AD Host Object and associated configuration data will be permanently deleted
This page was last edited on December 24, 2021, at 18:27.
Comments or questions about this documentation? Contact us for support!


