CM - Add a New Call Flow
Channel Monitoring (CM) Call Flows are the primary templates for testing voice call routing, be that a simple call to a SIP DN or a call that navigates through an IVR with DFMT and speech recognition functionality and finaling connecting to a contact centre agent.
A Channel Monitoring Call Flow defines the different Stages in which a call will execute against the system that is being tested.
- Select Channel Monitoring > Call Flows from the Workbench top navigation bar.
- The Call Flow Summary page is presented
- Click the Add Call Flow button above the Call Flow data-table list to create a new Call Flow.
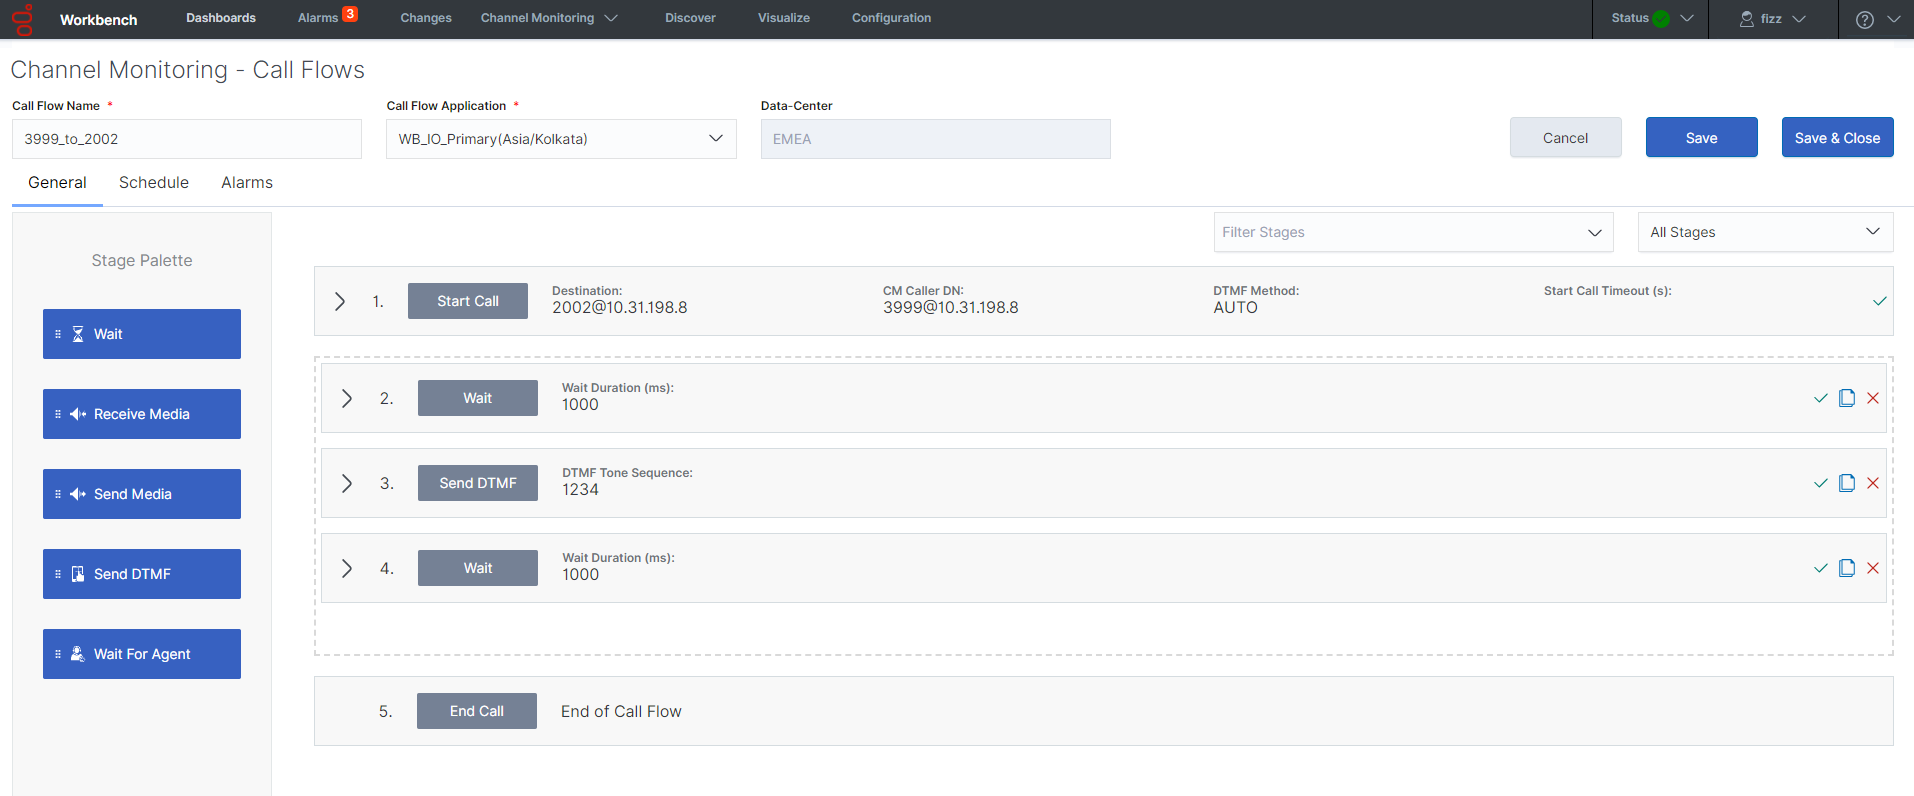
- The Channel Monitoring - Call Flows Edit page will be displayed; see example screen below
- Enter a unique name in the Call Flow Name field - i.e. "TEST_2999_to_RP_8001" - to optimize sorting use either upper or lower case but avoid using both
- Select the Call Flow Application from the dropdown list - i.e. "WB_IO_Primary"
- This is the Workbench IO application that will initiate the CM test calls
- The Data-Center field will be auto populated based on the Data-Center of the WB IO application
- The mandatory Start Call and End Call Stages are pre-populated in the Call Flow Stages list
Building the Call Flow
- To build a Call Flow that will test your specific routing requirement, simply drag and drop a Stage from the Stage Palette on the left into the Call Flow Stages list window.
- From within the Call Flow Stages list, click on a specific Stage to expand, display and edit it's properties; see the Send DTMF Stage example above.
- Call Stages can be reordered within the list by dragging them up/down to the desired location.
- Please see CM - Call Flow Stages section for the description and usage of each call stage.
- Perform the necessary Call Flow modifications to match the desired test of your call routing.
- Click the Save or Save & Close button.
Call Flow Edit Functionality
- The Cancel button cancels Call Flow Edit mode and redirects back to the Channel Monitoring Call Flow Summary page
- The Save button saves the current configuration and the user remains in edit mode
- The Save & Close button saves the current configuration and redirects the user back to the Channel Monitoring Call Flow Summary page
- The Green Tick icon on the Stage row indicates this Stage has been fully configured
- The Note with Pencil icon on the Stage row indicates this Stage has NOT been fully configured
- As such this Call Flow will have a Draft State as opposed to a Ready State
- The Copy icon on the Stage row copies (below) this Stage
- The Red Delete icon on the Stage row deletes this Stage
Important
- Every Call Flow requires it's own dedicated SIP Server DN.
- For example if you plan to test 5 x Genesys SIP/GVP call flows then you will need 5 x SIP Server DN's for the Channel Monitoring Start Call Stage and it's associated Caller User property.
This page was last edited on December 24, 2020, at 17:38.
Comments or questions about this documentation? Contact us for support!

