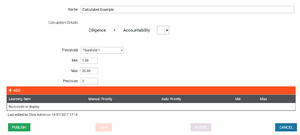
New Calculated Data Form
To create a new Calculated Data, click the ‘+ New Calculated Data’ at the top of the table of Calculated Data. The form includes a name field (a value must be provided for this field) and a section for calculation details. The calculation details section initially includes a drop-down control.
It is possible to either type numbers/operators/KPI names into this control directly or use the down arrow to view and select the available options. Clicking the down arrow will display available operands, brackets, and KPIs. Pressing the space bar will create the first element of the formula based on what was entered/selected and set the cursor focus to a new dropdown control to the right of the first element. Once you’ve created multiple elements, it is possible to edit them by double-clicking to move the focus to the element and enable the drop-down control.
Below the calculation, you can select an optional Threshold to apply to this calculation. You must also select an aggregation method from the list (the default is Average) and provide the minimum (Min) and maximum (Max) values that will be considered for reporting purposes. The Precision value determines how many decimal places will be used when displaying the results of this calculation.
The Learning Items grid allows you to add Learning Items to the learning calculated data, and clicking Add will allow you to add a new one.
It is possible to add any number of learning items. The Manual Priority is which order you would like the learning items to be assigned, Auto Priority is not currently used at the moment, and Min and Max determine when the learning item will be assigned.
The bottom of the page includes Publish, Save, Revert and Cancel buttons. The Publish button immediately saves and publishes the formula. The Save button saves the currently specified formula so that it is available for editing in the future. It is possible to save a rule that is syntactically invalid. The publish button, however, is only enabled if the formula is valid (i.e. valid syntax). If you open an existing formula, make changes, then click the Revert button, the formula will be changed back to the last previously saved state. Clicking the Cancel button undoes all changes made to the formula if it is an existing formula or cancels the creation of a new formula.
Once a formula is published it will be added to the queue of formulas that require processing. Users will have a value for the Calculated Data once the formula has been processed. Editing a published formula will display the published version of the formula at the top of the screen, with the editable version below it.
Notes:
- Only Published Calculated Data can be added to DNA strands.
- Published Calculated Data cannot be deleted.
- Once a Calculated Data has been published, it can still be edited; however, it must then be re-published for the changes to take effect.


