Configuring GIS Authentication
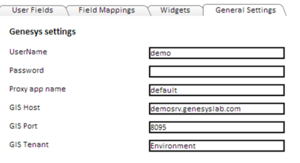
In Performance DNA, open the System Settings page and select the General Settings tab. Here, you’ll see the settings you need to configure GIS integration.
Note that these options are not visible until you’ve made the database change mentioned previously.
The GIS tenant will vary depending on your installation, but for a single tenant GIS it should be Environment.
Typically the proxy app name can be left as default.
The user name and password provided here are only used for the Skills Route part of the application. If Performance DNA is configured to use GIS as an authentication source, the username and password of the user who is logging in is used instead of these values.
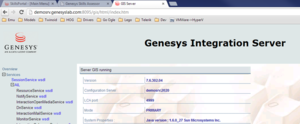
The GIS host and GIS port can be found by launching the status page from the Genesys server, and checking the URL – the port will be shown as a number after a colon following the host name. The Status Page should be accessible in the Start menu in Genesys Solutions > Genesys Integration Server > SOAP > Status Page (or OS equivalent).
In the example, the host is demosrv.genesyslab.com and the port is 8095.
Save the changes once you’ve completed all the fields.
The “Update Routing Skills” page in the Administration > DNA menu should now work as per the documentation.


