Adding Text to a certificate
Click the text icon from the toolbox. This is the first icon as shown in the diagram above. Clicking this icon will add a new next box into the top left-hand corner of the screen.
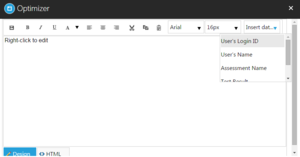
Right click the text as shown and you will be presented with a menu to edit the item.
Select Edit Item and you will have the ability to edit the text in the box.
You can then use the text editing tools as normal such as Bold, Italic and Underline as well as change the font sizes and colors etc.
If you wish to add elements of dynamic text, such as the name of the Assessment or User, this can be selected from the Insert data field dropdown box, as per the example above. This will create an area for this information to be included wherever the cursor was positioned within the text box.
Once you are satisfied with your text press the
icon. This will add your text to the certificate. In most cases you will need to resize the box to accommodate your text. To do this, click the right hand corner of the text box (the icon will change to a double pointed arrow). You can drag to resize.
To move your text, place your mouse pointer over the text box, click, and you can drag it around the screen.
Remember to ensure your text box is large enough to accommodate any dynamic text that will be entered such as a user’s full name or the name of an assessment.
Use the save icon within the tool box (1st icon) to regularly save your certificate. If any items such as text or images are outside the boundaries of the page these will be brought back into alignment automatically to ensure they fit the page.
You can add multiple text boxes within your certificate.

