Locales
Contents
A locale defines a language and region identifier that you want to work with. Composer lets you define default, active, and custom locales during Project creation or through the Project properties. The locales defined in each Composer project can be used in callflow diagrams, workflow diagrams, and Grammar Builder. When using Grammer Builder, you specify locales, which are the languages that a grammar file will support. The Grammar builder wizard uses the active locales for the Composer Project. Callflow diagrams use the default locale selection for the following Entry block variables:
- APP_LANGUAGE
- ASR_LANGUAGE
Workflow diagrams use the default locale selection for the following Entry block variable:
- system.Language
Changing Locales at the Project Level
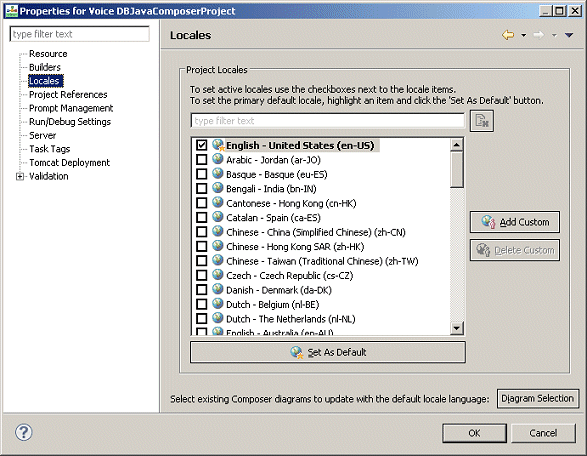
The Project locales may be changed at the Project Properties at any time.
- In the Project Explorer, right-click the Composer Project and select Properties.
- Select the Locales section.
- Enable the check boxes to set active locales for the Project.
- To set the default locale, select the row and click Set as Default.
Changing the Default Locale
To set the default locale, highlight the row in the Project Locales list and click Set as Default. Any new callflows or workflows will inherit this new default locale. You may optionally update existing callflow and workflow Entry block language variables to the desired default language. The callflow/workflow language variables (APP_LANGUAGE and ASR_APP_LANGUAGE/system.Language) will be updated.
- After selecting the default locale language, select the box Select existing Composer diagrams with the default locale language.
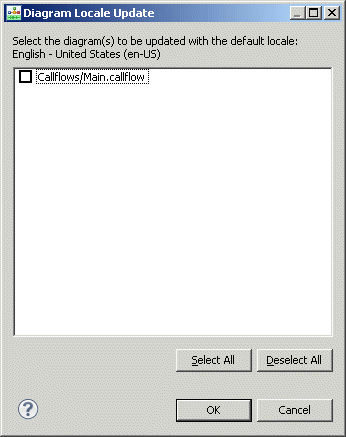
- Click OK. The Diagram Locale Update dialog box opens.
- Select the diagrams to be updated with the default locale language.
- Click OK.
Locales Supported
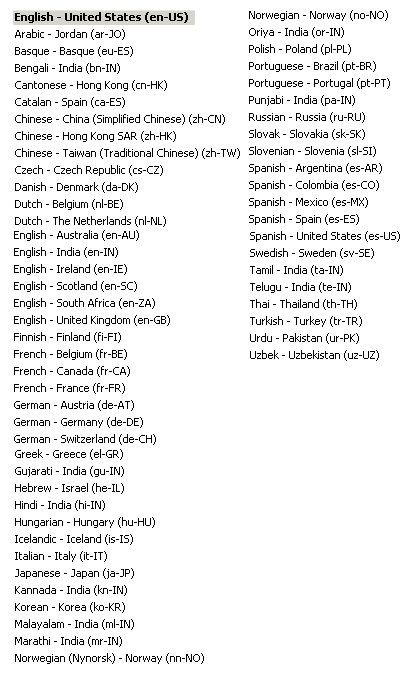
The Locales dialog box lists the following locales for selection:
Defining Custom Locales
There are two methods to define locales not already pre-defined in Composer:
- When creating a new Project via the New Composer Project wizard. Select File > New > Java Composer Project or File > New > .NET Composer Project. The Define Composer Project Locales page appears after the option to select a template. Click Add Custom to open the Add Custom Locale dialog box shown below.
- For an existing Project, right-click the Composer Project in the Project Explorer, select Properties, select the Locales, and then click Add Custom. This opens the Add Custom Locale dialog box shown below.
- Enter the Language Name.
- Enter the Country/Region Name.
- Enter the Locale ID by specify the two-letter language codes. Examples:
- en-IN (which represents English-India)
- en-SC (which represents English-Scottish
- en-IE (which represents English-Irish))
- Click OK. After clicking OK, the custom locale is listed for selection on the Locales properties page. Adding a custom locale also activates the Delete Custom Locale button on that page.
- Create the processing logic. See Processing Prompts Other Than en-US.
Locales Other than United States
When Composer is first installed, the default locale is set to English (en-US). Composer bundles a sample set of prompt file resources specifically for en-US, which is located in the following Composer Project directory ../Resources/Prompts/en-US/ The prompt audio resources located in this directory are used when processing a prompt. such as a prompt for a date/time, and so on. Composer provides the business logic to process prompts for locale United States -- English (en-US). This file is located in the Composer project location: ../Resources/Prompts/en-US/en-US.js
Processing Prompts Other Than en-US
When using locales other than en-US in a callflow application, you must define your own prompt business logic. Certain steps are needed to ensure that the prompts will process correctly. The steps are as follows:
- Under each locale directory (../Resources/Prompts/<locale>/), create a JavaScript locales file with the locale’s ID as its file name. A sample locale template JavaScript file is provided with instructions located under the Composer Project: ../Resources/Prompts/xx-XX.js.For example:..Resources/Prompts/es-MX/es-MX.js
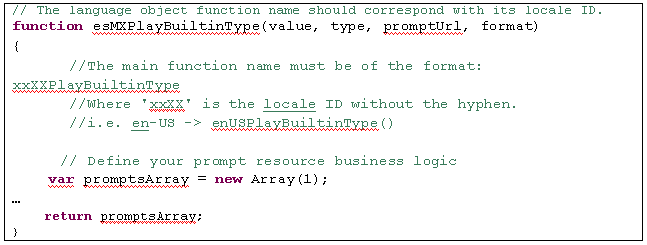
- Define the contents of the locale file created in previous step:
The function name must be of format xxXXPlayBuiltinType, where xxXX is the locale ID without the hyphen; for example: es-MX = esMPlayBuiltinType
In the PlayBuiltinType function, define the business logic for processing the prompt for that particular locale.
 Note: When declaring other functions in the JavaScript locale file, the function names must not duplicate the function names in other JavaScript locale files. Composer recommends pre-pending the locale ID to the function names, i.e., for locale es-MX use esMXMyFunctionName).
Developing Multi-Lingual Applications
This section provides information on how you can build multilingual applications in Composer. How Can I Work with Multiple Languages in a Composer Project? A Composer Project has a working set of active language locales that maybe used in an application. These language locales can essentially be used within a Composer application. You may set the Project locales in two ways.
- During the creation of a Composer Project, the new Composer Project wizard lets you select the default and active locales within the Project.
- Once a Composer Project is created, you may also modify the working set of language locales through the Project properties under the Locales section.
How Can I Change the Language for an Application at Runtime? For a multilingual application, if the application needs to change the language for the prompts and grammars based on your input or other settings, use the following steps:
- On the callflow diagram, the Entry block variables property will contain the variable APP LANGUAGE . Set the value of this variable to the correct TTS language value.
- Place the appropriate blocks and links on the diagram. To switch to another language in the callflow, use the Set Language block.
- The blocks subsequent to the Set Language block will then be of the switched language. When using Prompt blocks, the prompt resources located in the appropriate language locale directory will be used. For example:
- United States -- English (en-US) will use resources from ../Resources/Prompts/en-US/
- France -- French (fr-FR) will use resources from ../Resources/Prompts/fr-FR/
If you are using a TTS engine and/or an ASR engine, you must have the language packs for the TTS vendor and/or the ASR vendor installed on the TTS and/or ASR servers. Why does my application fail to play prompts of different locales? When Composer is first installed, the default locale is set to English (en-US). Composer provides the business logic to process prompts for en-US. In a callflow application, when using locales other than en-US, some steps are needed to ensure that the prompts will process correctly. See the Using Non-U.S. Locales below for more information.
Multi-Lingual Application Prompts
You can create applications that play a prompt type resource in one language (for example: ../Resource/Prompts/en-US/), switch the language using Set Language block, then play another prompt type resource using a different language (for example: .../Resource/Prompts/es-MX/). Multi-Lingual Application Prompts Using Composer 8.0.4 and Later To create a multi-lingual application prompts:
- Create a multilingual callflow diagram where the language is being switched using the Set Language block and the prompts are set accordingly.
- Generate the code for the callflow diagram file. The VXML is generated.
- Under each locale directory (..Resources/Prompts/<locale>/), create a JavaScript locales file with the locale’s ID as its file name. Use the template locales file provided in the Project Explorer (..Resources/Prompts/xx-XX.js) and follow its instructions about creating the corresponding locales .js file; for example: ..Resources/Prompts/es-MX/es-MX.js
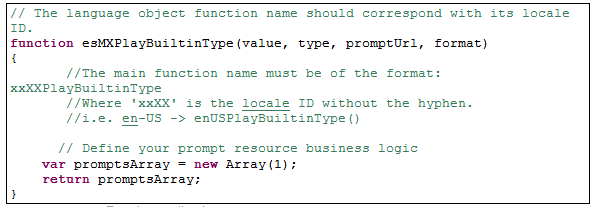
- In the prompts locale file, created in previous step, implement the following content:
- Create the language object function. The function name must be of format ‘xxXXPlayBuiltinType’, where ‘xxXX’ is the locale ID without the hyphen. For example: es-MX -> esMXPlayBuiltinType
- In the language object function, implement the main function as shown below and define the business logic for processing the prompt.
- Run the application
Using 8.0.3 or Older Composer Projects To upgrade an existing multi-lingual application with the en-US locale:
- In the Project Explorer, right-click the Project and select Upgrade to Composer 8.1.
- (Optional) If you have previously modified PlayBuiltinType.js, copy over any changes. The resource ‘../Resources/Prompts/en-US/PlayBuiltinType.js’ has already been upgraded. Previous Composer Project files are archived in the archive folder during an upgrade.
- Under each locale directory ‘..Resources/Prompts/<locale>/’, create a JavaScript locales file with the locale’s ID as its file name. Use the locales template file provided in the Project Explorer (..Resources/Prompts/xx-XX.js). Follow its instructions about creating the corresponding locales .js file; for example: ..Resources/Prompts/es-MX/es-MX.js
- In the prompts locale file created in previous step, implement the following content:
- Create the language object function. The function name must be of format ‘xxXXPlayBuiltinType’, where ‘xxXX’ is the locale ID without the hyphen. For example: es-MX -> esMXPlayBuiltinType
- In the language object function, implement the main function as shown as shown above in step 4.b. for Composer 8.0.4 and Later and define the business logic for processing the prompt.
Non en-US Locales
To upgrade an existing multi-lingual application with non en-US locales:
- In the Project Explorer, right-click the Project and select Upgrade to Composer 8.0.4.
- Under each locale directory ‘..Resources/Prompts/<locale>/’, create a JavaScript locales file with the locale’s ID as its file name. Use the template locales file provided in the Project Explorer (..Resources/Prompts/xx-XX.js) and follow its instructions about creating the corresponding locales .js file; for example: ..Resources/Prompts/es-MX/es-MX.js
- In the prompts locale file created in the previous step, implement the following content:
- Create the language object function. The function name must be of format ‘xxXXPlayBuiltinType’, where ‘xxXX’ is the locale ID without the hyphen. For example: es-MX -> esMXPlayBuiltinType
- In the language object function, implement the main function with the business logic for processing the prompt inline.

