Creating the IPD
Contents
Note: Composer automatically creates a default IPD as part of new Project creation. You can also create an IPD on demand using the main toolbar button. This topic presents typical high-level steps for creating:
Notes:
- IPDs are not stored in Configuration Server. Your Workspace (Interaction Processes folder in Project Explorer) is the only location where these diagrams exist (and, of course, in source control if enabled).
- If a Composer Project contains a folder at include/user, then any files with extension .js will be included in the generated SCXML. This allows you to write custom ECMAScript and include it in the application.
Creating IPDs for Voice Workflows
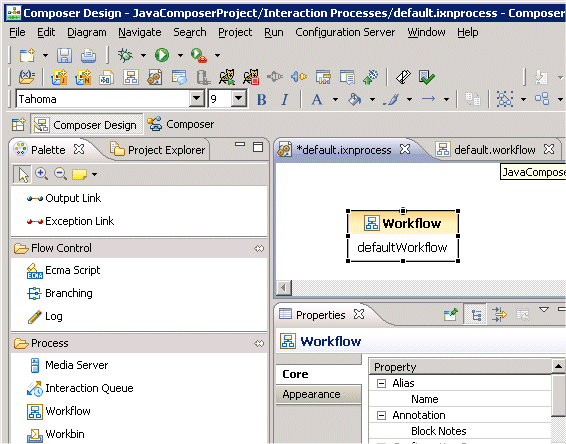
An IPD for a voice workflow contains a single Workflow block. After creating a new Project (which automatically creates an IPD with a Workflow block), the typical high level steps are as follows:
- Click the default.ixprocess tab on the canvas that will contain the IPD.
Note: You can change the name of an interaction process diagram file by right-clicking the file name in the Project Explorer and selecting Rename. This brings up a preview dialog. After accepting the change, the default.ixprocess tab reflects the name change.
- Double-click the Workflow block to display its properties in the Properties tab below.
- Opposite Resource, click under Value to display the
 button.
 - Click the
 button to open the Select Resource dialog box and select the empty workflow diagram. If you have not changed the name, this will be default.workflow.
Note: There is no need for a Media Server block or an Interaction Queue block when creating an IPD for a voice workflow.
- Click the default.workflow tab on the canvas as shown above and use the designer to develop your workflow diagram. This includes saving and validating. For more information on developing a workflow, see the Example Diagram section in the Creating a New Workflow topic.
- Validate the code and Publish your IPD diagram.
- Generate the code by selectingDiagram > Generate Code, or by clicking the Generate Code icon on the upper-right of the Composer main window when the canvas is selected. Check the Problems tab for errors and fix any problems. If code generation succeeds, click OK at the confirmation dialog box. The SCXML code is generated in the src-gen folder. The generated file name in the src-gen folder will follow the format:
<ipd_diagram_name>_<workflow_block_name>.scxml Note: One file per voice/interaction-less (see Interaction ID) workflow block will be generated.
Note: Composer Diagram Preferences includes the following:
- Prompt to Save before Publishing Interaction Process Diagram.
- Prompt to delete Published objects when Interaction Process Diagram is deleted.
Creating IPDs for Multimedia Workflows
After creating a new Project (which automatically creates an IPD with a Workflow block), the typical high level steps for creating an IPD for multimedia interactions are as follows:
- Click the default.ixprocess tab on the canvas that will contain the IPD.
- Add a Media Server block that has at least one Endpoint defined to the canvas by double-clicking or dragging and dropping. Configure the Media Server block properties in the Properties view.
- Add an Interaction Queue block to the canvas by double-clicking or dragging and dropping. Configure the Interaction Queue block properties in the Properties view. This includes defining at least one interaction queue view.
- Connect the Media Server Endpoint to the Interaction Queue block.
- Click the default.workflow tab and use the designer to develop your workflow diagram.
- Click the default.ixprocess tab and open the Workflow block. Use the Resource property to point the workflow diagram you just developed.
- Connect the view from the Interaction Queue block to the Workflow block.
The subsequent steps of adding additional blocks to complete the IPD or linking IPDs with workflows are user-defined and reflect your company's business logic. This includes saving and validating. For example, you may choose to continue processing interactions in this IPD by repeating the process of sending interactions from workflows back to queues, using views to extract the interactions, and then sending the interactions for further specialized processing by other workflows.
- Validate the code and Publish your IPD diagram.
- Generate the code for the IPD and workflow diagram All generated files go into the src-gen folder of the Project.
- Click the tab on the canvas that contains the IPD and generate the code. The generated file name in the src-gen folder will follow the format: <ipd_diagram_name>_<interactionqueue_block_name>.scxml
Note: One file will be generated for each interaction queue. Functionally these files will be equivalent. Generating one file per queue makes it easier to configure the application URL manually. As the developer, you will know the interaction queue you have submitted the interaction to and therefore can easily identify the correct SCXML page.
Manually execute any other configuration steps in Configuration Server using Genesys Administrator or Configuration Manager. For example, you must hook up your mailbox to send e-mails to the new end point defined in your e-mail server.
Generated Files
Multiple top level SCXML files are generated, one for each Interaction Queue connected to the Media Server block Endpoints. This allows different start states and different sessions for different interactions pulled from different Interaction Queues connected to the media servers. File names for the generated files use the following format:
- For IPDs that do not contain Interaction Queue blocks: IPD_<ipdname>_<Workflow block name>.scxml
- For IPDs that use interaction queues: IPD_<ipdname>_<InteractionQueue block name>.scxml
Each top level SCXML file for an IPD includes:
- All workflows (generated SCXML files) referred to by the Workflow blocks in the IPD.
- All workflows (generated SCXML files) referred to indirectly via Interaction Queues in other IPD’s.
The SCXML file inclusion in the top-level document is done using <xi:include>. The workflow file name without the .scxml extension is used for the _prefix attribute.

