Entry Block and Variables
Contents
- 1 Entry Block and Variables
- 1.1 Name Property
- 1.2 Block Notes Property
- 1.3 Exceptions Property
- 1.4 Variables Property
- 1.5 Restore System Variables Default Values
- 1.6 Defining Variables
- 1.7 Condition Property
- 1.8 Logging Details Property
- 1.9 Log Level Property
- 1.10 Enable Status Property
- 1.11 ORS Extensions Property
- 1.12 Refactoring Variables
Use the Entry block to:
- Set global error (exception) handlers.
- Define global variables for the workflow.
All workflow and callflow diagrams must start with an Entry block, which cannot have any incoming connections. There are different Entry blocks for routing workflows and voice callflows. The Entry block is used as the entry point for a main workflow or subworkflow (subroutine). Composer throws a validation message if the Entry block is missing or more than one is added.
The Entry block defines the initial entry state for interactions, all global state variables, and the datamodel. In the SCXML code for the workflow, all subsequent blocks are added as child states inside the Entry block’s state. This allows the event handlers in the Entry block to act as global event handlers for the entire workflow. Any events not caught at the local level (for individual blocks) are caught at the global level by the Event handlers in the Entry block.
The Entry block global variables define the State for the application and are maintained as the <datamodel> in the SCXML engine. The Back End block provides a Pass State property to pass state information to the Server side.
An Entry block user-defined variable can be used to access the results of a Stored Procedure call specified in a DB Data block for both voice and routing applications.
Note: Outlinks starting from the Entry block cannot be renamed or assigned a name through the Properties view.
The Entry block has the following properties:
Name Property
Find this property's details under Common Properties.
Block Notes Property
Find this property's details under Common Properties.
Exceptions Property
Use this property to define which exceptions or events to handle at the Entry block. This block contributes a state in the generated SCXML code that is a parent state for all blocks in a Workflow. This allows an event received for any of the workflow blocks to be handled at the Entry block.
- Click opposite Exceptions under Value. This brings up the
 button.
 - Click the
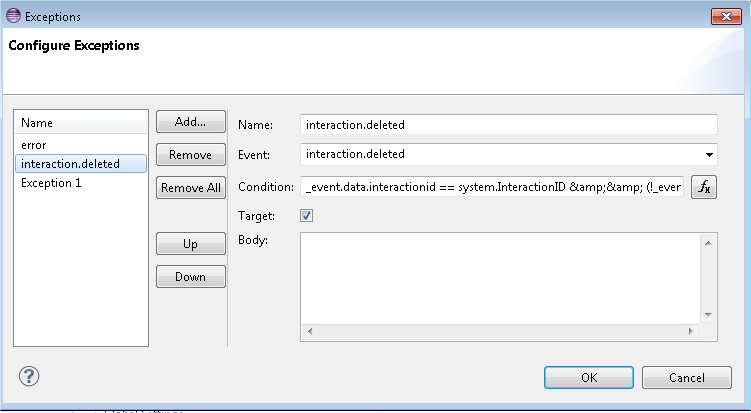
 button to bring up the Exceptions dialog box. The sample below shows the dialog with with the interaction.deleted event selected.
Starting with 8.1.410.14, a resultof guard condition check is now made when processing eServices/child interactions. The Entry block interaction.deleted event handlers are updated with the following guard conditions:
- Current interaction deletion.
- The interaction.deleted event is from an interaction deletion and not from a detach operation.
_event.data.interactionid == system.InteractionID && (!_event.data.resultof || _event.data.resultof == 'deletion')
- Click Add to add new exceptions to the list of handled exceptions.
- For each exception, specify a unique name and an exception event. Also see handling eServices Switchovers.
- Name--Composer uses the name of the exception to label the outport.
- Event--Use to select the specific exception event.
- Condition--The guard condition for this exception, which you define in Expression Builder. The exception is selected only if the condition evaluates to true.
- Target--If true, an exception port is created and the user can connect it to the block this exception will transition to when it is executed. If false, the exception will not cause a change in the state configuration when it is executed. The executable content contained in the exception will still be executed, so the exception will function as a simple exception event handler.
- Body--(optional) Executable scxml code that will be executed when this event is received and any specified condition evaluates to true. This code is executed before any other blocks that are connected as this exception's event handlers.
- When done with the dialog box, click OK.
You can also find general information on the Exceptions property under Common Properties.
Variables Property
You have the option of defining application variables in the Entry block (Application variables can also be defined outside the Entry block via the toolbar). Variable descriptions entered in the Entry block are visible when selecting the variable for use in other blocks, such as the Assign block. Composer supports passing variables between a workflow and sub-workflow. To view variables:
- In the Properties tab, click opposite Variables under Value to display the
 button.
 - Select Project, System, or User Variables.
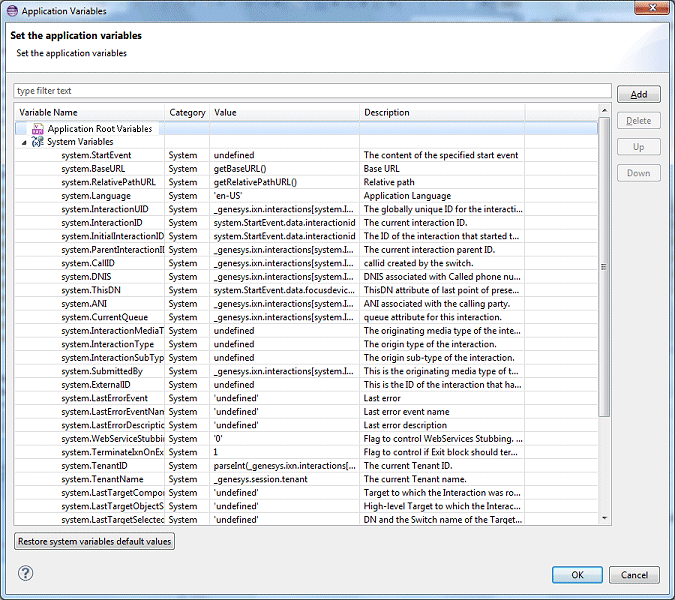
- Click the arrow to display the selected type. An example System Variables dialog box is shown below.

The Entry block lists all the variables associated with the workflow.
Composer supports the following types of variables for workflow diagrams in the Entry block:
- Predefined system variables, which cannot be edited or deleted, but applications can modify their values.
- Project variables local to the diagram file.
- Input variables, which are only used for Subroutines. These are user-defined and should be passed from the main diagram to the called Subroutine diagram file.
Starting with 8.1.410.14 you can:
- Invoke the Entry Block variables dialog when a property is selected in the Properties view using ALT+V.
- Enable Composer to automatically declare variables in a Main callflow to match input/output variable names in Sub-callflows and automatically perform the mapping. For more information, see the auto synchronization option in Diagram Preferences.
Also see:
- The DB Data Common Block, Column Names and Records Variable properties.
- The User Data Block, Variable Naming section.
Restore System Variables Default Values
Projects created in earlier versions of Composer may throw runtime errors due to incorrectly initialized system variables after upgrading to Composer 8.1.3. This was due to changes in how system variables are stored and handled in 8.1.3. To resolve this, the Entry block Variables dialog contains a button to restore system variables to default values. This can be used to reset variables and fix initialization. However, this also removes any custom values set in system variables. After resetting system variables, these custom values will need to be set again.
When upgrading to 8.1.4+ versions from prior 8.1.300.58 versions, make sure the workflow diagram Entry Block System variables have the latest default values. If not, workflow diagram file validation generates a warning message in the Problems view: System variables have non-default values. To restore the System variables to Composer-supplied default values, open the Entry Block > Variables dialog and use the Restore system variables default values button to reset the system variables.
Defining Variables
Important! When defining a variable name, the name:
- Must not start with a number or underscore.
- May consist of letters, numbers, or underscores.
When you define and initialize a variable that is expected to be played as a date later on in the workflow, define the value using the following format: yyyyymmdd. Example: MyDate=20090618. You must use this format; Composer does not perform any conversions in this case. When you define and initialize a variable that is expected to be played as a time later on in the workflow, define a 12 hour-based value using the following format: hhmmssa or hhmmssp. Examples: MyTime=115900a or MyTime=063700p. Define a 24 hour-based value using the following format: hhmmssh Example: MyTime=192000h. You must use this format; Composer does not perform any conversions in this case. Default Application Variables See the Variables: Project and Workflow topic. Adding a New Variable To add a new variable in the Application Variables dialog box:
- Click Add. Composer add a row for variable and generates a temporary name and number; for example: var7.
- Select the row and supply the Name, Type, Value, and Description fields.
- Click OK.
Variable Name You can use the Variable name field for either of the following purposes:
- To enter the name of a new variable.
- To change the name of an existing variable. To do this, select an existing variable from the list of variables. The variable's name appears in the Variable box, and you can the change its value in the Value box.
Excluded Characters The Variable name field will not accept the following special characters:
- less-than sign (<)
- greater-than sign (>)
- double quotation mark ()
- apostrophe (‘)
- asterisk (*)
- ampersand (&)
- pound (#)
- percentage (%)
- semi colon (;)
- question mark (?)
- period (.)
- all characters that are considered ECMAscript operators; example: "-"
The variable Value field will not accept the following special characters:
- less-than sign (<)
- greater-than sign (>)
- double quotation mark ()
- apostrophe (‘)
- ampersand (&)
- plus sign (+)
- minus sign (-)
- asterisk (*)
- percentage (%)
Condition Property
Find this property's details under Common Properties.
Logging Details Property
Find this property's details under Common Properties.
Log Level Property
Find this property's details under Common Properties.
Enable Status Property
Find this property's details under Common Properties.
ORS Extensions Property
Starting with 8.1.4, Composer blocks used to build routing applications (with the exception of the Disconnect and EndParallel blocks) add a new ORS Extensions property.
Refactoring Variables
Starting with Composer 8.1.450.33, when you rename a variable in the Entry block's Application Variables dialog and click OK, a new refactoring dialog is displayed as follows:
The refactoring dialog displays the other impacted instances of the variable you are renaming. Previously, when a variable was refactored, Composer displayed validation error messages to notify users to change the variable name in other impacted blocks, only when the particular diagram was validated. This new feature allows users to select variables to be refactored in the different impacted blocks of a diagram when they rename any variable in the Entry block.
- Select the instances that you want to refactor and click OK. The selected variables are refactored. If you close the refactoring dialog before the process completes, the operation is cancelled.
- Once the process is completed, a confirmation dialog is displayed.
- If any errors are encountered during the process, a dialog listing the exceptions is displayed. You can revert any changes using the Revert option on this dialog.
Note: For variables that you do not select from the refactoring dialog, Composer generates validation error messages (after diagram validation) to notify users to manually change those variables' names in the impacted blocks.
The following objects are not considered while refactoring:
- VXML Form Block (in Callflows)
- SCXML State Block (in Workflows)
- ECMA Script Block (in Workflows)
- Script Block (in Callflows)
- Project Variables in Workflow Diagrams
- Root Document Variables in Callfow Diagrams

