
Interaction Queue Views
Contents
This topic applies to the Views property for the Interaction Queue Block and Workbin Block topics. Views contain parameters used when pulling interactions from queues and workbins for submittal to all workflows for further processing.
Notes:
|
Multiple Views Per Queue
You can create multiple views per queue, with each view managing submission of an interaction to a separate routing workflow. Composer creates a dedicated output port on the Interaction Queue block for each view defined in the block. You can connect multiple workflows to the same view. Flow Control blocks are available.
Defining Views
You are required to create at least one view. To define a view: From the Views property in the Interaction Queue or Workbin block:
- Click under Value to display the
 button.
- Click the button to open the View Properties dialog box.
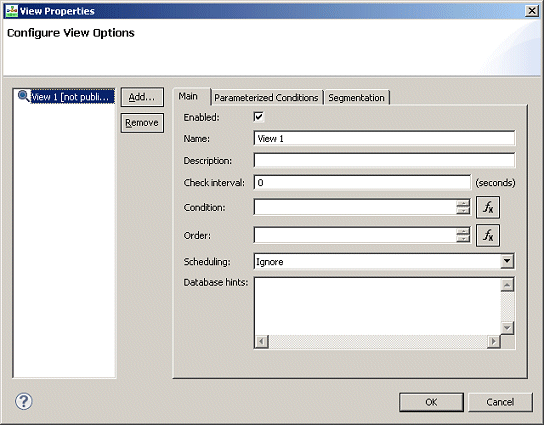
- Click Add to display fields in the Main tab.
- Complete the fields as described below.

Main Tab
Fields in the Main tab are described table below.
| Field | Description |
| Enabled | Check the box to make the view ready to extract interactions. |
| Name | Enter a name for the view to be used when saving as Configuration Database Script object. |
| Description | Enter text describing the view. |
| Check Interval | Enter the number of seconds to specify the frequency (time interval) that Interaction Server will use to check the queue and, if necessary, adjust the number of interactions that can be submitted to the workflow based on the Scheduling field. |
| Condition | You have the option of creating an expression to be used as the basis for extract interactions from the queue. Examples:
customer_segment='gold' AND service_type='sales' _time_in_queue[] > 4320 You can specify one or more expressions, which can be comprised of:
|
| Order | You have the option of defining the order for extracting interactions from the queue:
order:= [property_order[,order]]property_order:= property_name [asc|desc] Example using an attribute found in the eService/Multimedia interactions table: priority DESC |
| Scheduling | Use to specify the scheduling condition that Interaction Server should use, based upon the scheduled time contained in interactions. The interaction scheduling functionality uses a database field called scheduled_at, which is mapped to an interaction property called ScheduledAt. For information on this field, see the chapter on interaction properties in the eService/Multimedia User’s Guide.
Select one of the following:
This condition and the conditions below are stored in the Scripts folder of Configuration Manager, InteractionQueueView object, Annex tab.
|
| Database Hints | This field is only applicable to an Oracle database.
Background: Oracle allows special tags in SQL queries that cause queries to execute in a way that optimizes performance. These tags are called Hints. For example, you may wish Oracle to use a certain index to reorder data during query execution. You can apply a Hint, which will cause Oracle to use a specific index. One Hint that Oracle provides is: /*+ index (interactions interactions_default_view_idx) */. You could enter this Hint in the Database Hints field. |
Parameterized Conditions Tab
Use the Parameterized Conditions tab to specify interaction attributes that can be used in pull requests from clients of Interaction Server (for example, from an agent desktop). Each pull request can use any listed attribute, a combination of listed attributes, or none. If an attribute is not listed on this tab, then client applications cannot use it. For details on pull requests, see the RequestPull section in the chapter on Interaction Management Protocol in the eService/Multimedia Open Media Interaction Models Reference Manual. For example, if the Parameterized Conditions tab lists the from_address attribute, then a pull request from a client can include a condition such as from_address=joe_customer@myisp.com. This would retrieve all interactions from a particular contact. The Condition tab and the Parameterized Conditions tab both make use of interaction attributes (see the chapter on Interaction Properties in the eService/Multimedia User's Guide. The difference between them is:
- The Condition tab states a condition that applies to all pull requests.
- The Parameterized Conditions tab only lists attributes that can be used as parameters in a pull request, but it is up to the client whether or not to use these attributes.
You can: Select the attribute from a drop-down list of interaction attributes. This list includes most of the attributes in the interactions table. The exceptions are abandoned_at, destinations, moved_to_queue_at, scheduled_at, server_id, and snapshot_place_id. You can also enter the name of a custom property that you have created in Configuration Manager. Creating custom properties is described in the Interaction Properties section of the chapter on Interaction Properties in the eService/Multimedia User's Guide.
Using the Parameterized Conditions Tab
- Click the Parameterized Conditions tab in the View Properties dialog box.
- Click Add. The Property Configuration dialog box opens.

- Under Name, enter an Interactions table attribute.
- Under Value, enter a value.
- Click OK. The View Properties dialog box shows your entry.
Segmentation Tab
Use the Segmentation tab on the View Properties dialog box to submit an equal number of interactions of different segments, to define a default limit for each segment pulled from a queue, and to limit the total number of interactions that can be submitted to a workflow.
Use Case
Assume the following:
- You have a simple business process: a queue, the queue’s view, a strategy, and a submitter that submits interactions from the queue to the strategy through the view.
- There are two groups of agents equal in number. One group is trained to handle only customers of the gold Customer Segment and another group is trained to handle only customers of the bronze Customer Segment.
- The strategy directs interactions to the corresponding group of agents based on the value of the customer_segment property of an interaction (assume the value could be either gold or bronze).
- Next, start placing interactions into the queue, five interactions from bronze customers, then four interaction from gold customers, then again five interactions from bronze customers, three from gold, and so on.
If the strategy has a limit of five interactions that may be submitted into it, when the limit is reached, the strategy will be full of interactions from bronze customers, but will have no interactions from gold customers. As a result, interactions from gold customers will be waiting back in the queue and free agents, who are able to handle them, will also be waiting. Because the interactions are not yet in the strategy, the strategy is unable to route the interactions. To avoid such a scenario, you could add the customer_segment value to the Segmentation tab of the View Properties dialog box. After that, Interaction Server will fetch all interactions from the queue, grouping by the customer_segment property. It will find two distinct values of the property: gold and bronze. Interaction Server will then divide strategy limit by two (the number of distinct values) and limit the submission of each group of interactions to the strategy by the calculated value. As a result, Interaction Server submits an equal number of interactions from each group.
Using the Segmentation Tab
-
Click the Segmentation tab in the View Properties dialog box.
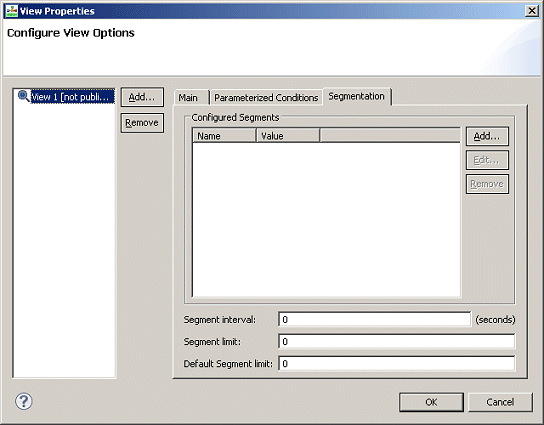
- Click Add. The Property Configuration dialog box opens.
- Opposite Name, enter an Interactions table attribute.
- Opposite Value, enter a value.
- Enter a Segment Interval. Specifies the time, in seconds, that elapses before Interaction Server rechecks the queue and adjusts the number of interactions that can be submitted to the strategy according to segmentation options. If you do not specify a value, Interaction Server uses the default value (set in the General tab). Use this parameter when the default interval at which a queue is checked for new interactions is too long, causing highly time-sensitive interactions to remain in the queue too long.
- Enter a Segment Limit. Enables you to override the maximum number of interactions that can be submitted to a strategy according to the configured segmentation options. If you do not enter a value, Interaction Server uses the limits set in the strategy. Starting with 81410, the IPD View publish logic does not generate default-limit option in the View section if the value is 0. The default-limit option is generated only if the value is greater than zero. For existing Diagrams, republishing the IPD diagram removes the default-limit option if the value is zero and updates the value if it is greater than zero.
- Enter a Default Segment Limit. Enables you to control the segmentation feature by specifying default number of interactions per segment.The segmentation feature ensures that equal number of interactions that belong to different segments are submitted into the URS strategy. By default, Interaction Server calculates that number by dividing the total limit for number of interactions in the strategy by the actual number of unique segments present.This Default Per Segment option overrides this behavior and uses this option value instead of calculating the limit dynamically.This feature is useful when the number of segments is large (> 1000) and changes rapidly in a wide range. In this case, it might take too long for the segmentation algorithm to balance the number of interactions submitted to URS. The Default-Segment Limit is generated only if the value is greater than zero. For existing diagrams, republishing the IPD remove the Default Segment Limit if the value is zero; updates the value if it is greater than zero.
- Click OK. The View Properties dialog box shows your entry.
