SCXML State Block
Use to write custom SCXML code for Composer to include in the SCXML document that it generates based on the workflow diagram.
The SCXML State block has the following properties:
Name Property
Click under Value and enter the block name. Composer will use the name to identify the block in the diagram and as the state name in the SCXML code.
Block Notes Property
Find this property's details under Common Properties.
Exceptions Property
Use to configure the exception nodes, with each port being hooked up to an event configured by you and selectable using Add Custom Event. Find this property's details under Common Properties.
Body Property
This property contains all the executable content of the <state> element (<onentry>, <onexit>, <final>, …).
- Click opposite Body under Value. This brings up the
 button.
- Click the button to bring up the Configure Body dialog box.
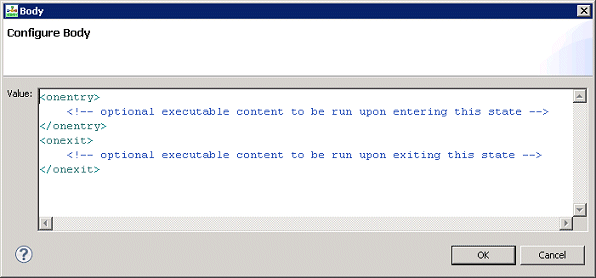
- Enter the executable content of the <state> element. . All content (children) of the state are editable. You also have the option of adding code to <onentry> and <onexit>.
- When through, click OK. Note: The editor does not validate against the SCXML schema.
Transitions Property
Use this property to add additional outports (transitions) using the block's custom Transitions dialog.
- Click opposite Transitions under Value. This brings up the button.
- Click the button to bring up the Configure Transitions dialog box.
- Click Add. The dialog box now appears as shown below.
- For each transition, specify at least one name, event, condition, or target (you are not required to complete all three fields). An output port is created for every transition
- Name--Composer uses the name of the transition to label the outport.
- Event--Use to select the event that will trigger this transition.
- Condition--The guard condition for this transition. The transition is selected only if the condition evaluates to true.
- Target--If true, an output port is created and the user can connect it to the block this transition will transition to when it is executed. If false, the transition will not cause a change in the state configuration when it is executed. The executable content contained in the transition will still be executed, so the transition will function as a simple event handler.
If a target is set, an outport for that transition will appear and you can connect it to other blocks. If a target is not set, an outport for that transition does not appear; in this case, you can add some SCXML code to handle the event.
When through in the dialog box, click OK.
Condition Property
Find this property's details under Common Properties.
Logging Details Property
Find this property's details under Common Properties.
Log Level Property
Find this property's details under Common Properties.
Enable Status Property
Find this property's details under Common Properties.
Using the SCXML State Block
The sample below demonstrates one way of using the SCXML State block to:
- Register an Agent-DN (Needed in order to send a Logoff request)
- Logoff Request for an Agent
- Unregister the Agent-DN
Below is an example diagram using the SCXML State block and example code. If you do not have the Agent information, retrieve it from the Configuration Database with FindCfgObjURS. Register the Agent, make the Agent not ready, and then log out the Agent, all using the URS trek function. The details of this function can be found by the http request—for example:
http://< urs host>:< urs http port>/urs/help/misc/trek
where the http port is defined in the URS options section http. Also you must enable this method by setting methods to all in the same section.
For this example, create the following Project variable: vursFetchReqID.
[+] Restrictions, Disclaimer and Copyright Notice
Any authorized distribution of any copy of this code (including any related documentation) must reproduce the following restrictions, disclaimer and copyright notice:
The Genesys name, the trademarks and/or logo(s) of Genesys shall not be used to name (even as a part of another name), endorse and/or promote products derived from this code without prior written permission from Genesys Telecommunications Laboratories, Inc.
The use, copy, and/or distribution of this code is subject to the terms of the Genesys Developer License Agreement. This code shall not be used, copied, and/or distributed under any other license agreement.
THIS CODE IS PROVIDED BY GENESYS TELECOMMUNICATIONS LABORATORIES, INC. ("GENESYS") "AS IS" WITHOUT ANY WARRANTY OF ANY KIND. GENESYS HEREBY DISCLAIMS ALL EXPRESS, IMPLIED, OR STATUTORY CONDITIONS, REPRESENTATIONS AND WARRANTIES WITH RESPECT TO THIS CODE (OR ANY PART THEREOF), INCLUDING, BUT NOT LIMITED TO, IMPLIED WARRANTIES OF MERCHANTABILITY, FITNESS FOR A PARTICULAR PURPOSE OR NON-INFRINGEMENT. GENESYS AND ITS SUPPLIERS SHALL NOT BE LIABLE FOR ANY DAMAGE SUFFERED AS A RESULT OF USING THIS CODE. IN NO EVENT SHALL GENESYS AND ITS SUPPLIERS BE LIABLE FOR ANY DIRECT, INDIRECT, CONSEQUENTIAL, ECONOMIC, INCIDENTAL, OR SPECIAL DAMAGES (INCLUDING, BUT NOT LIMITED TO, ANY LOST REVENUES OR PROFITS).
Copyright © 2008—2016 Genesys Telecommunications Laboratories, Inc. All rights reserved.
[+] Example SCXML Code
<onentry>
<script>
var KVPs = 'number:' + '704' + '|tenant:' + system.TenantName + '|switch:' + _genesys.ixn.interactions[system.InteractionID].location.media_server;
var vLocalParms = [2, KVPs ];
var ursFunc = 'urs/call/' + _genesys.ixn.interactions[system.InteractionID].voice.connid + '/func/FindConfigObject';
</script>
<session:fetch requestid="vursFetchReqID" srcexpr="ursFunc" method="'urs'">
<param name= "params" expr="uneval(vLocalParms)" />
</session:fetch>
</onentry>
Transitions:
Event: session.fetch.done
Condition: _event.data.requestid == vursFetchReqID
Body: ( if you want the data to be in JSON form )
var vEventData = _event.data.content.toString();
vEventData = vEventData.replace(/[.]/g, ",");
vEventData = vEventData.replace(/\\u000a/g,"");
vEventContent = JSON.parse(vEventData);
Results will be:
vEventContent =
{
dbid:159,
type:1,
number:"704",
name:"",
switchdbid:103,
switch:"SipSwitch",
tenantdbid:101,
tenant:"orchestration",
annex:{TServer:["true"]}
}
Event: error.session.fetch
Condition: _event.data.requestid == vursFetchReqID
Body: ( whatever you want to do if an error happens )
trekRegister:
<onentry>
<script>
var ursFunc = 'urs/trek/exec';
</script>
<session:fetch requestid="vursFetchReqID" srcexpr="ursFunc" method="'urs'">
<param name= "switch" expr="'SipSwitch'"/>
<param name= "thisdn" expr="'704'" />
<param name= "event" expr="'RequestRegisterAddress'" />
</session:fetch>
</onentry>
Transitions:
Event: session.fetch.done
Condition: _event.data.requestid == vursFetchReqID
Body: ( if you want the TEvent data to be in JSON form )
var vEventData = _event.data.content.toString();
vEventData = vEventData.replace(/[.]/g, ",");
vEventData = vEventData.replace(/\\u000a/g,"");
vEventContent = JSON.parse(vEventData);
Results will be:
vEventContent =
{
event:"EventRegistered",
AddressType:1,
AddressInfoType:8,
AddressInfoStatus:1,
AgentID:"704",
ThisDN:"704",
AgentWorkMode:0,
ReferenceID:53,
TimeinSecs:1461257507,
TimeinuSecs:61000,
return:"ok",
Extensions:
{
AgentStatus:2,
AgentStatusTimestamp:1461257264,
AgentStatusReliability:0,
AgentLoginTimestamp:1461257264,
AgentLoginReliability:0,
AgentSessionID:"7MQNHM3BJ15RN2NS1ABJKTUT0K00006G",
AgentWorkMode:0,
status:0,
EmulateLogin:"true"
}
}
Event error.session.fetch – handled as in first example.
trekNotReady:
<onentry>
<script>
var ursFunc = 'urs/trek/exec';
</script>
<session:fetch requestid="vursFetchReqID" srcexpr="ursFunc" method="'urs'">
<param name= "switch" expr="'SipSwitch'"/>
<param name= "thisdn" expr="'704'" />
<param name= "event" expr="'RequestAgentNotReady'" />
</session:fetch>
</onentry>
trekLogout:
<onentry>
<script>
var ursFunc = 'urs/trek/exec';
</script>
<session:fetch requestid="vursFetchReqID" srcexpr="ursFunc" method="'urs'">
<param name= "switch" expr="'SipSwitch'"/>
<param name= "thisdn" expr="'704'" />
<param name= "event" expr="'RequestAgentLogout'" />
</session:fetch>
</onentry>


