User Interface
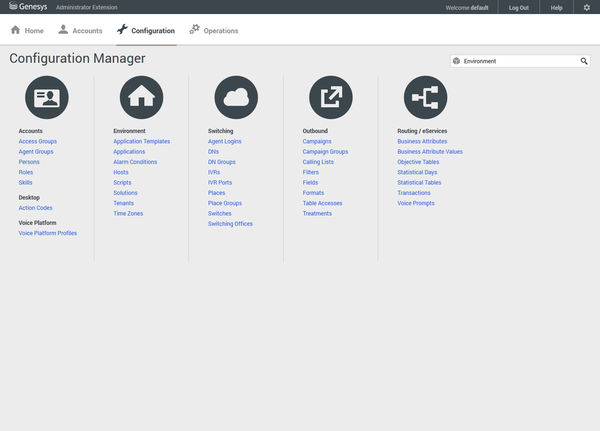
The main screen of Genesys Administrator Extension consists of two parts, as follows:
- The header, at the top of the screen, contains the main controls for the user interface.
- The workspace, under the header, is where you perform all the tasks in Genesys Administrator Extension.

Header
The Header area is located at the top of the main screen of the interface and contains the main controls for the Genesys Administrator Extension (GAX) interface.
The top Header Bar displays the name of the logged-in user in the following format: Welcome, (user's first name). The Header Bar also contains a link to log out of GAX, a link to this help file, and a gear button that, when clicked, presents options to set user preferences.
The lower Navigation Bar contains the menu options for navigating GAX.
The following fixed headings are always displayed:
- Home
- Accounts
- Configuration
- Operations
Click the Home button from any page in GAX to return to the home page.
Installing plug-ins will add submenu headings to the fixed headings. For example, installing the ASD plug-in adds Solution Deployment to the Configuration fixed heading. These submenu headings are listed in alphabetical order. If the plug-in does not specify a menu heading, it is added to the Configuration fixed heading.
Users can also add custom links to external websites that appear under the fixed headings. For more information, see Adding Links to the Navigation Bar.
Each submenu heading can contain several items. For example, Solution Deployment contains the following items:
- Installation Packages
- Deployed IPs
- Solution Definitions
- Deployed Solutions
These items are organized based on priority sequence, as defined in the plug-in.
Workspace
The workspace is located below the header, and is where you perform all tasks in Genesys Administrator Extension. Its length adjusts automatically, depending on what is displayed in it. The workspace displays new panels to the right as new options or functions become available, depending on the choices that you make in the active panel.

The workspace displays only those objects and options for which the logged-in user has role privileges and object permissions to access.
Layout
All panels can be collapsed or resized to suit your personal preference.
To collapse a panel, click the Collapse button.![]()
To restore the panel, click the Fit to Content button. ![]()
To resize a panel, move your mouse cursor to the edge of a panel. The mouse cursor will change to a line with a left arrow and a right arrow, which indicates that the panel can be resized. Click and drag the panel to resize the panel. To reset the size of the panel to fit the displayed content, click the Fit To Content button.
To close a panel, click the Close button. ![]()
The left-most panel contains items that correspond to the selected module that you have selected from the Menu in the header area. The list of items are organized by Tenant in multi-tenant environments. You can choose to view all Tenants, your default Tenant, or selected multiple Tenants by clicking the Tenant Filter button. ![]()
You can filter the content of the left-most panel by typing the name or partial name of a tenant in the Quick Filter field. ![]()
You can sort by tenant or other criteria by clicking the column heads.
When you click an item in the list of items, or when you click New or Add (![]() ), a new panel opens on the right side. This panel contains controls that you can use to view/edit/modify properties and other information related to the selected (or new) item. Genesys Administrator Extension supports auto-completion of forms and fields, to improve efficiency.
), a new panel opens on the right side. This panel contains controls that you can use to view/edit/modify properties and other information related to the selected (or new) item. Genesys Administrator Extension supports auto-completion of forms and fields, to improve efficiency.
Error and information messages are displayed at the top of the workspace. You must close them manually by clicking the X, or they will accumulate and fill up space in your workspace.
Auditing History
For some objects, you can view an auditing history. Select the object, such as a Personality, to view information about the object in a new panel. In the object information panel, click the Related button and select History. The History panel is displayed to the right. It contains information about the change history of the object.
Availability of Menu Items
Multiple instances of Genesys Administrator Extension might be connected to the same configuration environment, to support load balancing and high availability. Each instance of Genesys Administrator Extension might be configured to use different sets of functional modules. Not all modules might be available for every instance of Genesys Administrator Extension that is installed in your Genesys environment.
