Contents
Deploying SpeechMiner for GIR
GIR uses the SpeechMiner application to play back call and screen recordings that are stored in the GIR system. Note that call or screen recordings that have been backed up and then purged from the GIR system cannot be played back through SpeechMiner. These should be played with your own media player.
Installing SpeechMiner
To install and configure SpeechMiner, follow the instructions in the Deploying SpeechMiner topic of the SpeechMiner Administration Guide. Pay attention to the instructions specific to Analytics and Recording UI, or Recording UI Only modes.
To access this content:
- Customers: Log in to My Support and select Documentation.
- Partners: Log in to Partner Portal and select Genesys Technical Docs.
- Employees: Go to the internal access point.
Upgrading SpeechMiner
For information about upgrading your SpeechMiner components, see the SpeechMiner 8.5.x Upgrade Guide.
The SpeechMiner documents are restricted and require specific credentials to access the content. If you have a login, you can access the docs here: Login.
If you are a Genesys employee:
- To access the online documents and if you don’t have an account on this site, click the Employee Login / Restricted Content link in the lower-right corner of the page. Create your login and send your username to Tech Pubs Admins so that we can grant you access.
If you are a Genesys Partner or customer:
- Contact the product manager to access to these documents.
If you are upgrading SpeechMiner, you must upload and deploy the Solution Definition (SPD) files in order to gain access to any new Genesys Administrator Extension roles or privileges.
For more information about uploading the SPD file, see the Upgrading the Plug-in.
Configuring SpeechMiner users
In addition to the configuration that is described in the SpeechMiner Administration Guide, the SpeechMiner database and application must be configured specifically for Genesys Interaction Recording (GIR).
- Use Genesys Administrator Extension to create four new Application Templates:
- Import the following templates from the SpeechMiner CD:
- Speechminer_ClientApplications.apd
- Speechminer_InteractionReceiver.apd
- Speechminer_Platform.apd
- Speechminer_Web.apd
- Verify that each template has Genesys Generic Server in the Type field.
- Verify that the log parameters are defined.
- Import the following templates from the SpeechMiner CD:
- Create four new Application objects using the newly created templates.
- Enter the names in the Name field as they are indicated in the template. For example, name SpeechMiner Platform application, Speechminer_Platform, where SpeechMiner is the default and can be changed in the SMConfig Recording panel. The name used and the name in the SMConfig Recording panel should match.
- Set the hosts.
- The Start info Working Directory, Command Line must not be empty. Set it to ".".
ImportantThe SpeechMiner components do not integrate with LCA. - Use Genesys Administrator Extension to create an additional new Application Template:
- Import the following template from the SpeechMiner CD:
- Speechminer_node.apd
- Verify that the template has Genesys Generic Client in the Type field.
- Import the following template from the SpeechMiner CD:
- Create three new Application objects.
- In the Name field, enter the name of each application object.
The three new Application objects should be named as follows: (where SpeechMiner is the default and can be changed in the SMConfig Recording panel. The name used and the name in the SMConfig Recording panel should match):
- Speechminer_Platform_Node
- Speechminer_InteractionReceiver_Node
- Speechminer_Web_Node
- Create a connection for each Application object to the Server application with the similar name. For example, for Speechminer_Web_Node use the name Speechminer_Web.
- In the Name field, enter the name of each application object.
The three new Application objects should be named as follows: (where SpeechMiner is the default and can be changed in the SMConfig Recording panel. The name used and the name in the SMConfig Recording panel should match):
- In Genesys Administrator Extension, navigate to Configuration > Environment > Tenants and in the Options tab of each Tenant (including the Environment tab), in the [recording.archive] section configure the following parameters:
- user
- password
ImportantThe user and password value must be the same as the username and password configured in both of the following sections:- Configuring SpeechMiner Interaction Receiver Authorization Header in the Recording Destinations section of IVR profile configuration.
- Configuring SpeechMiner settings in RWS.
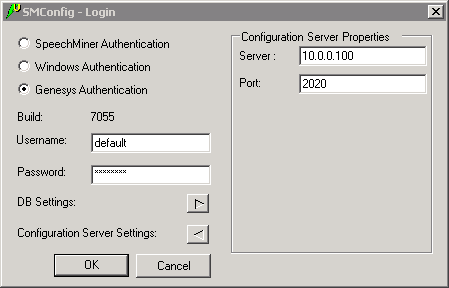
- In the SMConfig-Login screen (SpeechMiner Configuration), login with your Configuration Server credentials (for example, default/password) and set the Configuration Server host and port.
ImportantWhen you are logging in for the first time, you must go to the license tab, and add your recording-only license, and login to SM Config again. You will see the Recording tab in the UI only after you have added the license . - In the Sites and Machines/Machines and Tasks screen:
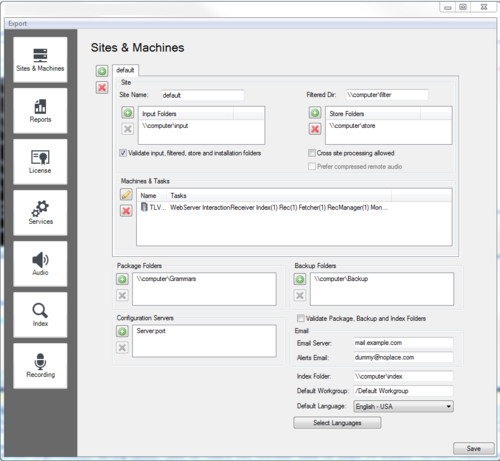
- Configure the Interaction Receiver tasks.
- Click Select Languages and select English USA.
- Perform the following:
- Configure the User Application Name so that it refers to the application you want to use for authenticating users. By default, it is default and should only be changed in a multi-tenant environment, for security reasons. For details, refer to the Configuring SpeechMiner users section in the Permissions page.
- Enable the following tasks in the SpeechMiner configuration (Recording Only mode):
- web server
- interaction receiver
- indexer
- uplatform
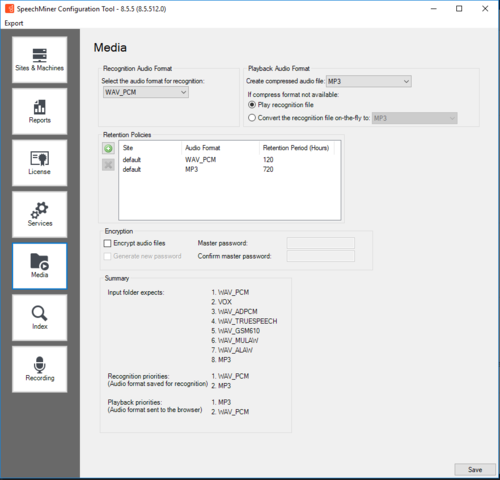
- In the Media panel of SMConfig, set the following to avoid creating unnecessary audio files and storing them for too long (Analytics Only mode):
Parameter Value Recognition Audio Format WAV_PCM Create compressed audio file Do not Generate WAV_PCM Retention Period 0
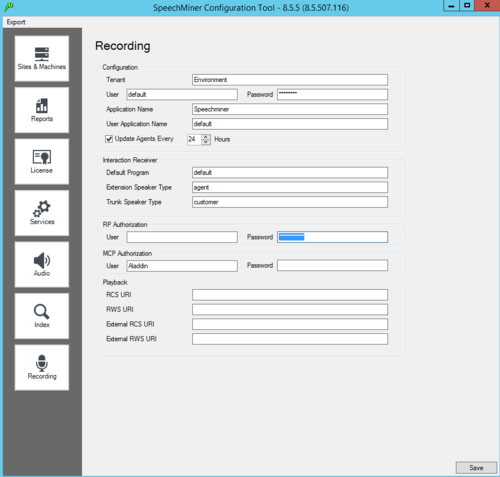
- In the Recording tab, set the parameters.
[+] Show the table that describes the parameters. - Depending on the license you are using and only after you have verified that the license matches the installation mode, perform one of the following:
- In Recording and Analytics mode, create and apply a program in SMART for every Program ID that RP may send.
ImportantBoth of these actions can be skipped, if the default in the database is satisfactory, or if the Recording Processor Script includes the program ID in the metadata.
On a per-call basis, the attached data key GRECORD_PROGRAM can be set to define the program external ID to be used for this call. For example, attached data can be set in a routing strategy.
- Configure the roles and permissions for the SpeechMiner Users.


