
Genesys Interaction Recording Solution Configuration
This section describes how to configure the Genesys Interaction Recording Solution.
Prerequisites
- SIP Server is installed and configured. See the SIP Server Deployment Guide for the required steps.
- Genesys Voice Platform (GVP) Media Control Platform and Resource Manager are installed and configured. See the Genesys Voice Platform documentation for the required steps.
- The SpeechMiner components are installed and configured. See the SpeechMiner Administration Guide document for the required steps.
-
Web Services is installed and configured.
-
Interaction Concentrator (ICON) is installed and configured.
- Recording Processor, Recording Crypto Server and the Recording Plug-in for Genesys Administrator Extension are installed and configured.
Enabling Call Recording
Configure the following components to enable call recording:
Configuring the WebDAV Server for Web Services
- Install WebDAV, run the following command:
yum install httpd
- Edit the /etc/httpd/conf/httpd.conf file, and append the following to the end of the file:
Alias /recordings /mnt/recordings
<Directory /mnt/recordings>
   Options Indexes MultiViews FollowSymLinks
   EnableSendfile off
   AllowOverride None
   Order allow,deny
   allow from all
</Directory>
<Location "/recordings">
   DAV On
   AuthType Basic
   AuthName "user"
   AuthUserFile /var/www/htpasswd
   Require valid-user
</Location>
- Open the firewall. Because WebDAV is an HTTP server, the incoming default HTTP and/or HTTPS ports (80 and/or 443) must be open to the server.
ImportantIt is possible to use custom ports by changing the permitted incoming ports in the firewall, the virtual host configuration file, and the URL used to reach the WebDAV server.
- Create the directory to keep the recording files, and set the permission to apache, using the following command:
mkdir /mnt/recordings
chown apache:apache /mnt/recordings
- Create a WebDAV user for httpd, and configure the password. The following example creates a user called "user":
htpasswd -c /var/www/htpasswd user - Configure the httpd to start on boot up (and start it now) using the following command:
chkconfig --levels 235 httpd on
service httpd start
- Test the WebDAV installation"
- Upload a hello.world file to the WebDAV server using the following command:
curl -T hello.world -u user:password http://myserver/recordings/hello.world
- Using a browser, open the the http://myserver/recordings/hello.world URL. The browser will request for user credentials.
- Upload a hello.world file to the WebDAV server using the following command:
- The WebDAV server is installed.
Configuring Web Services
Configuring the Web Services Parameters
To configure Web Services for Genesys Interaction Recording: Set the following parameters in the /genconfig/server-settings.yaml file:
| Parameter Name | Mandatory | Description | Type | Default Value |
|---|---|---|---|---|
| enableBackgroundScheduledMediaOperations | Y | Specifies whether to allow Web Services to schedule purge and backup events. | Boolean | True |
| createCallRecordingCF | N | Specifies whether to create a call recording column family (CRCF) for a new contact center. | Boolean | False |
| crClusterName | Y | Specifies the name of the elasticsearch cluster name. | Non-empty String | None
Note: This is a mandatory parameter, and the value must be the same for all Web Services nodes in the cluster. For example, if there are five nodes in the Web Services cluster, all five nodes must have the same crClusterName value. |
| crRegion | N | Specifies the name of the region where the Web Services node resides. | Non-empty String | None |
| cryptoSecurityKey | Y | Specifies the security key used for Web Services encryption of the recording settings in the database. | Non-empty String | None
Note: This is a mandatory parameter, and the value must be the same for all Web Services nodes in the cluster. For example, if there are five nodes in the Web Services cluster, all five nodes must have the same cryptoSecurityKey value. |
| defaultBackupExportURI | N | Specifies the location to store backed up recordings. For example, file:///tmp/archLocDefault'. | Non-empty String | None |
| multiPartResolverMaxUploadSize | Y | Specifies the maximum size, in KB, of the recording file. | Integer | 536870912 |
| multiPartResolverMaxInMemorySize | Y | Specifies the maximum length of time allowed to upload a recording file. | Integer | 536870912 |
| recordCryptoServerDecryptMaxConnection | N | Specifies the maximum TCP connections to each Recording Crypto Server instance defined in local-decrypt-uri-prefix settings.
Note: This option applies to the Web Services version 8.5.200.85 and later only. |
Integer | 50 |
| recordCryptoServerDecryptMaxTotalConnection | N | Specifies the maximum TCP connections to all Recording Crypto Server instances defined in local-decrypt-uri-prefix settings.
Note: This option applies to the Web Services version 8.5.200.85 and later only. |
Integer | 10 * recordCryptoServerDecryptMaxConnection |
| recordCryptoServerDecryptSocketTimeout | N | Specifies the socket timeout, in milliseconds, for TCP connections to Recording Crypto Server instances defined in 'local-decrypt-uri-prefix settings.
Note: This option applies to the Web Services version 8.5.200.85 and later only. |
Integer | 30000 |
| webDAVMaxConnection | N | Specifies the maximum TCP connections for each WebDAV Storage. | Integer | 50 |
| webDAVMaxTotalConnection | N | Specifies the maximum TCP connections the Web Services node allows to all WebDAV Storages. | Integer | 10 * webDAVMaxConnection |
| undocumentedExternalApiUrl | Y | Specifies the reachable Web Services Server address for the SpeechMiner UI, and the Screen Recording Client. Note: This option applies to the Web Services version 8.5.200.40 and later only. |
String | http://<IP Address>:8090/internal-api |
Configuring the Elasticsearch Engine
The Web Services Call Recording API uses the elastic search as the query engine. A configuration file is required if call recording is enabled (for example, JETTY_HOME/resources/elasticsearch.yml).
Configure the JETTY_HOME/resources/elasticsearch.yml file as follows:
index.analysis.analyzer.whitespace_lowercase.tokenizer: whitespace
index.analysis.analyzer.whitespace_lowercase.filter: lowercase

transport.tcp.port: 9200
http.port: 9300

discovery.zen.ping.multicast.enabled: false
discovery.zen.ping.unicast.hosts: <comma separated list of HTCC nodes which host the ES>
discovery.zen.minimum_master_nodes: 2

gateway.recover_after_nodes: 2
gateway.recover_after_time: 1m
gateway.expected_nodes: 3

threadpool.index.queue_size: -1
threadpool.bulk.queue_size: -1

path.conf: <Path to genconfig folder>/elasticsearch
path.data: <Path to the folder where ES stores its data>
For more configuration information, see http://www.elasticsearch.org/guide/.
The elastic search engine also requires a large PermGen space.
To increase the PermGen space:
- Add the following to your JAVA_OPTIONS:
JAVA_OPTIONS="-XX:MaxPermSize=512m -Djsse.enableSNIExtension=false"
- If you are using /etc/default/jetty, add:
JAVA_OPTIONS="-Xmx2048m -XX:MaxPermSize=512m -Xms2048m -Djsse.enableSNIExtension=false"
Rebuilding the Elasticsearch Index
If you must upgrade your Jetty 8 version to Jetty 9 version, you might need to add the elasticsearch data file to the new Web Services cluster.
To move the elasticsearch data:
- Rebuild the elasticsearch index using the following command:
curl -XPOST "http://<FE VM host>/api/v2/ops/contact-centers/<ID contact center>/recordings" -d '{ "operationName":"forceIndex", "from":<Time of previous 'green' state or backup snapshot>}'
The command above executes the forceIndex operation and is used to rebuild the elasticsearch index when needed. The following information provides additional details for this API.
HTTP Request
POST
.../api/v2/ops/contact-centers/{id}/recordings
Request Body
{
   "operationName":"forceIndex",
   "from":1369272257713,
   "to":1369275857713,
   "purgeOld":true
}
The following table describes the request body attributes:
| Attributes | Type | Mandatory | Description |
|---|---|---|---|
| operationName | String | Y | The name of the operation. In this case it is forceIndex. |
| from | Long Integer | Y | The Java time stamp (in milliseconds) which equals the UNIX time * 1000. This is the time stamp from which the records are re-indexed. |
| to | Long Integer | N | The Java time stamp (in milliseconds) which equals the UNIX time * 1000. This is the time stamp to which the records are re-indexed. If not specified, the current time of the request processing is used. |
| purgeOld | Boolean | N | Specifies whether the old index should be deleted prior to re-indexing. This attribute is necessary if the Web Services updated version uses indexes with a different structure. The default value is false. |
Restarting Web Services
For more information on starting and stopping Web Services, see the Web Services Deployment Guide.
Configuring the Storage Credentials for Web Services
To enable voice recording:
- Determine the contact center ID on Web Services using the following command with the ops username and password (ops:ops):
curl -u ops:ops http://<Web Services Server>:8080/api/v2/ops/contact-centers; echo
The following output is returned:
{"statusCode":0,"uris":["http://<Web Services Server>:8080/api/v2/ops/contact-centers/<contact center ID (in hex format)>"]}ImportantUse the <contact center ID (in hex format)> in all subsequent commands. - Using a text editor, created the create_table file using the following command:
{
"operationName":"createCRCF"
}
curl -u ops:ops -X POST -d @create_table http://htcc:8080/api/v2/ops/
contact-centers/<contact center ID (in hex format)>/recordings
--header "Content-Type: application/json"; echo
To enable storage:
- Using a text editor, create the recording_settings text file using the following command:
{
  "store": [{
          "webDAV": {
              "userName": "user1",
              "password": "password1",
              "uri": "http://apache1/webdav"
          }
    },
    {
         "webDAV": {
             "userName": "user2",
             "password": "password2",
             "uri": "http://apache2/webdav"
          }
     }
  ]
}

curl -u ops:ops -X PUT -d @recording_settings
 http://<Web Services Server>:8080/api/v2/ops/
contact-centers/<contact center ID (in hex format)>/settings/recordings
 --header "Content-Type: application/json"; echo
Configuring the Call Recording Audit Log
Web Services provides an audit log for the following call recording operations:
- Playback of the recording media file
- Deletion of the call recording file
To configure the audit log:
- Stop the Web Service Jetty using the following command:
sudo service jetty stop - Update the Jetty LogBack Configuration:
- Edit the /opt/jetty/resources/logback.xml file to include INFO level messaging similar to the following example:
<?xml version="1.0" encoding="UTF-8"?> <!-- Example LOGBACK Configuration File http://logback.qos.ch/manual/configuration.html --> <configuration scan="true"> <appender name="RECORDING" class="ch.qos.logback.core.rolling.RollingFileAppender"> <filter class="ch.qos.logback.classic.filter.LevelFilter"> <level>INFO</level> <onMatch>ACCEPT</onMatch> <onMismatch>DENY</onMismatch><!-- ACCEPT for printing log above INFO, DENY for printing only INFO--> </filter> <file>${jetty.logs}/recording.log</file> <rollingPolicy class="ch.qos.logback.core.rolling.TimeBasedRollingPolicy"> <fileNamePattern>${jetty.logs}/recording-%d{yyyy-MM-dd-HH}.gz</fileNamePattern> <maxHistory>720</maxHistory><!-- 1 Month --> </rollingPolicy> <encoder> <pattern>%d{MM/dd/yyyy HH:mm:ss.SSS, UTC} [%X{principal.name}] [%X{req.userAgent}] [%X{req.remoteHost}] %X{req.requestURI} %msg%n</pattern> </encoder> </appender> <appender name="FILE" class="ch.qos.logback.core.rolling.RollingFileAppender"> <file>${jetty.logs}/cloud.log</file> <rollingPolicy class="ch.qos.logback.core.rolling.TimeBasedRollingPolicy"> <!-- hourly rollover --> <fileNamePattern>${jetty.logs}/cloud-%d{yyyy-MM-dd-HH}.gz</fileNamePattern> <!-- keep 5 days' worth of history --> <maxHistory>120</maxHistory> </rollingPolicy> <encoder> <pattern>%d{MM/dd/yyyy HH:mm:ss.SSS, UTC} %-5level [%X{principal.name}] [%X{session}] [%X{contactCenter}] [%thread] %X{req.requestURI} %X{req.queryString} %logger{36} %msg%n</pattern> </encoder> </appender> <logger name="com.<domain>.cloud.v2.api.controllers.callrecording"> <appender-ref ref="RECORDING" /> </logger> <logger name="com.<domain>.cloud.v2.api.tasks.callrecording"> <appender-ref ref="RECORDING" /> </logger> <logger name="com.<domain>" level="WARN" /> <logger name="com.<domain>.cloud" level="DEBUG" /> <logger name="com.<domain>.cloud.rtreporting" level="WARN" /> <logger name="com.<domain>.salesforce.security" level="INFO" /> <root level="WARN"> <appender-ref ref="FILE" /> </root> </configuration> - For MLM:
- Create a RECORDING appender if it does not exist. Use the following example:
<appender name="RECORDING" class="ch.qos.logback.core.rolling.RollingFileAppender"> <filter class="ch.qos.logback.classic.filter.LevelFilter"> <level>INFO</level> <onMatch>ACCEPT</onMatch> <onMismatch>DENY</onMismatch><!-- ACCEPT for printing log above INFO, DENY for printing only INFO--> </filter> <file>${jetty.logs}/recording.log</file> <rollingPolicy class="ch.qos.logback.core.rolling.TimeBasedRollingPolicy"> <fileNamePattern>${jetty.logs}/recording-%d{yyyy-MM-dd}.gz</fileNamePattern> <maxHistory>720</maxHistory><!-- 1 Month --> </rollingPolicy> <encoder> <pattern>%d{MM/dd/yyyy HH:mm:ss.SSS, UTC} [%X{principal.name}] [%X{req.userAgent}] [%X{req.remoteHost}] %X{req.requestURI} %msg%n</pattern> </encoder> </appender>- Add the following loggers:
<logger name="com.genesyslab.cloud.v2.api.controllers.callrecording">
    <appender-ref ref="RECORDING" />
  </logger>
  <logger name="com.genesyslab.cloud.v2.api.controllers.screenrecording">
    <appender-ref ref="RECORDING" />
  </logger>
  <logger name="com.genesyslab.cloud.v2.api.tasks.callrecording">
    <appender-ref ref="RECORDING" />
  </logger>
  <logger name="com.genesyslab.cloud.v2.api.tasks.screenrecording">
    <appender-ref ref="RECORDING" />
  </logger>
  <logger name="com.genesyslab.cloud.v2.api.tasks.settings">
    <appender-ref ref="RECORDING" />
  </logger>
  <logger name="com.genesyslab.cloud.v2.media.scheduler">
    <appender-ref ref="RECORDING" />
  </logger>
  <logger name="com.genesyslab.cloud.v2.media.task">
    <appender-ref ref="RECORDING" />
  </logger>
For more information about Jetty Logback, see
Logback configuration.
- Start Jetty using the following command:
sudo service jetty start - Review the audit log:
- Open the /var/log/jetty/recording.log file. The following example shows that two recordings are requested for playback and deletion:
10/28/2013 15:46:03.203 [ops] [Mozilla/5.0 (Macintosh; Intel Mac OS X 10_9_0) AppleWebKit/537.36 (KHTML, like Gecko)
Chrome/28.0.1500.71 Safari/537.36] [192.168.135.1] /api/v2/ops/contact-centers/46284f2f-d615-4329-957a-f5341ed
fd5d7/recordings/recid0/play/2cb4ea04-f81d-44e8-83b6-1f4a63a1a659.mp3 Play media [2cb4ea04-f81d-44e8-83b6-1
f4a63a1a659] of recording [recid0] from contact center [46284f2f-d615-4329-957a-f5341edfd5d7] requested

10/28/2013 15:46:03.341 [ops] [Mozilla/5.0 (Macintosh; Intel Mac OS X 10_9_0) AppleWebKit/537.36 (KHTML, like Gecko)
Chrome/28.0.1500.71 Safari/537.36] [192.168.135.1] /api/v2/ops/contact-centers/46284f2f-d615-4329-957a-f5341ed
fd5d7/recordings/recid0/play/2cb4ea04-f81d-44e8-83b6-1f4a63a1a659.mp3 Play media [2cb4ea04-f81d-44e8-83b6-1
f4a63a1a659] of recording [recid0] from contact center [46284f2f-d615-4329-957a-f5341edfd5d7] failed

10/28/2013 15:46:10.946 [ops] [Mozilla/5.0 (Macintosh; Intel Mac OS X 10_9_0) AppleWebKit/537.36 (KHTML, like Gecko)
Chrome/28.0.1500.71 Safari/537.36] [192.168.135.1] /api/v2/ops/contact-centers/46284f2f-d615-4329-957a-f5341ed
fd5d7/recordings/recid1/play/2cb4ea04-f81d-44e8-83b6-1f4a63a1a658.mp3 Play media [2cb4ea04-f81d-44e8-83b6-1
f4a63a1a658] of recording [recid1] from contact center [46284f2f-d615-4329-957a-f5341edfd5d7] requested

10/28/2013 15:46:11.033 [ops] [Mozilla/5.0 (Macintosh; Intel Mac OS X 10_9_0) AppleWebKit/537.36 (KHTML, like Gecko)
Chrome/28.0.1500.71 Safari/537.36] [192.168.135.1] /api/v2/ops/contact-centers/46284f2f-d615-4329-957a-f5341ed
fd5d7/recordings/recid1/play/2cb4ea04-f81d-44e8-83b6-1f4a63a1a658.mp3 Play media [2cb4ea04-f81d-44e8-83b6-1
f4a63a1a658] of recording [recid1] from contact center [46284f2f-d615-4329-957a-f5341edfd5d7] succeed

10/28/2013 15:46:52.179 [admin@genesyslab.com] [Mozilla/5.0 (Macintosh; Intel Mac OS X 10_9_0) AppleWebKit/537.36 (
KHTML, like Gecko) Chrome/28.0.1500.71 Safari/537.36] [192.168.135.1] /api/v2/recordings/recid0 Delete recording [reci
d0] from contact center [46284f2f-d615-4329-957a-f5341edfd5d7] requested

10/28/2013 15:46:52.216 [admin@genesyslab.com] [Mozilla/5.0 (Macintosh; Intel Mac OS X 10_9_0) AppleWebKit/537.36 (
KHTML, like Gecko) Chrome/28.0.1500.71 Safari/537.36] [192.168.135.1] /api/v2/recordings/recid0 Delete recording
[recid0] from contact center [46284f2f-d615-4329-957a-f5341edfd5d7] failed

10/28/2013 15:46:56.253 [admin@genesyslab.com] [Mozilla/5.0 (Macintosh; Intel Mac OS X 10_9_0) AppleWebKit/537.36 (
KHTML, like Gecko) Chrome/28.0.1500.71 Safari/537.36] [192.168.135.1] /api/v2/recordings/recid1 Delete recording [reci
d1] from contact center [46284f2f-d615-4329-957a-f5341edfd5d7] requested

10/28/2013 15:46:56.420 [admin@genesyslab.com] [Mozilla/5.0 (Macintosh; Intel Mac OS X 10_9_0) AppleWebKit/537.36 (
KHTML, like Gecko) Chrome/28.0.1500.71 Safari/537.36] [192.168.135.1] /api/v2/recordings/recid1 Delete recording
[recid1] from contact center [46284f2f-d615-4329-957a-f5341edfd5d7] succeeded
Setting the Advanced Options for Web Services
API Thread Pool
Web Services provides properties for the Call Recording API thread pool via archaius.
The following table describes the parameters required to set the API thread pool.
| Property/API Name | Thread Pool Name | Description |
|---|---|---|
| hystrix.command.[API Name].
execution.isolation.thread. |
N/A | The hystrix timeout. The default value is set to 6000. |
| hystrix.threadpool.[API Pool Name]
.coreSize |
N/A | The thread pool size. The default value is set to 10. |
| RecordingOperationApiTaskV2 | ApiOperationPool | The call or screen recording operation. |
| CreateCallRecordingApiTaskV2 | ApiCreatePool | Create call recording |
| DeleteCallRecordingApiTaskV2 | ApiDeletePool | Delete call recording |
| GetCallRecordingApiTaskV2 | ApiGetPool | Get call recording meta data |
| GetCallRecordingCFInfoApiTaskV2 | ApiGetPool | Get call recording CF Information |
| GetCallRecordingMediaApiTaskV2 | ApiGetPool | Streaming call recording media |
| QueryCallRecordingApiTaskV2 | ApiQueryPool | Query call recording Meta data |
For more information about the Web Services Call Recording API, see the Web Services API Reference.
Configuring the SIP Server Application
| Section Name | Parameter Name | Description |
|---|---|---|
| TServer | msml-support | Set to true to enable support of the call recording solution. |
| resource-management-by-rm | Set to true to enable support of the call recording solution.
Resource monitoring and notification will be done by the Resource Manager. SIP Server will contact Media Server through Resource Manager. | |
| msml-record-support | Set to true to enable SIP Server to engage GVP as a Media Server through the msml protocol for call recording. | |
| msml-record-metadata-support | Set to true to send additional metadata in the INFO message of Genesys Media Server when starting call recording. | |
| record-consult-calls | Specifies whether to record consult calls:
| |
| recording-filename | Must be set to $UUID$_$DATE$_$TIME$. |
Configuring a DN for VoIP Service
- Create a new MSML DN object and add the following parameters to the General tab:
- Number = The name of the MSML Server
- Type = Voice over IP Service
- Add the following parameters to the Annex tab of the new DN:
Section Name Parameter Name Description TServer Contact Set this to the Resource Manager IP address and port. Use the following format:
sip: <Resource Manager_IP_address:Resource Manager_SIP_port>
Specifies the contact URI that SIP Server uses for communication with the treatment server.service-type Set to msml Prefix Set to msml= subcription-id Set to the name of the tenant to which this SIP Server belongs, using the following syntax <TenantName> refer-enabled Set to false make-call-rfc3725-flow Set to 1. ring-tone-on-make-call Set to false. sip-hold-rfc3264 Set to true oos-check Set to 5 oos-force Set to 4
To enable separate voice recording storage for each SIP Server instance, add the following parameter to the VoIP Service DN (msml):
- TServer.sip-uri-params = gvp-tenant-id=Recording00, where Recording00 is the IVR profile name assigned for this SIP Server instance.
Configuring the Agent's DN
On the Agent's DN, set the following parameter:
- enable-agentlogin-presence to true
Configuring Genesys Voice Platform
[+] IVR Profile
[+] Logical Resource Group
[+] Media Control Platform(s)
Configuring Geo-location
Geo-location is configured in two objects:
- DN objects in a switch
- Resource Groups for MCP and Recording Servers.
You can assign a geo-location tag for each DN (of type Trunk DN, Route Point DN, Extension DN, and Trunk Group DN). The geo-location option is configured in the TServer section of these places.
To assign a geo-location tag for a Resource Group (for MCP and Recording Server separately), use the Resource Group Wizard and set the geo-location as part of the Wizard process.
Usage
Geo-location is selected for each call depending on the usage model.
SIP Server selects the geo-location with the following order of preference for inbound calls:
- Geo-location configured in the extensions of RequestRouteCall.
- Geo-location configured in the Routing Point DN.
- Geo-location configured in the inbound Trunk DN.
- Geo-location configured in the DN where the recording is enabled.
For outbound calls, the following order of preference is used:
- Geo-location configured in the extensions of RequestRouteCall.
- Geo-location configured in the Routing Point DN.
- Geo-location configured in the Agent DN.
- Geo-location configured in the outbound Trunk DN if recording is enabled.
Full-time Recording
When a DN is configured to be recorded, the geo-location is set at the DN. When more than one DN involved in the call has the geo-location set (for example, both the inbound Trunk DN and the Routing Point DN have the geo-location parameter set), then SIP Server selects the geo-location based on the order of preference listed above.
Selective Recording from a Routing Strategy
If record=source is set in the RequestRoutecall extensions, the geo-location of the inbound Trunk DN of the call is selected (if it is configured). If record=destination is set in the RequestRoutecall extensions, the geo-location of the agent (Extension DN) is selected.
Dynamic Recording
When dynamic recording is initiated by the T-lib RequestPrivateService function, the geo-location is selected based on the recorded DN in the call. Specifically:
- If RequestPrivateService is requested with AttrExtensions as record = source, the geo-location configured for thisDN is selected. record=source is the default value if the extension is not defined.
- If RequestPrivateService is requested with AttrExtensions as record = destination, the geo-location configured for otherDN is selected.
Configuring Audio Tones
The following section outlines the general configuration for audio tones.
Media Server
The following table describes the options required for audio tones when using Media Server:
| Section Name | Parameter Name | Description |
|---|---|---|
| Conference | record_recorddnhearstone | Specifies whether the RecordDN (Party A) hears the repeating tone. |
| Conference | record_otherdnhearstone | Specifies whether the OtherDN (Party B) hears the repeating tone. |
Media Server allows you to configure whether the recording also gets the audio tone. When the audio tone is injected into the call, Media Server distinguishes between what the participant hears and what the participant says. The above two configuration parameters affect what the participant hears.
| Section Name | Parameter Name | Description |
|---|---|---|
| Conference | record_chan2source | Specifies the recorded media that represents the first participant (Record DN) in the recording session.
If the Other DN is configured to receive consent and you want the consent to be recorded, set the value to otherdnhears. |
| Conference | record_otherdnhearstone | Specifies the recorded media that represents the second participant (Other DN) in the recording session.
If the Record DN is configured to receive consent and you want the consent to be recorded, set the value to recorddnhears. |
Configuring Workspace
To configure MSML recording, set the following Workspace parameters:
| Parameter Name | Value |
|---|---|
| active-recording.voice.recorder-uri | Leave empty. The file recording destination is configured through the GVP IVR Profile. |
| active-recording.voice.recording-type | MSML |
Your Genesys Interaction Recording Solution is ready to start recording.
Configuring ICON
Configure your ICON application to filter the metadata to display specific keys in SpeechMiner.
In the callconcentrator section of the ICON application, set the following parameters:
- adata-reasons-history = none
- adata-extensions-history = none
- adata-userdata-history = all
- role = all
For more information about the ICON options, see the Interaction Concentrator 8.1 Deployment Guide.
To improve ICON performance for Genesys Interaction Recording, Genesys recommends updating the Genesys Interaction Recording dedicated ICON database schema with the following new indexes:
- Index G_PARTY:
- NONCLUSTERED/NONUNIQUE INDEX G_PARTY.CALLID
- Index G_USERDATA_HISTORY:
- NONCLUSTERED/NONUNIQUE INDEX G_USERDATA_HISTORY.CALLID
- Index G_IS_LINK:
- NONCLUSTERED/NONUNIQUE INDEX G_IS_LINK.CALLID
For optimal performance, it is recommended that the ICON's gsysPurge81 stored procedure (or similar) be used regularly to purge call data from the ICON database that is older than one or two days. See the
Interaction Concentrator 8.1 Deployment Guide for more information.
Configuring the Recording Processor Script
For information about configuring the Recording Processor components, see Deploying the Recording Processor Script.
Configuring the Recording Crypto Server
For information about configuring the Recording Processor components, see Deploying the Recording Crypto Server.
Configuring the Recording Plug-in for Genesys Administrator Extension
For information about configuring the Recording Processor components, see Deploying the Plug-in for Genesys Administrator Extension.
Configuring the SpeechMiner Components
[+] Configure the SpeechMiner Database
[+] Configure SpeechMiner


Your Genesys Interaction Recording System is ready for voice recording.
Configuring TLS for the Genesys Interation Components
For more information about configuring the transport layer security for the Genesys Interaction Recording components, see Secure Transport Configuration.
Configuring Access Control
Configuring Access Groups
By default, the Configuration Server has an Access Group called Users stored in the configuration database.
Install the Solution Deployment SPD file "Creation of base SpeechMiner access groups" option to perform the following steps:
- Create an Access Group called SpeechMiner Users, and set the permission to grant Users Access Group with Read access.
- Add a new folder within Access Groups, called Recording, and set the permission to add Users Access Group with Read access. Make sure the Replace Permissions Recursively flag is set as shown in the following diagram:
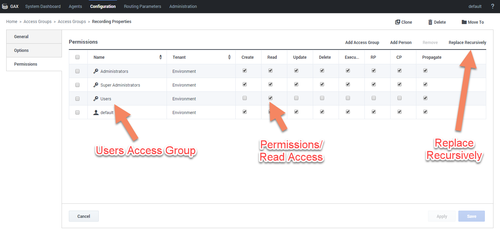
- Create the / (forward slash) Access Group within the Recording folder.

Configuring SpeechMiner Users
All users for SpeechMiner must be assigned to two Access Groups—Users and SpeechMiner Users. If agent hierarchy and partition features are not used, assign all the SpeechMiner users to the / (slash) Access Group. If agent hierarchy or partition features are used, the users must be granted to the specific Access Groups in order to be able to access recordings for the various agent hierarchy and partitions.
You must configure Genesys Interaction Recording to enable the SpeechMiner UI search option to display a list of agent names:
- In the Agent's Person object, create a recording section in the Annex (if it doesn’t already exist).
- Add the agent_hierarchy option in the recording section, and set the value to slash: "/" or what is appropriate for access control.
- Repeat these steps for any additional agents that might be searched for in the SpeechMiner UI.
- The SpeechMiner cache might need to be updated for this configuration to take effect:
- In the configServer table of the Configuration Server database, update the updateAgentsEveryH column to the number of hours between the SpeechMiner person object updates. SpeechMiner will check the Configuration Server according to this option at regular intervals to retrieve the list of person objects under the Recording folder access group. The names of these agents are then available when searching for call recordings or screen recordings. Restart the Interaction Receiver IIS application for this change to take effect.
- If the list of agents does not update, update the NextAgentsUpdate column in the configServer table to a date in the near future to force a quicker update.
- The Access Group / (forward slash) grants access to all recordings.
- Genesys Recommends using caution when using the Audio Protection: Comments role. You might not hear any part of the call if the call being played has no comments. You will only hear audio the corresponds to the areas where comments have been made.
The follow is a screen shot showing the assignment of Access Group members to /Anthony/Paul in Genesys Administrator Extension:

The Recording Plug-in for Genesys Administrator Extension includes a Solution Definition (SPD) file that can be used to configure roles and access groups.
Configuring Roles
For information about configuring roles for Genesys Interaction Recording users, see Roles in the Genesys Administrator Extension User's Guide.
Configuring Agent Hierachy
Agent hierarchy and partitions are not required to record calls or access recordings; however, all agents must be assigned to the Users Access Group.
If agent hierarchy is required, assign the agent’s hierarchy by configuring the agent_hierarchy option in the recording section of the Person object's Annex tab. For each hierarchy name, create a corresponding Access Group object within the Recording folder.
For the example above, create the following Access Groups:
- /
- /Anthony
- /Anthony/John
- /Anthony/Paul
The deployment can also grant access control for each specific agent, and in order to use this functionality, create an Access Group for each agent. For the same example, create the following Access Groups:
- /Anthony/John/Agent1
- /Anthony/John/Agent2
- /Anthony/Paul/Agent3
- /Anthony/Paul/Agent4
- /Anthony/Anthony (parent and child with the same name)
- /Anthony/John and /Steve/John (branches under Anthony and Steve have the same name)
Configuring Partitions
For each partition used in the contact, create an Access Group object with the name of the partition within the Recording folder. For example, if there are three partitions— /sales, /support, and /marketing, create three Access Group objects named /sales, /support, and /marketing, respectively.
For more information about configuring Access Controls in Genesys Administrator Extension, see the Genesys Administrator Extension User Guide.
Configuring Encryption for Call Recording
Call Recording
A Recording Certificate binds a public encryption key to a particular recorded message identity.
The following steps describe how to configure encryption for voice recordings:
Prerequisites
- A certificate for the Certificate Authority (CA) in .pem format—for example, ca_cert.pem.
- A recording certificate (also known as public key) in .pem format—for example, 02_gir_cert.pem.
- A recording private key in .pem format—for example, 02_gir_priv_key.pem.
- On the machine where the Recording Crypto Server is installed, place the Certificate Authority (ca_cert.pem) in the <Record Crypto Server Install Directory>\RCS directory.
- Edit the rcs.properties file:
- Change the value of the cacertstorepath parameter to ca_cert.pem.
- Set the value of the cacertstorepassword parameter to the valid password.
- Restart the Recording Crypto Server.
- Using Genesys Administrator, edit all your Media Control Platforms (MCP):
- On the Options tab of each MCP application object, in the mpc section, set the mediamgr.CA_file parameter to the location of the Certificate Authority file (for example, c:\keystore\ca_cert.pem).
- Restart all the MCP instances.
You are now ready to upload and deploy your certificates to complete the encryption process.
A Recording Certificate binds a public encryption key to a particular recorded message identity.
The following steps describe how to configure encryption for voice recordings:
Prerequisites
- A certificate for the Certificate Authority (CA) in .pem format—for example, ca_cert.pem.
- A recording certificate (also known as public key) in .pem format—for example, 02_gir_cert.pem.
- A recording private key in .pem format—for example, 02_gir_priv_key.pem.
- On the machine where the Recording Crypto Server is installed, place the Certificate Authority (ca_cert.pem) in the <Recording Crypto Server Install Directory>\RCS directory.
- Edit the rcs.properties file:
- Change the value of the cacertstorepath parameter to ca_cert.pem.
- Set the value of the cacertstorepassword parameter to the valid password.
- Restart the Recording Crypto Server.
- Using Recording Plug-in for Genesys Administration Extension, edit all your Media Control Platforms (MCP):
- On the Options tab of each MCP application object, in the mcp/tt> section, set the mediamgr.CA_file parameter to the location of the Certificate Authority file (for example, c:\keystore\ca_cert.pem).
- Restart all the MCP instances.
For an example of a certificate, see Sample Certificate and Key File Generation. You are now ready to upload and deploy your certificates to complete the encryption process.
[+] Show how to upload a Certificate


[+] Show how to deploy a Certificate


Enabling Voice Recording
Call recording can be enabled through three methods:
- Full-time recording or Total recording—A specific DN is configured to enable recording for all calls for the specific DN.
- Selective Recording—Record a party in the call is determined at a route point and the recording starts as soon as the call is established.
- Dynamic Recording—Start/stop/pause/resume a recording call can be requested by an agent at any time after the call is established using Interaction Workspace.
Once a recording has started, there are two conditions where the recording stops:
- When the party being recorded leaves the call, or when the customer drops the call. For example, when the recording applies to the agent in the call and the call is transferred to a second agent. The recording is stopped when the agent leaves the call. Note that the second agent can have recording enabled and the same call gets recorded with a second call recording segment.
- When dynamic recording control requests the recording to be stopped.
Enabling Screen Recording
Configure the following components to enable screen recording:
Configuring Web Services for Screen Recording
[+] Configure the Parameters[+] Restart Web Services
[+] Configure Storage Credentials
[+] Advanced Configuration
For more information about the Web Services Call Recording API, see the Genesys Interaction Recording API Reference.
Configuring Encryption for Screen Recording
Assigning Certificates
To assign a new certificate:
- Using Genesys Administrator Extension, in the header, go to Administration > Screen Recording Certificates.
- On the Screen Recording Certificates panel, click Add.
- From the Select Certificate window, perform one of the following actions:
- Select the check box next to the appropriate certificate, and click Add.
- Click Cancel to discard any changes.
- Perform one of the following actions:
- Click the Save button to accept the changes.
- Click the Cancel button to discard the changes.
Setting up the Decryption Proxy
- Configure the Record Crypto Server (RCS) locations that Web Services uses for encrypted screen recordings:
- For a single location:
- Using a text editor, create the create_single_location file using the following command:
{ "name":"decrypt-uri-prefix", "location": "/", "value": "<rcs uri>" }ImportantReplace <rcs uri> with the appropriate value. - Execute the following command:
curl -u ops:ops -X POST -d @create_single_location http://<Web Services Server>:8080/api/v2/ops /contact-centers/<contact center ID (in hex format)>/settings/screen-recording --header "Content-Type: application/json"; echo
- Using a text editor, create the create_single_location file using the following command:
- For multiple locations:
- Using a text editor, create the create_first_location file using the following command:
{ "name":"storage", "location": "<node_location>", "value": "<rcs uri>" } - Execute the following command:
curl -u ops:ops -X POST -d @create_first_location http://<Web Services Server>:8080/api/v2/ops
/contact-centers/<contact center ID (in hex format)>/settings/screen-recording
 --header "Content-Type: application/json"; echo
ImportantReplace <node_location> with the appropriate value. The values for the <node_location> are similar to the nodePath settings in the server-settings.yaml file, but allow a hierarchical representation. For example, a Web Services node uses a decrypt-uri-prefix setting with a location of "/US" if the nodePath set to "/US/AK" or "/US/HI". - Repeat steps a and b for each location required.
- Using a text editor, create the create_first_location file using the following command:
- For a single location:
Enabling Screen Recording
- To set up recording conditions, add the recordingWhen parameter to the screen-recording-client section of the WWEWS_Cluster object.
When this parameter is set at WWEWS_Cluster object, the recording condition applies to all agents in the environment. You can create the recordingWhen parameter in a screen-recording-client section of each agent object to override the settings at the environment level.
The parameter value is an expression of conditions to enable screen recording for each agent. The format is:- For Non-voice agents: recordingWhen=condition1,condition2,... where condition1,condition2, etc. are a set of conditions that must all be true in order for the screen recording to be taking place.
- For Voice agents: Screen recording starts when recordingWhen is not set to off and the voice recording starts.
Condition Description off A special case. Cannot appear with other conditions. When specified as such, screen recording never occurs for the agent. loggedin When the agent is logged in DNDoff When agent sets DND (do not disturb) to off ready(any) True when any media type is set to ready, or list(ready media).count != 0 ready(abc) True when the abc media type is set to ready ready(abc,...xyz) A list of media types that are set to ready. Note that ready(abc,...xyz) = ready(abc) || ... ready(xyz). random_voice(%) Records the agent's screens based on a percentage (%) of the total voice call volume for that agent. - For voice deployments, set up the maximum screen recording duration based on the quality preset in the screen recording client configuration. (see,
Configuring the Screen Recording Client for more information about these parameters).
Depending on the qualityPreset value, set the screen recording duration as follows:- If qualityPreset is Low— set maxDurationMinutes to 180.
- If qualityPreset is Standard—set maxDurationMinutes to 120.
- If qualityPreset is High—set maxDurationMinutes to 75.
Configuring the Screen Recording Client
For information about configuring the Screen Recording Client, see Deploying the Screen Recording Client.