Import, Export, and Manage Contact Lists
For the latest content and most recent updates, see the CX Contact Help on the Genesys Multicloud site.
This article describes how to import and manage contact lists. It includes the following topics:
- Import a list
- View import activity
- Create an empty list object
- Export a list
- Edit a list
- Delete a list
- Manage contacts
Import a New List
There are two basic steps to importing a contact list in CX Contact:
Data Mapping
Before importing a contact list, you need to decide how you want the contact data to be mapped in CX Contact. Here are your options:
- Create a header row in your contact list with field names that match those in the CX Contact contact list. When the file is imported, the data is mapped directly into the corresponding contact list fields.
- Use a specification file to map custom fields to CX Contact fields. If you choose this option, you will need to import the specification file before importing the contact list. Refer to the Import Specification Files page for instructions.
- Use the data Mapping feature in CX Contact to define the mapping for your contact list. If you choose this option, you will need to create the data mapping schema before importing the new contact list. Refer to the Create a Data Mapping Schema page for instructions.
Import the Contact List
To import the contact list, click New->List to go to the New List page. The table below describes the available list upload options.
| Option | Description |
|---|---|
| Upload Rule | Select an upload rule if, during the upload, you want the records within your contact list to be split according to defined splitting criteria. All upload rules are defined on the List Rules page in CX Contact.
Related Documentation: Create and Manage List Rules |
| Secure with encryption | To secure a Contact list with encryption, select the checkbox. When this option is selected, the system will accept input files encrypted with an asymmetric key using PGP Encryption. Also, when this option is selected exported files will also be encrypted with an asymmetric key using PGP Encryption.
Related Documentation: Security |
| Specification File | To use a specification file, set the Use Specification File switch to the On position and then choose a specification file from the Specification File menu.. All specification files are imported via the Lists -> Specification Files page in CX Contact.
Related Documentation: Import Specification Files |
| Data Mapping | This option is enabled only when the Use Specification File switch is set to Off. It allows you to apply a data mapping schema to your contact list. All data mapping schemas are created on the Data Mapping page in CX Contact.
Related Documentation: Create a Data Mapping Schema |
| Label | If you want to apply a labeling schema to the contact list, select the labeling schema.
Related Documentation: Create and Manage User Field Labels |
| Use Custom Timezones | If you want to override the automatic system timezone assignment and instead use the entries you created in the time zone compliance section of CX Contact, leave the Use custom time zones option checked (this is checked by default).
Related Documentation: Time Zone Assignment Options |
Once you click Import, the file will begin loading, and contacts will be loaded into the contact list. The new contact list appears on the Lists page and includes the following details:
- Name - Name of the list
- Description - Description of the list (if specified)
- Label - The labeling schema being applied to that contact list, if applicable.
- Size - The number of contact records in the list.
- When importing a Call List you will now see a progress bar in the Size column. The Progress bar
 displays the current status of the import process.
 - To cancel the process of importing a Call List, click the x next to the Progress bar.
- When importing a Call List you will now see a progress bar in the Size column. The Progress bar
- Created Date - The date the list was created
- Actions
- Filter - To create a virtual list using a selection rule, click the filter icon. As part of creating the new list, you can see a preview of the list. The preview can be discarded, overwritten by the selection of a different rule, or saved as a new list, based on the original list.
- Edit
- Download
- Delete
- View Import Activity
View Import Activity
Once a list has been imported into CX Contact, you can view all import activity associated with it. To do this, go to the main Lists page and from the Actions menu, click Import Activity. The following information is presented:
- Start Time - The start time of the import
- End Time - The end time of the import
- Original - The number of lines in the input file. Click the download icon to download the Original input file. The Original input file may be used to validate the Calling List content.
- Rejected - The number of lines rejected during import.
- Action Type - See below for a description of each append type.
- Activity Type - Indicates if the import activity is manual or list automation.
- Import Result - Indicates if the import activity succeeded or failed.
- Message - An Error message about the failed import result.
- Columns Action Type, Import Result and Message are only available for the Manual activity type. These fields will be empty for the List Automation activity type.
- The default CX Contact behavior is to reject Bad Numbers/No Devices during the Import process. These rejected records are stored as a downloadable artefact. For specific use cases (for example, auditing, or number tracing services), users can create a selection rule for invalid numbers that supports the importing of rejected records into target lists.
Create an Empty List Object
If you want to create a new list from scratch:
- Select New->List.
- Enter the list name and description (optional).
- Click Import.
You can now append contacts to this empty list object, using the append types described below.
Export a List
When you export a contact list, a CSV text file is made available as a download from CX Contact. All data associated with the contact list, including user-defined data, is included in the export as a single list. See Contact Lists Fields for more information about contact list fields.
To export a contact list, select the Download icon ![]() from the Actions menu next to the name of the list to be exported.
from the Actions menu next to the name of the list to be exported.
Edit a List
Once you've created a list, you can edit the list and the contacts contained within that list.
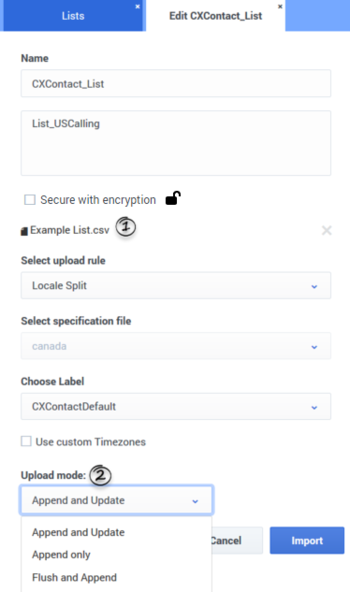
To edit a list, on the Lists page, select the list to be edited by clicking the name or by selecting the pencil icon. Edit any or all of the list details as required.
Or, if you've added contacts to the list and need to update the list, select Select File to import the new records.
In the Upload mode menu, select from the following append types:
- Append and update - the imported records are added to the contact list. If CX Contact finds a duplicate record it overrides the existing record with the new record.
- Append only - the imported records are added to an existing contact list. Duplicate records are always ignored.
- Flush and append - before the new records are imported into the contact list, the existing contact list is completely flushed.
Delete a List
To delete one or more contact lists, select the check box next to the list(s) to be deleted and click Delete.
The list and all contacts in that list are deleted from CX Contact
Manage Contacts within a List
Once you've created a list, you can add or delete contacts within the list.
Add a Contact to a List
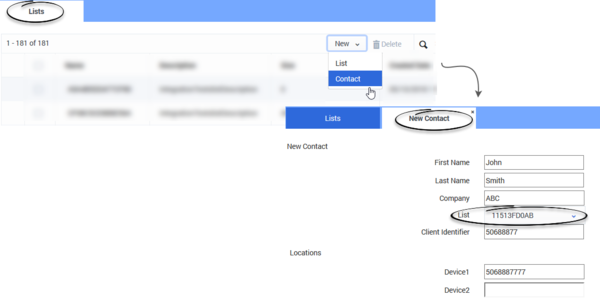
You can create a new contact and assign that contact to a list in one of two ways:
Option 1
- From the Lists page, select New -> Contact.
- Enter the contact information.
- From the List drop-down, select the list that the contact will belong to.
Option 2
- From the tabbed Lists menu, select Contact Search.
- On the Contact Search page, click New Contact.
- Enter the contact information.
- From the Lists menu, select the list that the contact will belong to.
For information about contact list fields, go here.
Delete a Contact from a List
When you delete a contact from a list, you permanently delete the contact.
To delete a contact from a list:
- From the Lists menu, select Contact Search
- On the Contact Search page, search for the contact you want to delete.
- Select each contact you want to delete and click the trash can icon.


