Contents
Compliance Tools
For the latest content and most recent updates, see the CX Contact Help on the Genesys Multicloud site.
This article describes the compliance tools used to restrict contact attempts. The compliance tools include the following:
Attempt Rules
Use the Attempt Rules option to specify certain conditions that, when met, suppress a contact attempt. The following conditions can make up an Attempt Rule:
| Required | Indicate whether the rule is Required. If a rule is Required, CX Contact will apply it to all new and existing campaigns, even ones that are currently running. If a rule is not Required, it is considered an Optional rule and must be manually applied to all applicable campaigns. You do this when you create or modify a new campaign template or campaign group. See the instructions below. |
| Priority | Set the priority of this rule. If you have multiple rules the priority value denotes the order in which the rules will be applied. A lower priority value indicates a higher priority, with 1 being the highest priority. |
| Rule Scope | Specify if the rule should be applied at the Tenant level or at the Campaign Group level. |
| Do Not Contact if | Fill in the values for the contact attempt rule. For example, Do not contact if 4 Outbound attempts have been made in the last 5 hours.
Select Today when you want to count the attempts made today (after the last midnight) and select In the last when you you want to count attempts made in during a specific time. |
| Count By > Call Results | Define the attempt rule by call result status. By default, the following 12 call results are pre-selected.
Refer to the Call Results table on the Delivery and Retry Options page for a description of each call result. |
| Count By > Disposition Codes | Define the attempt rule by Disposition Code.
For details refer to the Treatments based on Disposition Codes section in the Delivery and Retry Options page and the Dispositions section in the Administrator's Guide. |
| Contact Results | Select the call results that should be included as part of the Attempt Rules definition. |
| Count Attempts Using | Indicate whether to count previous attempts only:
Note: When Device or ClientID/Device is selected, additional options will be presented, allowing you to target specific Device fields (including all Devices), and to also define a Device type. For example All Devices that are Mobiles enables you to control the number of attempts made to mobile phones. |
| To | Specify the location of previous attempts (that otherwise meet the conditions above) to count. If not specified, previous attempts to anywhere (using the current Client ID or Device, as specified above) are counted. |
| Count attempts between times | Indicates the number of outbound attempts that were made today during a specific time period. The Attempt rule will only count attempts made within the defined time period. Attempts made outside this time period will not be counted by this rule.
Note: The Start Time and End Time options are only available when Count attempts between times is turned on. The Timezone source field is not editable. It is set within the campaign group settings. |
| Apply Disposition Code | Select a Disposition Code to be applied to the call attempt when the outcome is a negative rule check result. Treatment could be defined for this Disposition Code. If no Disposition Code is selected, Treatment can be applied to "Cancel Record" call result. |
| How to enable |
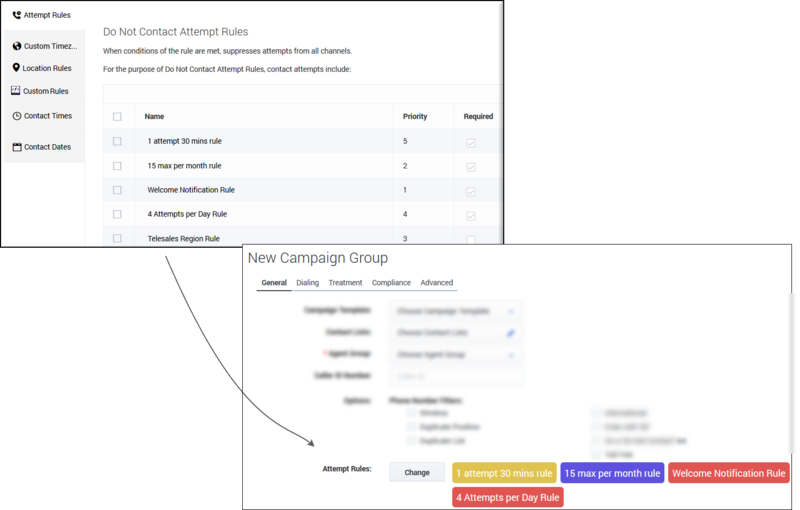
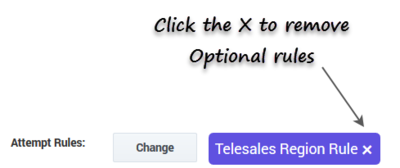
On the Attempt Rules tab, select New and specify the parameters as described in the table above. The new rule will appear on the Attempt Rules page and it will populate in the Attempt Rules section when you create or edit a campaign object (dialing profile, campaign template, or campaign group). Notice that you only see the Required rules, meaning that those are the rules that are automatically applied to all new and existing campaigns because you checked Required when you set up the rule. If you don't want to apply a Required rule to a campaign object, you must return to the Compliance Tools page and uncheck Required for that rule. You cannot deselect a Required rule when you create or edit the campaign object. If you want to add Optional rules (rules that weren't marked as Required) to the campaign object, click Change and select the rules from the list. The Optional rules will appear alongside the Required rules. You can click the X next to the name of any Optional rule to remove it. |
Edit, Delete, or Duplicate an Attempt Rule
On the main Attempt Rules page, use the Actions menu next to any Attempt rule to do any of the following:
- Edit - Click the pencil icon.
- Delete - Click the trash can icon.
- Duplicate - Click the document icon. The Duplicate Attempt Rule dialog box opens with the settings from the original rule populated. You can change any or all of them. If you do not change the name of the Attempt rule, it will inherit the name of the original Attempt rule, with _duplicate1 appended to it.
Custom Timezones
Use the Custom Timezones option to assign a timezone to phone numbers containing a specific country code, area code, and optionally exchange. For example, you can assign the EST timezone to all national rate phone numbers.
| How to enable |
|
Edit or Delete Custom Timezone Rules
On the main Custom Timezones page, use the Actions menu next to any rule to edit or delete the rule:
- Edit - Click the pencil icon.
- Delete - Click the trash can icon.
Location Rules
Location rules suppress contact attempts based on the location of a contact or device.
Each Location rule is made up of the following attributes:
| Name | The rule name must be unique within the account and rule type, and may contain letters, digits, hyphens, and underscores, and spaces. |
| Required | Specify if this is a Required rule. If a rule is Required, CX Contact will apply the rule to all new and existing campaigns, even ones that are currently running. If a rule is not Required, it must be manually applied to all applicable campaigns. You do this when you create or modify a campaign object. See the instructions below for more information. |
| Priority | Set the priority of this rule. If you have multiple rules the priority denotes the order in which the rules will be applied. A lower priority value indicates a higher priority, with 1 being the highest priority. |
| Determine location by | The location of the attempt may be based on the Device or the Contact. |
| Do not contact locations |
Specify the locations that should be suppressed:
Note: The postal code can include an asterisk (*) that acts as a wildcard (that is, zero or more instances of any character).
Note: Selecting All Types and/or All Devices will completely suppress dialing. |
| Devices | Select the devices to which you want to apply the Location rule.
|
| How to enable |
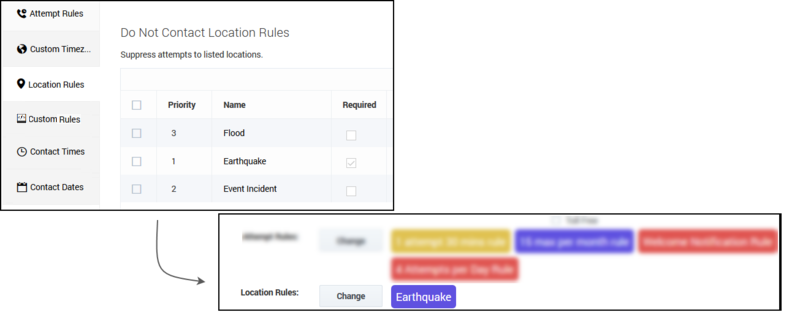
On the Location Rules tab, select New and specify the location attributes as described above. The new rule will appear on the Location Rules page and it will populate in the Location Rules section when you create or edit a campaign object. Notice that you only see the Required rules, meaning that those are the rules that are automatically applied to all new and existing campaigns because you checked Required when you set up the rule. If you don't want to apply a Required rule to a campaign object, you must return to the Compliance Tools page and uncheck Required for that rule. You cannot deselect a Required rule when creating or editing a campaign object. If you want to add Optional rules (rules that weren't marked as Required) to the campaign template or campaign group, click Change and select the rules from the list. The Optional rules will appear alongside the Required rules. You can click the X next to the name of any Optional rule to remove it from that campaign template or campaign group. |
Edit, Delete, or Duplicate a Location Rule
On the main Location Rules page, use the Actions menu next to any Custom rule to do any of the following:
- Edit - Click the pencil icon.
- Delete - Click the trash can icon.
- Duplicate - Click the document icon. The Duplicate Location Rule dialog box opens with the settings from the original rule populated. You can change any or all of them. If you do not change the name of the Location rule, it will inherit the name of the original Location rule, with _duplicate1 appended to it.
Custom Rules
Use the New Custom Rule option to create a rule that will allow or deny outbound dialing according to a user-defined Java Script expression evaluated for each outbound call immediately before dialing occurs. A custom rule enables you to implement customized business rule logic.
- AttemptsOnDevice - Indicates the number of attempted interactions from a specific device.
- AttemptsOnContact - Indicates the number of attempted interactions from a specific contact.
!($GSW_STATE_CODE == CA && AttemptsOnDevice(24H, [Answer, Abandoned, Overflowed, ...]) > 1) Each Custom rule is made up of the following attributes:
| Name | The rule name must be unique within the account and rule type, and may contain letters, digits, hyphens, and underscores, and spaces. |
| Required | Specify if this is a Required rule. If a rule is Required, CX Contact will apply the rule to all new and existing campaigns, even ones that are currently running. If a rule is not Required, it must be manually applied to all applicable campaigns. You do this when you create or modify a campaign group. See the instructions below for more information. |
| Priority | Reserved for future use. Editing this parameter will not yield any results in CX Contact. |
| Description | Enter an optional explanation of the purpose of the custom rule. |
| Custom Expression | Enter a Java Script expression that evaluates the conditions for a True or False outcome. True allows the dial to occur. False does not allow the dial to occur. Note: You can refer to the user data values attached to the call using: $<user data key name> in expression. For example: ($Other15 !== 'Platinum' || new Date().getDate() % 2 === 0). |
| Apply Disposition Code | Select a Disposition Code to be applied to a call attempt, when the outcome of the call attempt is a negative rule check result. A treatment can be defined for the Disposition Code. If a Disposition Code is not selected, the "Do Not Call" call result treatment may be applied. |
| How to enable |
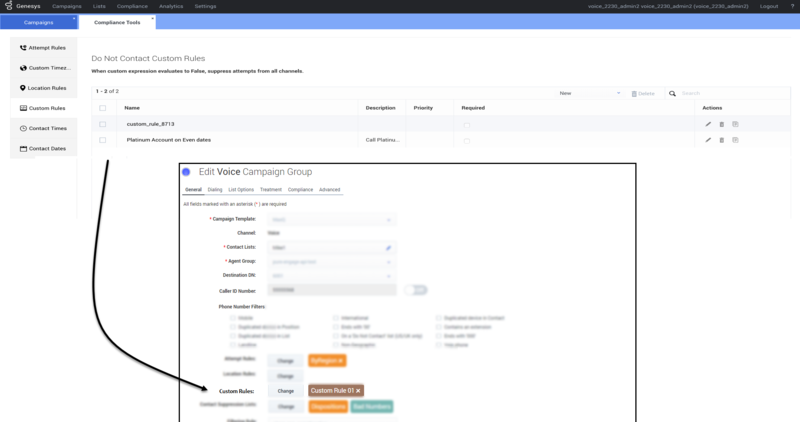
On the Custom Rules tab, select New and specify the custom rule attributes as described above. The new rule will appear on the Custom Rules page and it will populate in the Custom Rules section when you create or edit a campaign group. Notice that you only see the Required rules, meaning that those are the rules that are automatically applied to all new and existing campaigns because you checked Required when you set up the rule. |
Edit or Delete Custom Rules
On the Custom Rules page, use the Actions menu next to any rule to edit or delete the rule:
- Edit - Click the pencil icon.
- Delete - Click the trash can icon.
- Duplicate - Click the document icon. The Duplicate Custom Rule dialog box opens with the settings from the original rule populated. You can change any or all of them. If you do not change the name of the Custom rule, it will inherit the name of the original Custom rule, with _duplicate1 appended to it.
Contact Times
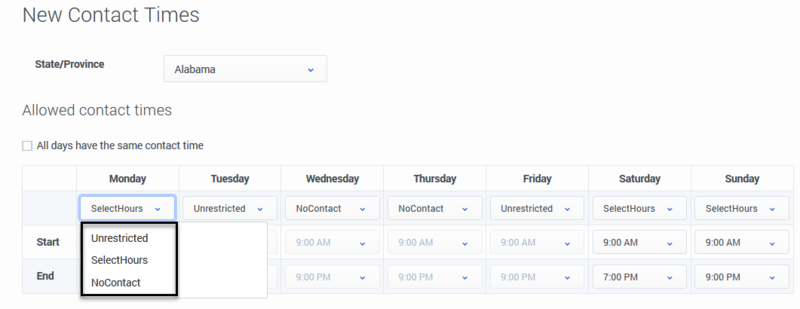
Use the Allowed Contact Times option to define allowable calling windows for each day of the week for a given region for a specific set of devices. Contact attempts to your contacts in those regions will be limited to the time frame you define on each day, regardless of your contact center hours and campaign time frames. For example, if you have campaigns running from 8AM to 9PM local time, and you restrict attempts in New York to 9AM to 7PM, no attempts will be made to anyone in New York until 9AM, and they will end at 7PM.
To enable Contact Times by region:
- Select the Contact Times tab.
- Select New > Contact Time and configure the following:
| Option | Description |
| Name | The Contact Time name. |
| Required | Select Required to apply the Contact Time rule to all Campaign Groups. |
| Priority | Set the priority of this rule. If you have multiple rules the selected priority denotes the order in which the rules will be applied. A lower priority value indicates a higher priority, with 1 being the highest priority. |
| Country | Select the target country for this rule or select “Any Country” to apply this rule regardless of the country being contacted. |
| Region/State/Province | Select one or more Regions, States or Provinces for this rule. If not selected all regions/States/Provinces for this country will be applied to this rule. |
| Devices | Select one or more devices associated with this new rule. Note: Any Device can only be selected when no other device was selected. |
| Device Type | Select one or more of the following devices. Note: Any Device Type can only be selected when no other device was selected.
|
| Timezone Source | Indicates the timezone source. |
| Apply Disposition Code | Select a Disposition Code to be applied to a call attempt when the outcome is a negative rule check result If a Disposition Code is not selected, Treatment can be applied to the "Cancel Record" call result. |
| Strict | Select one of the following:
|
| Allowed Contact Times | The following types of restrictions are available for any given region:
Note: When Strict is enabled All days have the same contact time is enabled and cannot be unselected. |
Edit or Delete Contact Times Rules
On the Allowed Contact Times by Country and Region/State/Province' page, use the Actions menu next to any rule to edit or delete the rule:
- Edit - Click the pencil icon.
- Delete - Click the trash can icon.
Contact Dates
Use the Do Not Contact Dates option to specify a date in which contact attempts cannot take place. This will apply to any device in the account and will be effective for 24 hours (midnight to midnight, local to the device).
| How to enable | On the Do Not Contact Dates tab, add a Label (for example Christmas Day) and select the associated date (for example December 25). |
Delete Contact Dates Rules
You cannot edit a Contact Dates rule - the only option is to delete the existing rule and create a new one with a different date or label. To delete the rule, check the box next to the rule name and click the trash can icon.

