Contents
Device Escalation
For the latest content and most recent updates, see the CX Contact Help on the Genesys Multicloud site.
In the event records within a contact list contain multiple devices, you can use the Device Escalation feature to specify which device(s) in the record you want the system to dial. If you want the system to dial more than one device, you can define the order in which the devices are dialed. For voice campaigns, you can also specify how to handle answering machine detection - drop the call, deliver the call to an agent, or send the call to a DN for treatment (for example, leave a pre-recorded message).
This article describes the Device Escalation sub-tab of the Treatment tab. For information on the Delivery Options sub-tab or the Retry Options sub-tab, go here. For information about applying SCXML treatment scripts, go here.
Enable Device Escalation
To get started, go to the Treatment tab to see all available treatment sub-tabs - Delivery Options, Retry Options, Device Escalation and Summary.
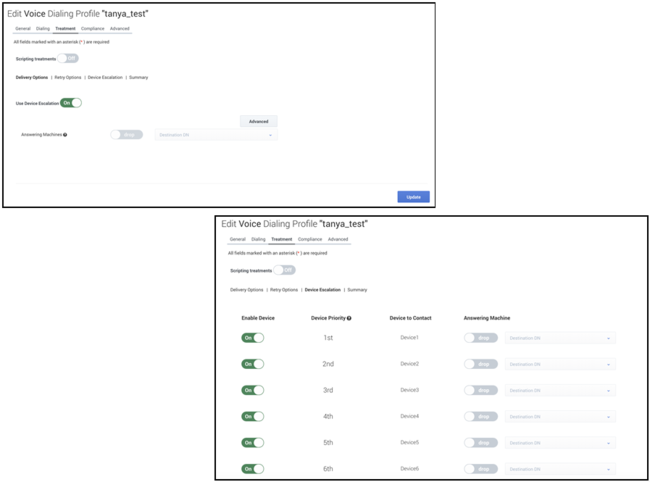
The Device Escalation sub-tab is initially disabled (greyed out). To enable it, set the Use Device Escalation switch to the On position.
Now you can click the Device Escalation sub-tab to define the device escalation plan.
By default, all 10 devices are enabled and are prioritized/ordered from Device 1 to Device 10. Each device can be enabled or disabled.
The fields on the Device Escalation tab are as follows:
- Enable Device - On means the device is attempted and included in the escalation plan. Off means it is excluded.
- Device Priority and Device to Contact - These fields define the priority of a device being attempted. For example, if you want Device 3 to be attempted first (i.e. before all other devices in the escalation plan), drag and drop Device3 to align with the 1st Device Priority field. See the Prioritize Contact Order example below for more information.
- Answering Machine (enabled for the voice channel only) - Define how you want the system to respond if it detects an answering machine. See the section on Handling Answering Machine Detection below for more information.
Handle Answering Machine Detection
The system can handle answering machine detection in a couple of ways:
- Drop the call
- Deliver to a DN - to either an agent group or to a DN where a pre-recorded message is played.
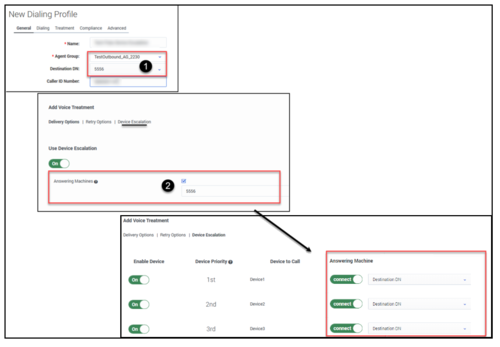
If you opt for the second option, you must first do the following:
- On the General tab for the campaign object, specify an Agent Group and Destination DN.
- On the Treatment -> Delivery Options tab, set the switch to connect to enable the correct behavior for the Answering Machine. The DN or DN's associated with the agent group specified on the General tab populate the DN field drop down menu.
Device Escalation Business Scenario
The best way to understand how this feature works is to read the scenario below and then apply the principles and plan to your own scenario.
To begin, let's say there are four devices for a record:
- Device 1 is home
- Device 2 is personal mobile
- Device 3 is work
- Device 4 is business mobile
You should now formulate a plan. In this scenario, you should start by determining which devices you want to target, then prioritize the order in which those devices are contacted, and then determine what you want to do if the system detects an answering machine on any given device.
Target Devices
Plan: You're calling at a time when contacts are unlikely to answer their home phone or their work phone - say at lunch time on a weekday - so you want to target mobile devices only. In this case, that's Device 2 (personal mobile) and Device 4 (business mobile).
Action: For Device 2 (personal mobile) and Device 4 (business mobile), leave the Enable Device switches set to the On position. For all other devices, turn the Enable Device switch to the Off position.
Prioritize Contact Order
Plan: Notice in the Device to Contact field that Device 2 (personal mobile) is placed in the 2nd priority position, while Device 4 (business mobile) is placed in the 4th priority position. That means the system will call the personal mobile phone before calling the business mobile. Let's say you want the reverse to happen - you want to start with Device 4 (business mobile) before proceeding to Device 2 (personal mobile).
Action: To reverse the order:
- Drag Device2 (personal mobile) from the 2nd priority position to the 4th priority position. This moves Device4 to the 3rd priority position because a device that is displaced from its original position moves up or down one position - it does not switch places with the device moving into its position.
- Drag Device4 (business mobile) from the 3rd priority position to the 2nd priority position.
Handle Answering Machine Detection
Plan: If an answering machine is detected on Device 2 (personal mobile), you want an agent to take the call and leave a voicemail. If an answering machine is detected on Device 4 (business mobile), you want the system to hang up.
Action: In the Answering Machine field, select the following:
- Device 4 (Business mobile) - Enable the Drop option.
- Device 2 (Personal mobile) - Leave the Connect option enabled (checked).


