Contents
Create and Manage User-defined Field Labels
For the latest content and most recent updates, see the CX Contact Help on the Genesys Multicloud site.
By default, all user-defined fields in a contact list are labelled as Other1, Other2, Other3, and so on, but you can override the default labels to clearly identify what the field is used for. For example, if you use Other21 to store the current balance remaining on a contact's account, you can change the field's Other21 label to Balance.
In this article, you'll learn how to change the default label for a user field. More specifically, you'll learn the following:
- Create the labeling schema that stores all user fields and their label properties
- Create or edit user fields in a labeling schema and define their label properties
- Apply a labeling schema to any of the following:
Create a Labeling Schema
A labeling schema is the shell that stores all defined label properties for a user field in a contact list. You must have a labeling schema in place before you can create or edit user fields and define their label properties.
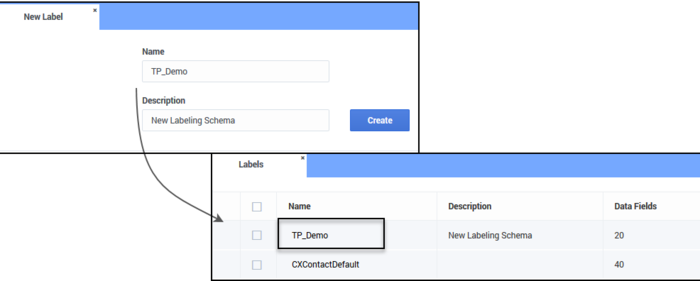
To create the labeling schema, go to the Lists -> Labels page and click New.
Next, specify a name and a description for the labeling schema and click Create. You'll return to the main Labels page and see the new labeling schema you just created.
The main Labels page displays the following properties for each labeling schema:
| Property | Description |
|---|---|
| Name | Name of the labeling schema. |
| Description | The description of the schema. |
| Data Fields | The number of data fields stored in the labeling schema. Note: Every labeling schema contains the standard 20 user fields (Other1-Other20) included in a contact list, so the minimum value in this field will always be 20. |
| Created Date | The date you created the labeling schema. |
| Actions |
Use the Actions menu to do any of the following:
|
Create or Manage User Fields and Labels
Once you've created the labeling schema, you can click its name and do any of the following:
- Create a new user field and define its label properties
- Create multiple user fields simultaneously
- Edit existing user fields or label properties
- Delete user fields
- Search for a user field
Create a New User Field and Define Label Properties
To create a new user field in your labeling schema and define its label properties, click the name of the labeling schema on the main Labels page. You'll go to the User Fields page that lists all user fields and corresponding label properties in that labeling schema.
Click New and define the label properties as described in the table below. An example follows.
Click Import and import label definitions from a .json file. For details see Import Lables.
| Property | Description |
|---|---|
| Field Name | This is the default field name - Other1, Other2, Other3, and so on. When you create a new user field, the system auto-populates the value of Field Name so that all user fields are in sequential order. For example, if you currently have 27 user-defined fields in your contact list (Other1-Other27) and you click New to create a new user field, the Field Name value will default to Other28. You cannot edit this value. |
| Label | This is the label that corresponds to the field name. |
| User Data Key Name | Used to identify the type of data stored in a field within the contact list. |
| Display | Select this option if you want the new field label to override the default Other field label in all sections of the user interface that display contact list fields. |
| Attach to calls | Select this option if you want the new user field to be attached to outbound calls, so that agent desktop applications can access the data. |
Once you define the properties and select Save, you'll return to the User Fields page and see the new label properties that correspond to your user field.
| Example |
If you want to use the Other21 field to store the balance owing on a customer's account, you could use the following label properties:
|
Create Multiple User Fields
If you want to create more than one new user field, go to the User Fields page and click New Multiple.
Next, in the Field count box, enter the number of new fields you want to create. If, for example, you have 20 existing user fields and you want to add 12 new user fields, type 12 in this box. When you're finished, the system will add 12 new fields in sequential order (Other21-Other32).
You will then select each new field individually to define its label properties.
Edit User Fields
To edit the label properties of a user field, go to the User Fields page and click the name of the field (in the Field Name column) or click the corresponding pencil icon to open and edit the field's properties.
Import Labels
To import labels from a .json file, click the Import icon.
Next, in the Import Label Definition from file window, click Select file (.json).
After you select the .json file click Import. The new label is created and an Import Label tab is opened for the imported label.
Review the details, make modifications if necessary and click Create. The imported label will now appear in the Labels table.
Delete User Fields
To delete a user field, click the trash can icon that corresponds to that user field or click the check box to the left of the field name and click the trash can icon at the top of the list of user fields.
- Because the user fields in a contact list are ordered sequentially, you can only delete the last user field in a sequence. For example, if you have 27 user fields in your schema (Other1-Other27) and you want to delete Other25, you must first delete Other27 and then Other26.
- Because Other1-Other20 fields are standard fields in a contact list, those fields cannot be deleted. You can only edit the label properties for those fields.
Search for a User Field
Use the search box located at the top of the user field list to search for a user field.
Create Multiple User Fields
If you want to create more than one new user field, go to the User Fields page and click New Multiple.
Next, in the Field count box, enter the number of new fields you want to create. If, for example, you have 20 existing user fields and you want to add 12 new user fields, type 12 in this box. When you're finished, the system will add 12 new fields in sequential order (Other21-Other32).
You will then select each new field individually to define its label properties.
Edit User Fields
To edit the label properties of a user field, go to the User Fields page and click the name of the field (in the Field Name column) or click the corresponding pencil icon to open and edit the field's properties.
Delete User Fields
To delete a user field, click the trash can icon that corresponds to that user field or click the check box to the left of the field name and click the trash can icon at the top of the list of user fields.
- Because the user fields in a contact list are ordered sequentially, you can only delete the last user field in a sequence. For example, if you have 27 user fields in your schema (Other1-Other27) and you want to delete Other25, you must first delete Other27 and then Other26.
- Because Other1-Other20 fields are standard fields in a contact list, those fields cannot be deleted. You can only edit the label properties for those fields.
Search for a User Field
Use the search box located at the top of the user field list to search for a user field.
Apply a Labeling Schema to a Contact List
After you've created the labeling schema, you can apply it to any contact list stored within CX Contact. Here's how it works:
- Create and save the labeling schema.
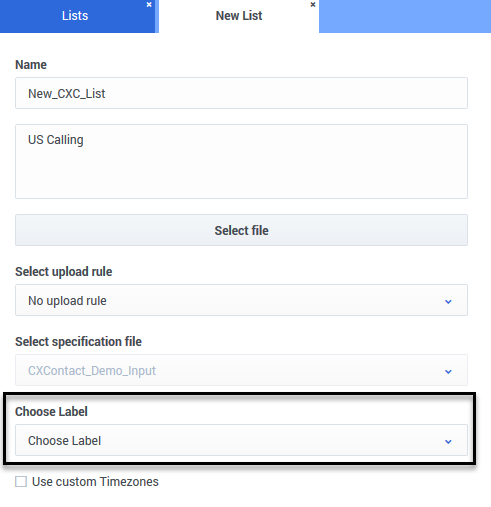
- Create or edit a contact list and choose the labeling schema from the Choose Label menu.
Now, when you go to the Lists page, the name of the labeling schema that you applied to a contact list appears in the corresponding Labels column.
Apply a Labeling Schema to a Dialing Profile, Campaign Template, or Campaign Group
Once you've created a labeling schema, you can apply it to a dialing profile, campaign template, or campaign group. Here's how:
- Create the labeling schema.
- Create or edit an existing dialing profile, campaign template, or campaign group.
- From the Labels menu, select the labeling schema.
The labeling schema will be applied to all contact lists that are part of the campaign group. The labels within the labeling schema will populate in the Contact Order menu as long as you selected the Display option when you defined the label properties for the user fields.
Apply a Labeling Schema to a List Rule
Once you've created a labeling schema, you can apply it to a either a selection rule or an upload rule, as follows.
Selection Rule
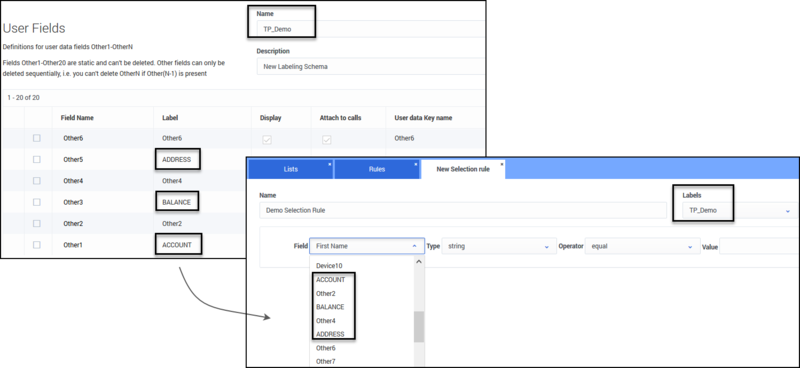
To apply a labeling schema to a selection rule.
- Create and save the labeling schema.
- Create or edit an existing selection rule.
- Select the labeling schema from the Labels menu.
The user fields contained in your labeling scheme will now populate in the Fields menu as long as you selected the Display option when you defined the label properties for the user fields.
Upload Rule
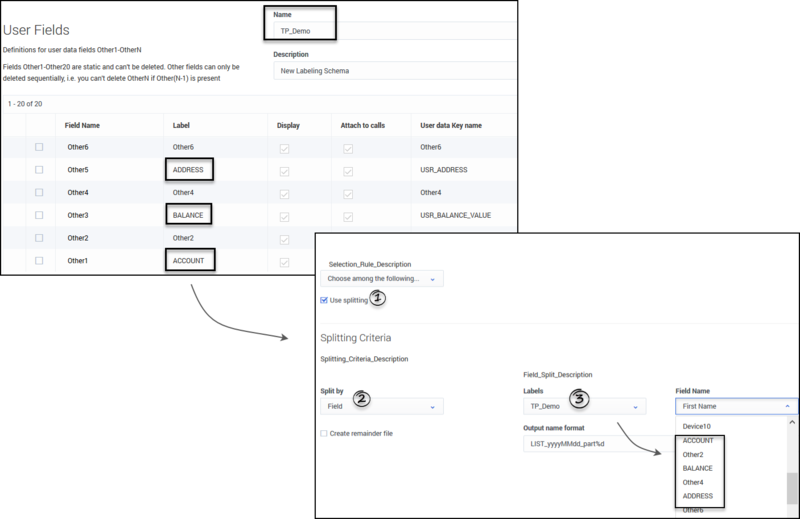
If you are using the Split by Field option when applying an upload rule to a contact list, you can apply a labeling schema. Here's how:
- Create and save the labeling schema.
- Create or edit an existing upload rule.
- Check the Use Splitting option.
- Select Field from the Split by field menu.
- Choose the labeling schema from the Labels menu.
The user fields contained in your labeling scheme will now populate in the Fields menu as long as you selected the Display option when you defined the label properties for the user fields.
Filtering Rule
To apply a labeling schema to a filtering rule:
- Create and save the labeling schema.
- Create or edit an existing filtering rule.
- Select the labeling schema from the Labels menu.
If you use the Use ordering option, the user fields contained in your labeling scheme will now populate in the Fields menu as long as you selected the Display option when you defined the label properties for the user fields. You can then define how you want to order and display the records within these fields in a contact list (options are Ascending and Descending). Refer to the Filtering Rules section of the Create and Manage List Rules page for more information.


