Example - Custom Handling Attempt Report
This customization example shows how you can modify the Handling Attempt report to show your custom data.
1. Creating User Data Dimension Tables
Create and populate one or more user data tables in the Info Mart database — Within the Info Mart database, create and populate a custom user data dimension table (for example, USER_DATA_CUST_DIM_10). The USER_DATA_CUST_DIM_x tables store information about changes in data that accompany telephony events that are recorded by Interaction Concentrator (ICON) and further processed by Genesys Info Mart ETL runtime processes. Genesys Info Mart writes to these tables up to five descriptors of your business data. This example populates two fields: PRODUCT_LINE with product line data and PRODUCT_CODE with product code data.
Refer to the relevant Genesys Info Mart Physical Data Model Documentation for your RDBMS (available on docs.genesys.com) for the complete data model of the USER_DATA_CUST_DIM_* tables.
2. Mapping User Data Keys and Columns
Configure user data keys in the aggregation tables to point to your user data table(s) and populate the aggregation tables. — The information in this section describes how to configure user data keys and columns in the Info Mart database Mapping and Aggregation tables.
User Data Mapping Tables in Info Mart
Deployment-specific attributes, in the form of user-defined attached data, are represented in the Genesys Info Mart model both by low-cardinality data (in string format) and high-cardinality data (in numeric, date/time, and string formats). Low-cardinality-string user data that is associated with an interaction resource—such as automobile models and product codes—is stored in the IRF_USER_DATA_KEYS and USER_DATA_CUST_DIM_x dimension tables. High-cardinality user data that is associated with an interaction resource—such as prices, number of widgets sold, and dates—is stored in the IRF_USER_DATA_GEN_1 and IRF_USER_DATA_CUST_x fact extension tables. In addition to these tables are the CTL_UD_TO_UDE_MAPPING and CTL_UDE_KEYS_TO_DIM_MAPPING tables that you must update:
- CTL_UD_TO_UDE_MAPPING ties in user data keys that are defined in the underlying ICON application with user data columns that are defined in the tables mentioned above.
- CTL_UDE_KEYS_TO_DIM_MAPPING maps the user data dimension tables (USER_DATA_CUST_DIM_x) to IRF_USER_DATA_KEYS.
Execute the sample script (Sample SQL Script for Creating and Mapping User Data) to set up user data mapping and recording in your environment. Also, refer to the:
- Interaction Concentrator Deployment Guide.
- make_gim_UDE_template.sql script, provided with Genesys Info Mart deployment. Note that RAA deploys scripts with similar names—make_gim_UDE_template_<rdbms>.sql. These scripts, however, hold entirely different content and are designed to configure user data for social media measures.
- Mapping User Data Worksheet in the Genesys Info Mart Deployment Guide. This worksheet contains several columns that you can use to record information about the specific attached data keys in use in your environment. Consider adding each custom attached data table in use within your environment to this worksheet.
- Refer to Special Note about Numeric User Data for information about configuring keys for Revenue and Satisfaction user data.
- The instructions in step 4 (below) for adding user data dimensions to the project and customizing the reports apply to all of the fields in this document, and is required only if you plan to use tables other than the default Genesys Info Mart tables.
Predefined attached data also appears in other Info Mart database tables, including the following:
- INTERACTION_DESCRIPTOR (fields CUSTOMER_SEGMENT, SERVICE_TYPE, SERVICE_SUBTYPE, BUSINESS_RESULT)
- STRATEGY
- REQUESTED_SKILL
- ROUTING_TARGET
Using the attached data from these tables falls outside the scope of this section. Several reports, however, are provided for all of the attached data-related fields in the INTERACTION_DESCRIPTOR table.
Configuring User Data Keys in the Aggregation Tables
The AG2_AGENT, AG2_AGENT_CAMPAIGN, AG2_AGENT_QUEUE, AG2_CAMPAIGN, and AG2_ID aggregate tables provide two key columns each that you can configure to join to two user data dimension tables of your choice. The AG2_QUEUE, QUEUE_ACC, and QUEUE_ABN tables are also configured to support USER_DATA_KEY1 and USER_DATA_KEY2. The user data dimension tables store low-cardinality, string data only. The AG2_AGENT_GRP aggregate tables also provide two such columns, but their values are inherited from the AG2_AGENT tables. The USER_DATA_KEY fields are not available in the agent session, agent states, agent interval, and queue-only aggregate tables.
These columns are:
- USER_DATA_KEY1—A key that points to one dimension table, such as USER_DATA_CUST_DIM_10, storing five dimensions
- USER_DATA_KEY2—A key that points to a second dimension table, storing another five dimensions
These two fields provide access to a total of 10 attached data dimensions—or two hierarchies—for each aggregate table and view, as shown in the figure to the right. You must configure the aggregation job to aggregate and populate these fields.
Our product-line example uses the business attribute aggregate set, AG2_ID_*, which consists of four tables and three views. We must configure the USER_DATA_KEY1 column in each to point to the custom user data dimension table, USER_DATA_CUST_DIM_10. For more information about how to map the USER_DATA_KEY2 field, see How Do I Configure User Data for Aggregation? in the Reporting and Analytics Aggregates User’s Guide.
- Create a text file having the following content on a single line:
(map-user-data-key (hierarchy: H_ID) (dimension: USER_DATA_KEY1) (expression: irfud.CUSTOM_KEY_10))
- Save the file in the Genesys Info Mart root directory with the name user-data-map.ss.
The next time Genesys Info Mart Server restarts, the aggregation process detects this file, and aggregation begins.
Refer to the relevant Reporting and Analytics Aggregates physical data model documentation (available on docs.genesys.com) for a data model of the aggregation tables in the Info Mart database, and the relevant Genesys Info Mart physical data model documentation (available on docs.genesys.com) for information about the structure of the USER_DATA_CUST_DIM_* tables.
3.Configuring User Data Storage
Set Genesys Info Mart and Interaction Concentrator configuration options for collection of user data. — Several options are available that you can use to configure what data is written to the Info Mart database, and how long data is retained. In particular, you can configure storage of user data as follows:
- On Interaction Concentrator, by means of the attached data specification file (adata_spec.xml) and ICON configuration options, such as EventData, for event-based user data.
- On Genesys Info Mart, by means of customizable SQL scripts to create mapping and storage tables in the Info Mart database.
Some of these options apply specifically to user data. Interim releases of Genesys Info Mart and Interaction Concentrator might also introduce new configuration options that affect results. Review the following documents for a listing and description of these options:
- Genesys Info Mart Deployment Guide
- Genesys Info Mart Release Notes
- Interaction Concentrator Deployment Guide
- Interaction Concentrator Release Notes
4. Modifying the Project warehouse
If you plan to configure attached data based on tables other than the default Genesys Info Mart tables, use the following procedure to modify the project warehouse.
- Open MicroStrategy Developer, and open the CX Insights project. This requires a login account with appropriate credentials.
- In the main menu, click Schema > Warehouse Catalog. The Warehouse Catalog dialog appears:
- In the Tables available in the database instance list, select USER_DATA_CUST_DIM_10 table, and click > to move it to the Tables being used in the project list.
- Click Save and Close
- In the MicroStrategy Developer folder list, navigate to the folder CX Insights > Schema Objects > Tables, and verify that the USER_DATA_CUST_DIM_10 table is now visible.
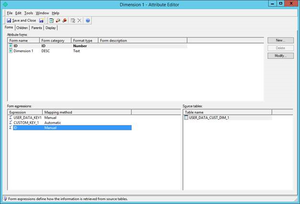
- In the MicroStrategy Developer folder list, open the folder CX Insights > GCXI > User Data Example, right-click one of the standard attributes Dimension 1 – Dimension10, and choose Edit. The Attribute Editor appears:
- Modify the attribute to use the USER_DATA_CUST_DIM_10 table in the ID attribute form.
- Change Dimension x form to link it to the custom column PRODUCT_LINE or PRODUCT_CODE:
( PRODUCT_LINE VARCHAR(170) NOT NULL DEFAULT 'none', PRODUCT_CODE VARCHAR(170) NOT NULL DEFAULT 'none',) - Repeat the previous two steps for each of the remaining Dimension 1 – Dimension10 attributes. Note that if attached data is previously configured (using default GCXI project objects), changes you make here can affect data in reports.
- Click Save and Close.
- Click Schema > Update Schema to update the project schema.
5. Modifying the Handling Attempt Report
In Genesys CX Insights / MicroStrategy, you can easily add attached data as attributes, and then display the results either as attributes, or as metrics. This procedure shows how you can customize the Handling Attempt Report to display the data from custom attributes as metrics.
- Open the Handling Attempt Report in edit mode.
- Click ALL OBJECTS, and navigate to GCXI\Detail\Handling Attempt\Handling User Data Example.
- Drag an attribute into the report, for example Detail 1.
- Right-click the column where the Detail 1 attribute appears in the report, and select Insert Metric\Maximum.
- Click REPORT OBJECTS.
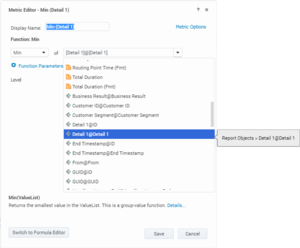
- Right-click the metric Min (Detail 1), and select Edit. The Metric Editor appears.
- Optionally, rename the metric.
- Correct the function so that it uses the Detail 1 form of the Detail 1 attribute, instead of ID form - Detail 1@Detail 1.
- Click Save.
- Right-click the Detail 1 attribute, and select Remove from Grid.
- Optionally, reorganize the order of the columns by dragging the Detail 1 metric column to the preferred position in the report.
- Save and run the report to validate the data.
Sample SQL Script for Creating and Mapping User Data
The following sample script provides the SQL code that is used for this example (in step 2. Mapping User Data Keys and Columns). Note that this is a sample script only. You should validate it for use within your environment.
IF EXISTS ( SELECT 1
    FROM sysobjects
    WHERE id = object_id('USER_DATA_CUST_DIM_10') AND type = 'U' )
    DROP TABLE USER_DATA_CUST_DIM_10
GO

CREATE TABLE USER_DATA_CUST_DIM_10 (
    ID               INT identity     ,
    TENANT_KEY       INT NOT NULL     ,
    CREATE_AUDIT_KEY INT NOT NULL     ,
    PRODUCT_LINE     VARCHAR(170) NOT NULL DEFAULT 'none',
    PRODUCT_CODE     VARCHAR(170) NOT NULL DEFAULT 'none',
    DIM_ATTRIBUTE_3  VARCHAR(170) NOT NULL DEFAULT 'none',
    DIM_ATTRIBUTE_4  VARCHAR(170) NOT NULL DEFAULT 'none',
    DIM_ATTRIBUTE_5  VARCHAR(170) NOT NULL DEFAULT 'none',
    CONSTRAINT PK_USER_DATA_CUST_DIM_10 PRIMARY KEY(ID) )
GO

SET IDENTITY_INSERT USER_DATA_CUST_DIM_10 ON;

-- This row is for the predefined key 'UNKNOWN'. It is
-- mandatory. Do not remove it!
INSERT INTO USER_DATA_CUST_DIM_10 (
    ID,
    TENANT_KEY,
    CREATE_AUDIT_KEY )
VALUES ( -1, -1, -1 ) ;
GO

-- This row is for the predefined key 'NO_VALUE'. It is
-- mandatory. Do not remove it!
INSERT INTO USER_DATA_CUST_DIM_10 (
    ID,
    TENANT_KEY,
    CREATE_AUDIT_KEY )
VALUES ( -2, -2, -1 ) ;
GO

SET IDENTITY_INSERT USER_DATA_CUST_DIM_10 OFF;

-- Add a foreign key reference column from IRF_USER_DATA_KEYS
-- to the user data dimension table.
--
-- Note: Adding columns to a sizeable IRF_USER_DATA_KEYS table
-- could consume significant DBMS resources and time. Consider the
-- tradeoff between:
-- (1) adding redundant columns initially and adding/activating
--     mapping later and
-- (2) adding columns later.

ALTER TABLE IRF_USER_DATA_KEYS
   ADD CUSTOM_KEY_10 INT NOT NULL DEFAULT -2
GO

-- Add mapping between user data dimension table and
-- IRF_USER_DATA_KEYS to CTL_UDE_KEYS_TO_DIM_MAPPING

INSERT INTO CTL_UDE_KEYS_TO_DIM_MAPPING (
    DIM_TABLE_NAME,
    DIM_TABLE_PK_NAME,
    UDE_KEY_NAME )
VALUES (
    'USER_DATA_CUST_DIM_10',
    'ID',
    'CUSTOM_KEY_10' )
GO

-- Add mapping between user data keys and user data tables to
-- CTL_UD_TO_UDE_MAPPING.
--
-- Note: ICON should be configured to record these user data keys.

INSERT INTO CTL_UD_TO_UDE_MAPPING (
    ID              ,
    UD_KEY_NAME     ,
    UDE_TABLE_NAME  ,
    UDE_COLUMN_NAME ,
    PROPAGATION_RULE,
    DEFAULT_VALUE   ,
    ACTIVE_FLAG )
VALUES (
    103                    ,
    'CustomProductLine'    ,
    'USER_DATA_CUST_DIM_10',
    'PRODUCT_LINE'         ,
    'CALL'                 ,
    ''                     ,
    1 )
GO

INSERT INTO CTL_UD_TO_UDE_MAPPING (
    ID              ,
    UD_KEY_NAME     ,
    UDE_TABLE_NAME  ,
    UDE_COLUMN_NAME ,
    PROPAGATION_RULE,
    DEFAULT_VALUE   ,
    ACTIVE_FLAG  )
VALUES (
    104                    ,
    'CustomProductCode'    ,
    'USER_DATA_CUST_DIM_10',
    'PRODUCT_CODE'         ,
    'CALL'                 ,
    ''                     ,
    1  )
GO


