Contents
- 1 Managing the MicroStrategy environment
- 1.1 Managing Folders
- 1.2 Managing Connections
- 1.3 Managing the CX Insights Project
- 1.4 Managing Users, Groups, and Privileges
- 1.5 Predefined User Groups
- 1.6 Permissions needed to manage other users
- 1.7 Changing your own password
- 1.8 Changing another user's password
- 1.9 Change administrator passwords
- 1.10 Creating a new user
- 1.11 Deleting a user
Managing the MicroStrategy environment
This page describes the MicroStrategy environment, and introduces MicroStrategy Developer, a web-based application that you can use to perform management activities. Other pages in this document discuss using MicroStrategy Developer to customize or create metrics or attributes. This page describes key administrative tasks you can perform using MicroStrategy Developer. For more information, or for information about other administrative tasks, see the MicroStrategy System Administration Help.
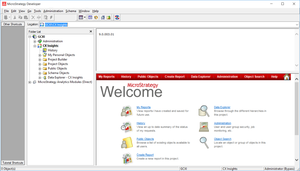
The figure MicroStrategy Developer shows the MicroStrategy Developer Welcome screen, which summarizes the most popular tasks that administrators perform with this tool.
Managing Folders
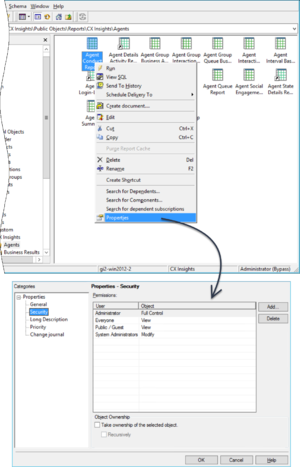
MicroStrategy software uses a hierarchy of folders to organize repository documents. You control access to these folders, and to specific items within them, by setting permissions. Subfolders of the CX Insights root folder house report and documentation subfolders. To set security permissions for an object or folder, right click and choose Properties, as shown in the figure Setting Folder Permissions Within Developer.
A MicroStrategy installation deploys many default folders that are not used by all GCXI report users. As the MicroStrategy administrator, you can optionally hide these folders to avoid confusion. To hide folders from select groups of users, apply no-access levels to those groups within the security profile of the folder’s properties.
For additional information, refer to the Setting Access at the object level section of the Genesys CX Insights Deployment Guide.
Managing Connections
The Genesys CX Insights installation routine copies a database connection object when it imports the CX Insights Project into the MicroStrategy repository. Genesys recommends that you modify this connection connection so that it links the CX Insights Project with your data source (your Info Mart database). Refer to the Post-Installation steps section of the Genesys CX Insights Deployment Guide for step-by-step instructions on how to link the CX Insights Project to your Data Mart.
Managing the CX Insights Project
You control which users have write access to the CX Insights Project by setting user permissions appropriately in MicroStrategy Developer. Extend this permission only to those users who need it; editing the project can affect report results for all who receive them. See the reports descriptions for information about which metrics of the CX Insights Project are directly used in the Genesys CX Insights reports.
Managing Users, Groups, and Privileges
To control what objects in the MicroStrategy repository are available to other users in your contact center, set up MicroStrategy accounts for users who will access the system, and assign the users to groups, which causes the users to inherit privileges from the groups. Assign users using either of the following methods:
- Assign users to the predefined CX Insights user groups using the predefined access levels.
- Assign users to groups that you create with custom permissions.
For instructions on how to assign users in a MicroStrategy environment, refer to Managing MicroStrategy Users and MicroStrategy Security Roles. For more information about access restrictions, see About Integrated Data Access Restrictions.
Video: Changing your own password
This video describes how to change your own password, if your permissions allow it. Note that some steps shown in this video can vary slightly depending on the release of Genesys CX Insights you have installed.
Video: Managing users
This video describes how to manage users, including how to:
- create users
- delete users
- change users' passwords
- change users' permissions
Note that some steps shown in this video can vary slightly depending on the release of Genesys CX Insights you have installed.
Predefined User Groups
When you create a user, you must add them to at least one user group, thereby controlling the user's ability to work with reports and dashboards. Normally, you can do this by assigning users to the predefined user groups described in this section.
Predefined user groups and privileges
If you require permissions different from those assigned to the predefined groups, Genesys recommends that you avoid modifying privileges for the predefined user groups, because these user groups are overwritten during upgrades. Instead, create custom groups by duplicating the user group you wish to modify, and edit the duplicate group. Note that the group structure in release 9.0.011 and later is unlike earlier releases of the software, and each group contains only users (and does not contain other groups).
| Groups | Summary | Project Access Level* |
|---|---|---|
| Custom | Customer-defined user groups. | User-defined |
| CX Insights Developers | Members of this groups can create, edit, or view objects in the Genesys CX Insights project. | Genesys CX Insights |
| CX Insights Dynamic Access Restrictions | Security Filter you can use to restrict access to data based on user name, geographical location, line of business, or organizational role. | Genesys CX Insights |
| CX Insights Editors | Members of this groups can edit or view objects in the Genesys CX Insights project. | Genesys CX Insights |
| CX Insights Static Access Restrictions | Security Filter you can use you prevent members of specified user groups from viewing data for a list of objects you specify. | Genesys CX Insights |
| CX Insights User Administrators | Members of this group can manage users in the Genesys CX Insights project. | Genesys CX Insights |
| CX Insights Viewers | Members of this groups can view objects in the Genesys CX Insights project. | Genesys CX Insights |
| Everyone | The Everyone group provides a way for you to easily apply privileges, security role memberships, or permissions to all users. All users are automatically members of this group. | none |
| General Developers | Members of this group can create, edit, and view objects in any project. | all |
| General Editors | Members of this group can edit and view objects in any project. | all |
| General User Administrators | Members of this group can manage users in any project. | all |
| General Viewers | Members of this group can view objects in any project. | all |
| iWD Developers | Members of this group can create, edit, and view objects in the CX Insights for iWD project. | iWD |
| iWD Editors | Members of this group can edit and view objects in the CX Insights for iWD project. | iWD |
| iWD User Administrators | Members of this group can manage users in the CX Insights for iWD project. | iWD |
| iWD Viewers | Members of this group can view objects in the CX Insights for iWD project. | iWD |
| MicroStrategy Groups | Built-in groups that are included in all MicroStrategy deployments. | none |
| System Administration | Members of this group have unrestricted management capabilities. | all |
Some groups provide access only to a specific project:
| ||
Permissions needed to manage other users
To manage the accounts of other users, you must be a member of one of the Administrator user groups described in the following table, which describes the types of accounts each of the Administrator types can manage, and the actions they can carry out on each.
The following table describes the permissions needed to manage users.
| Managing Group | Administrator | General Users Administrators | CX lnsights Users Administrators | iWD Users Administrators |
|---|---|---|---|---|
| Managed Group | ||||
| Custom | Full Control | Full Control | Full Control | Full Control |
| MicroStrategy Groups | Full Control | No Access | No Access | No Access |
| System Administrators | Full Control | No Access | No Access | No Access |
| Everyone | Full Control | View / Modify / Modify children | View / Modify / Modify children | View / Modify / Modify children |
| General Developers | Full Control | View / Modify / Modify children | No Access | No Access |
| General Editors | Full Control | View / Modify / Modify children | No Access | No Access |
| General Viewers | Full Control | View / Modify / Modify children | No Access | No Access |
| General Users Administrators | Full Control | View / Modify / Modify children | No Access | No Access |
| CX Insights Static Access Restriction | Full Control | View / Modify / Modify children | View / Modify children | No Access |
| CX Insights Dynamic Access Restriction | Full Control | View / Modify / Modify children | View / Modify children | No Access |
| CX Insights Developers | Full Control | View / Modify / Modify children | View / Modify / Modify children | No Access |
| CX Insights Editors | Full Control | View / Modify / Modify children | View / Modify / Modify children | No Access |
| CX Insights Viewers | Full Control | View / Modify / Modify children | View / Modify / Modify children | No Access |
| CX Insights Users Administrators | Full Control | View / Modify / Modify children | View / Modify / Modify children | No Access |
| iWD Developers | Full Control | View / Modify / Modify children | No Access | View / Modify / Modify children |
| iWD Editors | Full Control | View / Modify / Modify children | No Access | View / Modify / Modify children |
| iWD Viewers | Full Control | View / Modify / Modify children | No Access | View / Modify / Modify children |
| iWD Users Administrators | Full Control | View / Modify / Modify children | No Access | View / Modify / Modify children |
Changing your own password
Use the following steps to change your password. Not all users are permitted to change their password; contact your administrator to find out if the functionality described on this page is available for your use.
- Log in to MicroStrategy Web.
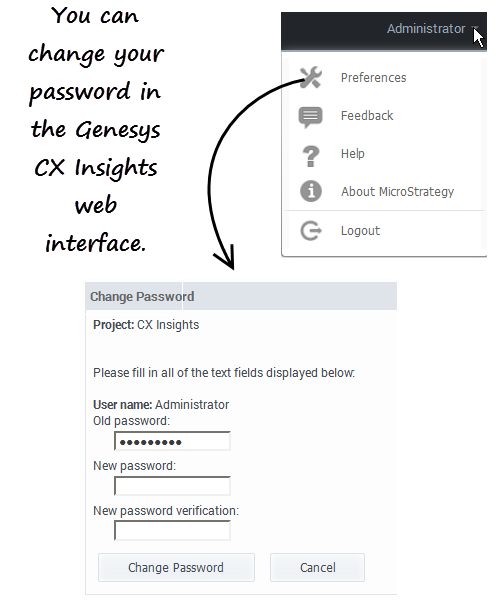
- On the menu bar, click your user name, and click Preferences.
- Click Change Password.
- In the Old Password field, type your current password.
- In the New Password field, type your new password, and re-type it in the New Password Verification field.
- Click Change Password.
Changing another user's password
Use the following steps to change a password for another user (for example when they have forgotten their password) or to otherwise manage an existing user account.
To edit another user's account, you must log in as a member of a group that has the Create And Edit Users And Groups privilege.
- In your web browser, open the MicroStrategy Web Administrator page:
http://<hostname>:<port>/MicroStrategy/servlet/mstrServerAdmin
- On the page that appears, select your server.
- On the MicroStrategy Web Administrator login screen, enter your user name and current password, and click Login. The Tools page opens.
- Click User Manager.
- Click a group of which the user is a member. A list appears, showing all the users in that group.
- Right-click the user's name, and in the menu, click Edit.
- In the Password field, enter the new password, and enter it again in the Confirm Password field.
- Select User must change password at next login, and make any other changes if required.
- Click OK.
Change administrator passwords
Genesys recommends that you change the default administrator password.
Procedure: Changing the MicroStrategy Administrator password
Purpose: Use this procedure to create a new password for the default MicroStrategy Administrator account.
Steps
- Open the gcxi.properties file for editing. Note: If you use gcxi-secrets.yaml to store secrets, edit it instead of gcxi.properties in this procedure, and, after step 3, delete and recreate your secrets, by executing kubectl delete -f k8s/gcxi-secrets.yaml and kubectl create -f k8s/gcxi-secrets.yaml.
- Enter values in the following fields:
MSTR_PASSWORD_OLD=<old_password>
MSTR_PASSWORD=<new_password>
- where:
- <old_password> is the existing password.
- <new_password> is a the password.
- Enter the following commands to delete and reload configmap gcxi-config
kubectl delete configmap gcxi-config
kubectl create configmap gcxi-config --from-env-file=<path>/gcxi.properties --namespace genesys
- where:
- <path> is the path to the directory where your gcxi.properties file is stored.
- Enter the following commands to stop currently running containers:
kubectl scale deploy/gcxi-secondary --replicas=0
kubectl scale deploy/gcxi-primary --replicas=0
- Enter the following commands to start the containers:
kubectl scale deploy/gcxi-primary--replicas=1
kubectl scale deploy/gcxi-secondary --replicas=1
- Open the gcxi.properties file for editing.
- Once both pods are running, log in the Genesys CX Insights web interface with the new password.
Creating a new user
Use the following steps to create a new user account.
To edit another user's account, you must log in as a member of a group that has the Create And Edit Users And Groups privilege.
- In your web browser, open the MicroStrategy Web Administrator page:
http://<hostname>:<port>/MicroStrategy/servlet/mstrServerAdmin
- On the page that appears, select your server.
- On the MicroStrategy Web Administrator login screen, enter your user name and current password, and click Login. The Tools page opens.
- Click User Manager.
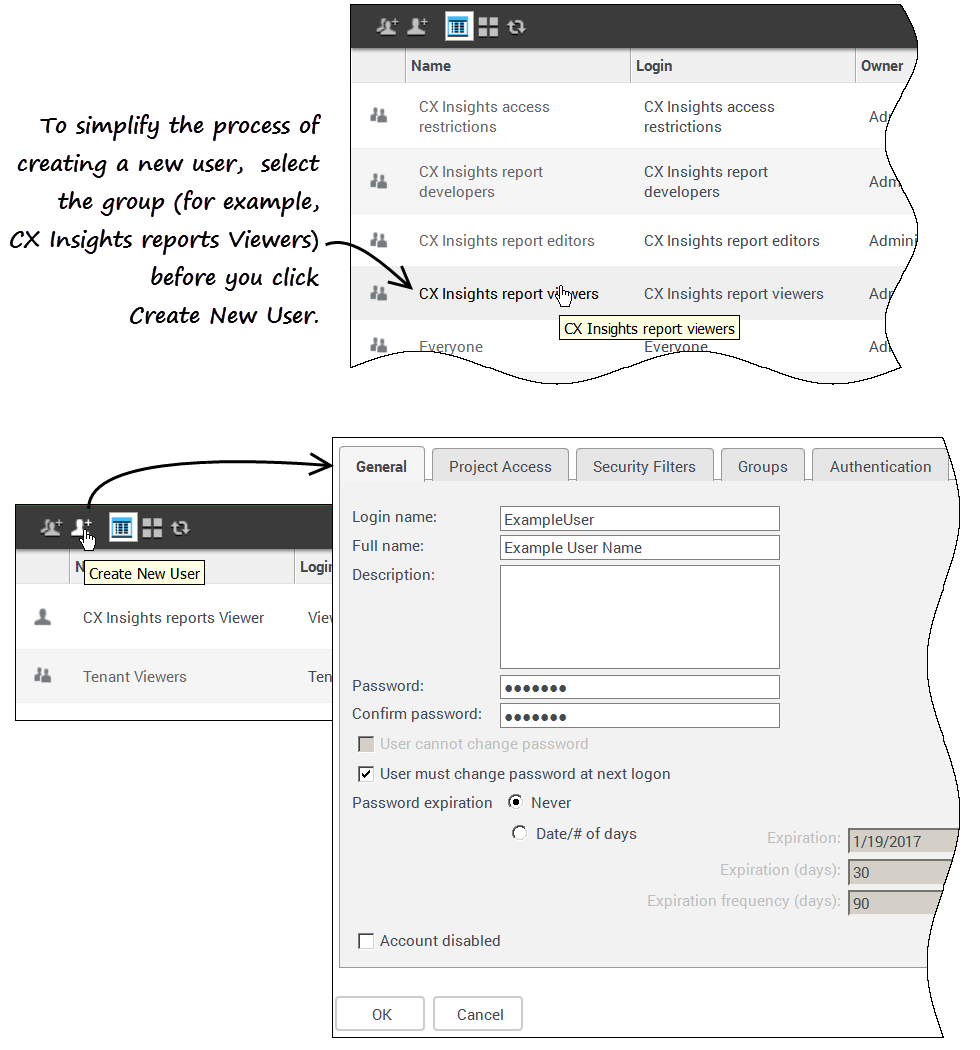
- On the menu, click Create New User.
- Specify user information as appropriate, on each tab in the editor. If you need more information about any field, see the MicroStrategy Web Administrator Help. Be sure to:
- Include a Login Name, Full Name, Password, Confirm Password and other selections in accordance with your password policies (on the General tab).
- Assign at least one Group (on the Groups tab). By default, all users are also members of the group Everyone, but you must assign at least one group, or the new user account will not be editable by other administrators.
- Click OK.
- To verify that the user was created, open one of the groups to which you added the user (or open the group Everyone).
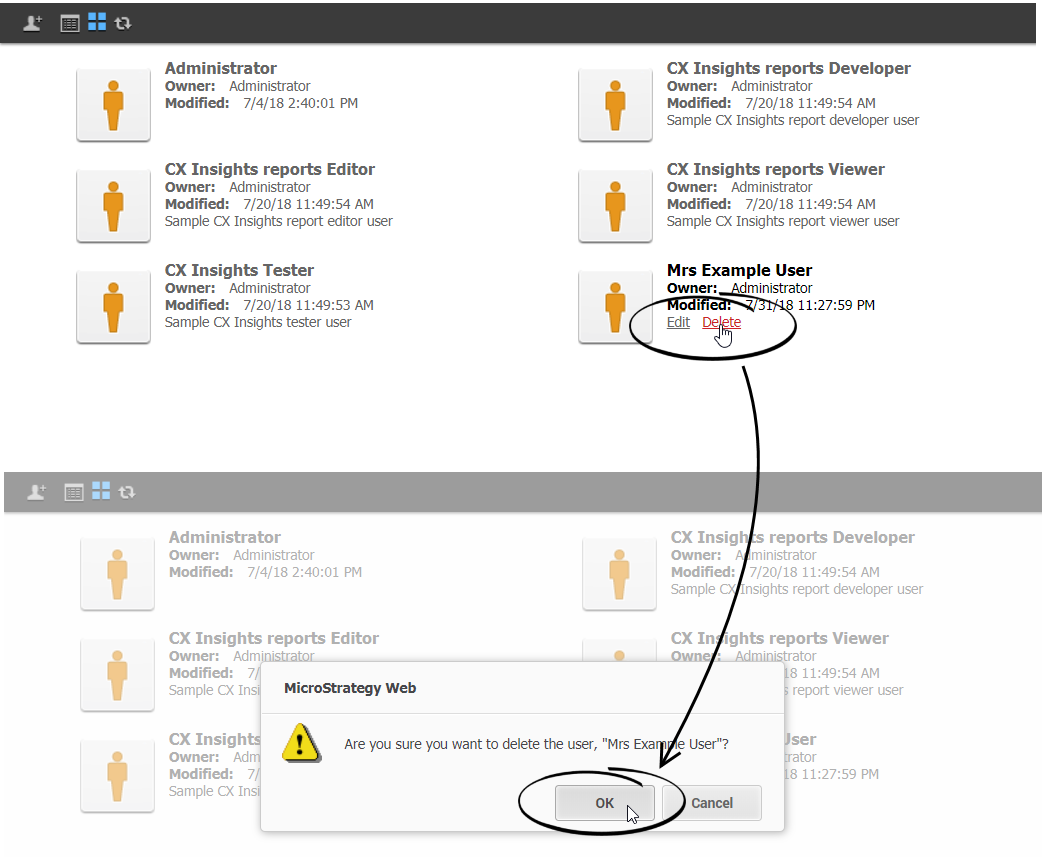
Deleting a user
Use the following steps to delete a user account.
To edit another user's account, you must log in as a member of a group that has the Create And Edit Users And Groups privilege.
- In your web browser, open the MicroStrategy Web Administrator page:
http://<hostname>:<port>/MicroStrategy/servlet/mstrServerAdmin
- On the page that appears, select your server.
- On the MicroStrategy Web Administrator login screen, enter your user name and current password, and click Login. The Tools page opens.
- Click User Manager.
- Open a group of which the user is a member, for example Everyone.
- Hover over the user you plan to delete, and click Delete.
- Click OK.
For more information, see the MicroStrategy web site.

