
Contents
Deployment of the LFMT Collector
This section describes how to deploy and configure the LFMT Collector software.
The LFMT Collector is the component which collects the log files from the Genesys Application Servers (i.e. sip, urs, gvp etc), via the Workbench Agent 8.5 component, for storage in the Central Log Storage (CLS) repository and creates packages for user downloads.
- LFMT Collector applications must be installed in pairs (LFMT Collector / LFMT Indexer), on the same host as the associated LFMT Indexer.
Provisioning the LFMT Collector(s)
The following directories in the LFMT Collector distributable contain the LFMT Collector templates:
- For Linux:
- /LFMT_8.5.10x/LFMTCollector/8.5.10x.xx/templates
- For Windows:
- \LFMT_8.5.10x\LFMTCollector\8.5.10x.xx\templates
Provisioning the LFMT Collector(s) in GAX
Before installing the LFMT Collector(s) software you must first create an LFMT Collector Template and Application in CME.
- Log into GAX, and navigate to Configuration Manager.
- From the Environment section, select Application Templates.
- In the Application Templates section, select New.
- In the New Properties pane, select Import Application Template.
- In the Import Application Template dialog, click the Choose File file button and navigate to the LFMT Collector .apd template. Select the template, and click the OK button to confirm the template import.
- In the New Properties pane, select the Save button to save the new application template.
- Once the application template has been imported, navigate to Configuration Manager.
- From the Environment section, select Applications.
- In the Applications section, select New.
- In the New Properties pane, complete the following:
- In the General tab, enter a name for the LFMT Collector application in the Name field,.
- Click on the Template field and navigate to the application template created above.
- In the Working Directory field, enter "." .
- In the Command Line field, enter "." .
- Click on the Host field and navigate to the host where LFMT Collector will be installed.
- In the Application Options tab, review and configure the LFMT Collector options.
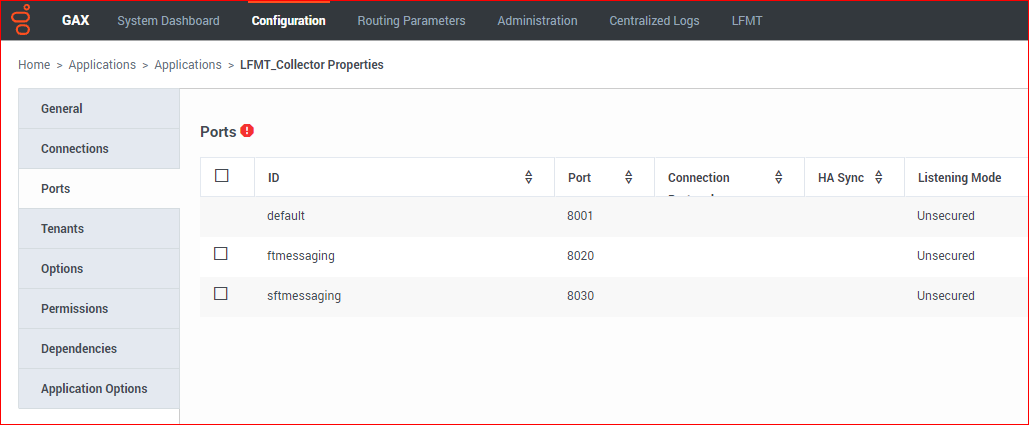
- In the Ports tab, add the following listening ports:
- default = <an open/free port on the LFMT Collector host - i.e. 8001
- ftmessaging = <an open port on the LFMT Collector host - i.e. 8020
- sftmessaging = <an open port on the LFMT Collector host - i.e. 8030
- Select the Save button to save the new application.
TipFor more information on the LFMT Collector configuration options, please refer to the LFMT Collector Configuration Options section.

Installing the LFMT Collector(s)
The following directories in the LFMT Collector distributable contain the LFMT installation packages:
- For Linux:
- /LFMT_8.5.10x/LFMTcollector/8.5.10x.xx/linux/ip
- For Windows:
- \LFMT_8.5.10x\LFMTCollector\8.5.10x.xx\windows\ip
Installing the LFMT Collector(s) on Linux
- In the directory to which the LFMT Collector installation package was copied, execute the install.sh script.
- When prompted, confirm the hostname of the computer on which LFMT Collector is to be installed.
- When prompted, specify the host and port to the Configuration Server associated with this LFMT Collector.
- When prompted, specify the username and password to access the Configuration Server.
- When prompted, specify the host and port to the Backup Configuration Server associated with this LFMT Collector.
- When prompted, select the LFMT Collector Application object (i.e. LFMT_Collector_Chicago_1) you configured in “Provisioning the LFMT Collector” from the list of applications.
- Enter the Destination Folder (i.e. /home/genesys/gcti/LFMT_Collector_Chicago_1) for the LFMT Collector installation.
Installing the LFMT Collector(s) on Windows
- In the directory to which the LFMT Collector installation package was copied, double-click setup.exe to start the installation.
- On the Welcome screen, click Next.
- When prompted, specify the connection parameters to the Configuration Server associated with this LFMT Collector and click Next.
- When prompted, select the LFMT Indexer Application object you configured in “Provisioning the LFMT Collector” from the list of applications and click Next.
- Enter the Destination Folder for the LFMT Collector installation and click Next.
- (Optional) Enter the Hostname and Port of the Backup Configuration Server associated with this LFMT Collector and click Next.
- On the Ready to Install screen, click Install.
- On the Installation Complete screen, click Finish.
Configuring GAX for use with the LFMT Collector(s)
- Log into GAX, and navigate to Configuration Manager.
- From the Environment section, select Applications.
- In the Applications section, select the GAX Application configured for use with the LFMT Client.
- In the Application Properties pane, select the Connections tab.
- In the Connections tab, add a connection to the LFMT Collector Application(s) object(s) that GAX will control.
- Select the Save button to save changes to the application.
- Restart GAX.

- Ensure GAX is restarted.
Verifying the LFMT Collector(s) installation
After completing the installation of the LFMT Collector, its configuration should be verified through the GAX interface.
- Log into GAX, and navigate to Configuration Manager.
- From the Environment section, select Applications.
- In the Applications section, locate and open the LFMT Collector application.
- In the General tab, verify that the following parameters have been updated by the installation process.
- Working Directory: The LFMT Collector installation path
- Command Line: collector_startup.bat or ./collector_startup.sh
- Command Line Arguments: -app <LFMT Collector Application Name> -host <Configuration Server Host> -port <Configuration Server Port> -backuphost <Backup Configuration Server Host> -backupport <Backup Configuration Server Port>
Post LFMT Collector Configuration
Ensure you configure, these default blank options below, with valid paths, within the LFMT Collector application(s), before starting the LFMT Collector application(s):
- cls_location - this value does NOT have a default therefore you need to assign a valid path
- package_location - this value does NOT have a default therefore you need to assign a valid path
Please review here https://docs.genesys.com/Documentation/ST/latest/DeploymentGuide/CollectorOptions for further details.