Contents
Configuration of Access Control for LFMT Users
This section describes where and how to configure GAX Role privileges to restrict/grant access to LFMT functionalities.
Role-based access control using Genesys Administration Extension (GAX)
- Log into GAX, and navigate to Configuration
- From the Environment section, select Application Templates
- Find and click the GAX Template associated with the particular GAX instance that is being used for LFMT - i.e. "Genesys_Administrator_Extension_900"
- Click Import Metadata and import the lfmt-gax-template-metadata.xml file
- Click Save
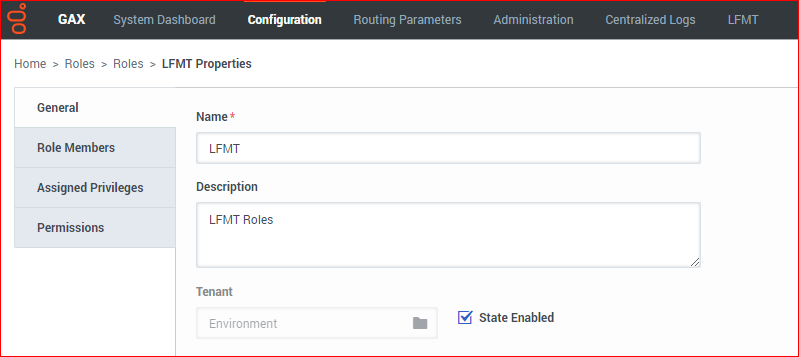
- From Configuration / Accounts / Roles - add a new LFMT Role - i.e LFMT
- From the Role Members tab - add the relevant Users/Groups to the new LFMT Role
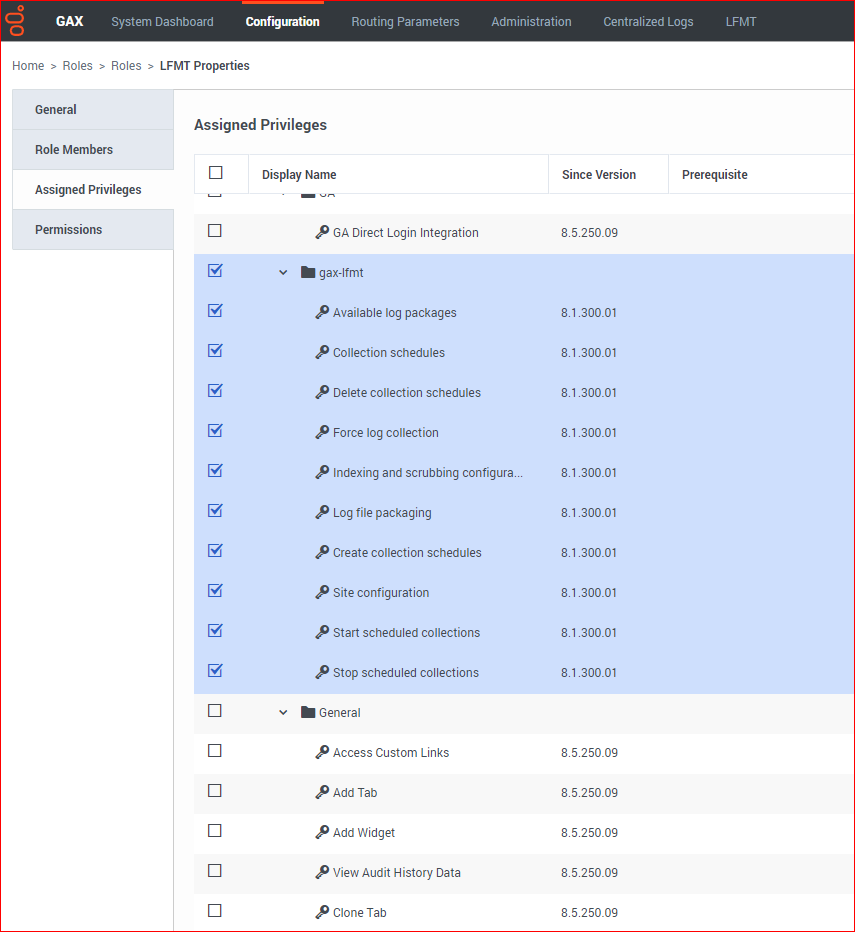
- From the Assigned Privileges tab - locate the gax-lfmt section and check the relevant privileges (i.e. only "Available log packages") for this new LFMT Role
- Click Save
- On GAX re-login, the respective Users/Groups will be assigned the functionality based on the LFMT Role privileges
- Login to GA, and select the Provisioning tab.
- Select Environment > Application Templates in the left navigation menu.
- Select the Genesys Administration Extension template and click Edit.
- Click Import Metadata to import the metadata for the LFMT client application template.
- Click Add on the “choose metadata XML file to import” dialog.
- Select the lfmt-gax-template-metadata.xml file and click Open. The file is uploaded.
- Click Save in the top menu to save the metadata.
- Select Roles in the left navigation menu.
- Click New and add a name for this role, such as LFMTTest.
- Select the Role Privileges tab. In the Add/Remove Product section, scroll to the entry for the current Genesys Administrator Extension – LFMT Plug-in release (such as Genesys Administrator Extension – LFMT Plug-in 8.1.3000.00) and select it. A new section called “Genensys Administrator Extension – LFMT Plug-in ” is added.
- Click Save in the top menu.
- In the Roles tab, select the LFMTTest role and click Edit.
- In the Configuration tab, expand the Members section and click Add, to add this LFMTTest role to the desired user profiles.
- In the list of user names, select one or more users and click Ok.
- The selected users will be displayed in the Members list as enabled for this LFMTTest role.
- Click Save in the top menu to save the member assignments to this role.
Example
List of Available Privileges
The following role privileges can be allowed/denied for the role configuration:
- * Available log packages
- * Collection schedules
- * Create Collection Schedules
- * Delete Collection Schedules
- * Force log collection
- * Indexing and scrubbing configurations
- * Log file packaging
- * Site configuration
- * Start scheduled collections
- *Stop scheduled collections
Role-based access control using Genesys Administration (GA)
Use these steps to enable Role-based access control in Genesys Administrator.
The following role privileges can be allowed/denied for the role configuration:
- * Available log packages
- * Collection schedules
- * Create Collection Schedules
- * Delete Collection Schedules
- * Force log collection
- * Indexing and scrubbing configurations
- * Log file packaging
- * Site configuration
- * Start scheduled collections
- * Stop scheduled collections
This page was last edited on September 1, 2021, at 13:03.
Comments or questions about this documentation? Contact us for support!


