
Contents
Deployment of the LFMT Client
This section describes how to deploy and configure the LFMT Client software.
The LFMT Client is a GAX Plug-in that provides the LFMT user interface through which users specify the log files to retrieve, package, and upload to a given location.
Important
- Genesys recommends LFMT is deployed on its own separate GAX instance so that it does not affect any other GAX Plugins that are used to manage/operate the contact center.
Installing the LFMT Client
The following directories in the LFMT Client distributable contain the LFMT installation packages:
- For Linux:
- /LFMT_8.5.10x/LFMTClient/8.5.10x.xx (GAX 9.0.100.52+ within GAX 9.0.100.xx family)/linux/ip.
- For Windows:
- \LFMT_8.5.10x\LFMTClient\8.5.10x.xx (GAX 9.0.100.52+ within GAX 9.0.100.xx family)\windows\ip.
Important
- LFMT Client places GAX Plug-in files in the <GAX Installation Directory>\webapp\gax\WEB-INF\lib folder; this folder is created the first time GAX is started.
- Please ensure GAX has been started at least once prior to the installation of the LFMT Client.
Installing the LFMT Client on Linux
- In the directory to which the LFMT Client installation package was copied, execute the install.sh script
- Enter the location to the GAX installation directory (i.e. /opt/Genesys/gax)
- Enter the Destination Folder for the LFMT Client installation (i.e. /home/genesys/gcti/LFMT_Client_8510400)
- Ensure the .jar files in the <LFMT Client Install Directory> have been copied to <GAX Installation Directory>/webapp/WEB-INF/lib
Installing the LFMT Client on Windows
- In the directory to which the LFMT Client installation package was copied, double-click setup.exe to start the installation.
- On the Welcome screen, click Next.
- Enter the Destination Folder for the LFMT Client installation and click Next.
- On the Ready to Install screen, click Next.
- On the Installation Complete screen, click Finish.
- Ensure the .jar files in the <LFMT Client Install Directory> have been copied to <GAX Installation Directory>\webapp\WEB-INF\lib.
Configuring GAX for use with the LFMT Client
Important
- If/when using LFMT Client 8.5.104.00 thru LFMT Client 8.5.105.03 and GAX 9.0.103.08+
- Please ensure the respective GAX Application, with the LFMT Client Plug-in installed, has the [lfmt]/use_lfm_extension option set to true
- So that .lfm files and not .zip (the default as of 8.5.104) LFMT Package files are created and therefore downloadable via GAX
- This avoids a "Failed Forbidden" error when trying to download LFMT Packages
- This change is required because GAX 9.0.103.08+ filters .gz, .jar, .zip, and .rar API requests
- Log into GAX
- Navigate to Configuration Manager.
- From the Environment section, select Applications.
- In the Applications section, select the GAX Application (i.e. GAX_LFMT) to be configured for use with the LFMT Client.
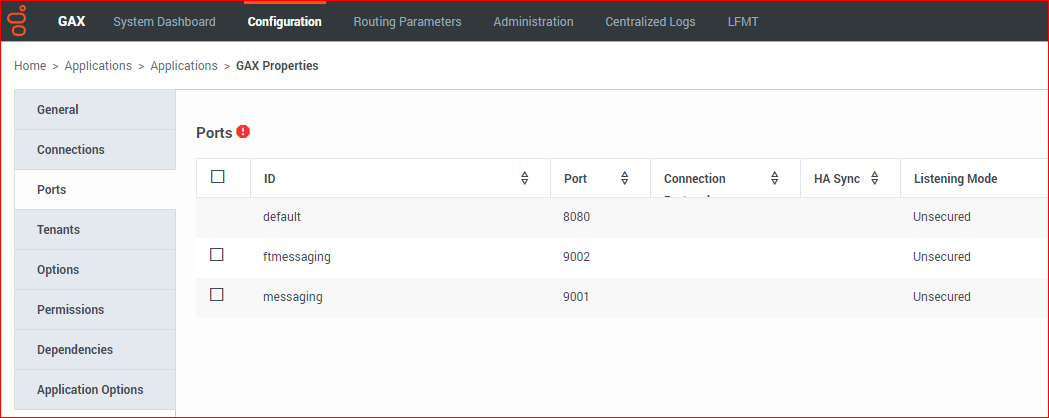
- In the Application Properties pane, select the Ports tab.
- In the Ports tab, add the following listening ports.
- messaging = <an open/free port on the GAX host - i.e. 9001>
- ftmessaging = <an open/free port on the GAX host - i.e. 9002>
- (Optional)Navigate to the Application Options tab.
- Add and configure the following Section and Options in the GAX configuration object.
- Add the Section lfmt.
- Within the new lfmt Section, add/configure the following LFMT FTP options:
- ftp_host, ftp_port, ftp_user, ftp_pwd.
- Add and configure the following Section and Options in the GAX configuration object.
- Select the Save button to save changes to the application.
- Restart GAX.

Important
- Ensure GAX is restarted post the LFMT Client installation.
Tip
- For more information on the GAX LFMT configuration options, please refer to the LFMT GAX Configuration Options section.
This page was last edited on May 11, 2022, at 12:16.
Comments or questions about this documentation? Contact us for support!