
Contents
Before you Begin
This chapter describe the step(s) required to prepare your environment for the Knowledge Center installation. Preparation step(s) are:
- Define the languages used in your environment
- Chose and install RDBMS for Genesys Knowledge Center CMS
- Configure access to Elasticseach cluster for Genesys Knowledge Center Server
Configuring Languages
Overview
To operate the Genesys Knowledge Center solution you need to define and configure languages that will be used within your knowledge.
Knowledge Center requires:
- all supported languages to be defined in Configuration Server
- ISO codes to be defined in the Annex of the Language Attributes Values
Knowledge Center supports two types on languages:
- Language ("base" language)
- Regional language
Regional language is a version of the "base" Language that is used in a particular country.
The use of regional languages is recommended only in situations when knowledge documents can be different in the different countries using a same language (for example: knowledge documents which include local regulatory information or region-specific terminology, and so on).
Regional language requires two ISO codes:
- language code (ISO 639-1)
- country code (ISO 3166-1 alpha-2 code)
How to configure a language
- Open Genesys Administrator and navigate to Provisioning > Routing/eServices > Business Attributes.
- Select Language business attribute
- Click Edit button
- Select Attribute Values tab
- Click New button or select existing attribute value and press Edit button
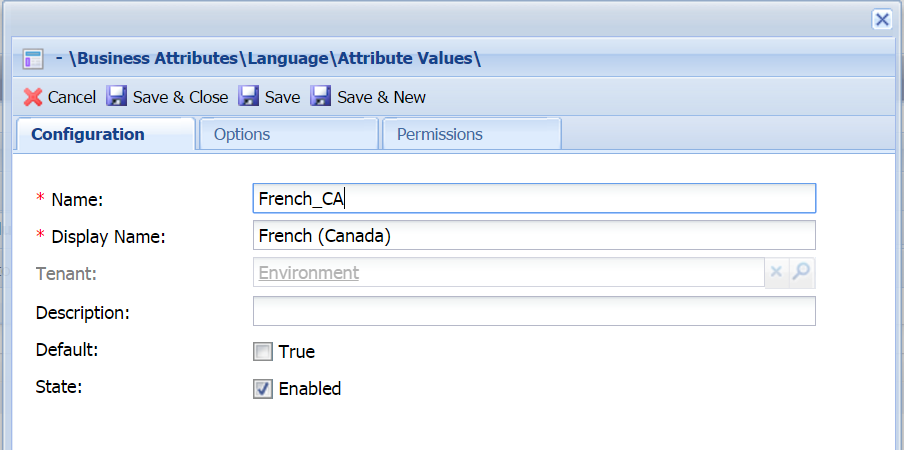
- On Configuration tab (skip this step if you are editing existing Attributes Value. For example, English which is created by default)
- Enter Name. For instance, French_CA
- Enter Display Name. For instance French (Canada)
- Ensure that State check is enabled
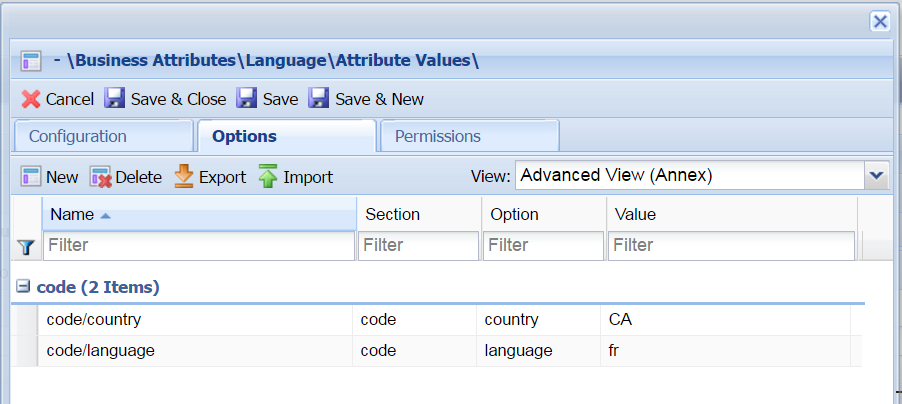
- Select Options tab:
- Press New button to add language code
- Enter "code" in Section field (eg. new section "code" should be created)
- Enter "language" in Name filed (eg. new option "name" should be created)
- Enter ISO 639-1 alpha-2 code that corresponds to desired language in Value field. For instance fr
- Press OK button
- If you are adding regional language you also need to specify a region code:
- Press New button
- Enter code in Section field
- Enter country in Name filed
- Enter ISO 3166-1 alpha-2 code that corresponds to desired region/country in value filed. For instance CA
- Press OK button
- Press Save & Close button
Note: You need to repeat this procedure for every language that you plan to use in your Knowledge Base.


- Languages should be create in the same tenant in which Knowlege Server and CMS applications will be configured.
- Every language needs to have language (mandatory) and country (if applicable) codes defined on options tab (languages w/o codes will be ignored)
- Ensure that all language/country combinations are unique (duplicate combinations will be ignored)
- Do not edit/change defined codes if they are used in the knowledge bases
- Language code needs to correspond to the ISO 639-1 alpha-2 code for the given language (http://www.iso.org/iso/home/standards/language_codes.htm)
- Country code needs to correspond to the ISO 3166-1 alpha-2 code for given language (http://www.iso.org/iso/country_codes)
Example
If you wish to have following languages in your environment:
- English
- French (Canadian)
- French (France)
You will need to create 3 attribute values:

| Name | Display Name | Options |
|---|---|---|
| English | English | code/language=en |
| French_FR | French (France) | code/language=fr code/country=FR  |
| French_CA | French (Canada) | code/language=fr code/country=CA  |
Installing a Relational Database Management System
Knowledge Center CMS requires a Relational database management system (RDBMS) to be deployed and configured in order to store the knowledge data.
The following RDBMS providers are supported by Genesys Knowledge Center CMS:
- Microsoft SQL Server
- Oracle
- PostgreSQL
Before proceeding with the installation of the Knowledge Center solution you need to:
- Install RDBMS
- Create a new dababase
- Create a user that will be used by the Knowledge Center to access the database
- Ensure that you are able to connect to the new database from the hosts that the Knowledge Center CMS nodes are running on
- Create backups for the new database
Configure access to Elasticsearch
Knowledge Center Server requires Elasticsearch cluster to be deployed.
To use Elasticsearch culster by Knowledge Center Server you need to configure a Resource Access Point and connect it with the Knowledge Center Cluster application.
Importing the Elasticsearch Resource Access Point Template
Start
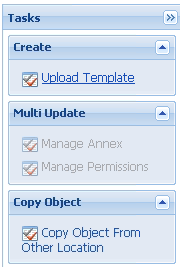
- Open Genesys Administrator and navigate to Provisioning > Environment > Application Templates.
- In the Tasks panel, click Upload Template.
- Click Add and choose the application template (APD) file to import, then click Add.
- Browse to the Elasticsearch_Resource_Access_Point.tpl file. Click Open.
The New Application Template panel opens: - Click Save & Close.


End
Creating the Elasticsearch Resource Access Point Application
Prerequisites
- You completed Importing the Elasticsearch Resource Access Point Template
Start
- Open Genesys Administrator and navigate to Provisioning > Environment > Applications.
- In the Tasks panel, click Create New Application.
- In the Select Application Template panel, click Browse for Template and select the Elasticsearch_Resource_Access_Point template that you imported in Importing the Elasticsearch Resource Access Point Template. Click OK.
- The template is added to the Select Application Template panel. Click Next.
- In the Select Metadata file panel:
- Click Browse
- Click Add
- Select the Elasticsearch_Resource_Access_Point.xml file
- Click Open
- The metadata file is added to the Select Metadata File panel. Click Next.
- In the Specify Application Parameters field:
- Enter a name for your application (for instance, "Genesys Knowledge Elasticsearch RAP")
- Make sure that State is enabled
- Select the Host on which the Access Point will reside
- Click Create
- The Results panel opens.
- Enable Opens the Application details form after clicking 'Finish' and click Finish. The Elasticsearch Resource Access Point application form opens and you can start configuring its properties.


End
Configuring the Elasticsearch Resource Access Point Application
Prerequisites
- You completed Creating the Elasticsearch Resource Access Point Application.
Start
- If your Elasticsearch Resource Access Point application form is not open in Genesys Administrator, navigate to Provisioning > Environment > Applications. Select the application defined for the Elasticsearch Resource Access Point and click Edit.
- Expand the Server Info pane.
- In the Tenant section, click Add and select your tenant (for instance, Environment). Click OK. (Tenant should be same as the Genesys Application cluster previously created).
- If your Host is not defined, click the lookup icon to browse to the hostname of your application, which should point to the host where you plan to locate your Elasticsearch node or Load-Balancer.
- In the Listening Ports section, create the default port by clicking Add. The Port Info dialog opens.
- Enter the Port (for instance, 9200 [use value of http of your Elasticsearch]).
- Click OK. The default port appears in the list of Listening ports.
- Ensure the Working Directory and Command Line fields contain a "." (period).
- Click Save.
- The confirmation dialog for changing the application's port opens. Click Yes.
- Select the Options tab.
- Make sure the following options are set in the [resource] section:
- [resource]/type=elasticsearch
- Make sure the following options are set in the [resource] section:
- Click Save & Close. If the confirmation dialog opens, click Yes.


End
Configuring the Knowledge Center Cluster for Use with Elasticsearch RAP
Prerequisites
- You completed Configuring the Elasticsearch Resource Access Point Application.
Start
- Navigate to Provisioning > Environment > Applications. Select the application defined for the Knowledge Center Cluster and click Edit.
- In the Connections section of the Configuration tab, click Add. The Browse for applications panel opens. Select a Genesys application defined as a Elasticsearch Resource Access Point, then click OK.
- Select the added connection to application, click Edit and ensure that the default connection port is selected as ID.
- Click Save & Close. If the confirmation dialog opens, click Yes.

End