Configuring the Knowledge Center Cluster Application
Carry out the procedures below, in order, to install and configure the Knowledge Center Cluster Application.
Import the Knowledge Center Cluster Application Template
- Open Genesys Administrator and navigate to Provisioning > Environment > Application Templates.
- In the Tasks panel, click Upload Template.
- In the Click 'Add' and choose application template (APD) file to import window, click Add.
- Browse to the Knowledge_Center_Cluster.apd file available in the templates directory of your installation CD.
- Click open.
- The New Application Template panel opens.
- Click Save and Close.
Create Cluster Applications
- Open Genesys Administrator and navigate to Provisioning > Environment > Applications.
- In the Tasks panel, click Create New Application.
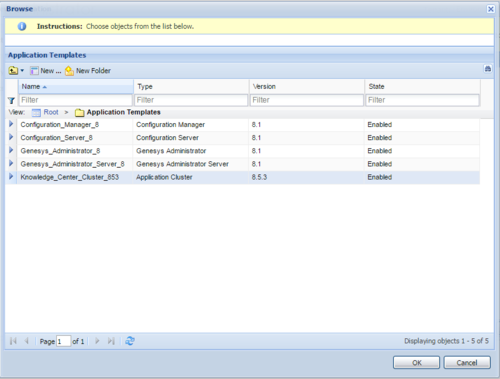
- In the Select Application Template panel, click Browse for Template and select the Genesys Knowledge Center Cluster application template that you imported earlier. Click OK.
- The template is added to the Select Application Template panel. Click Next.
- In the Select Metadata file panel:
- Click Browse.
- Click Add.
- Select the Knowledge_Center_Cluster.xml file available in the templates directory of your installation CD.
- Click Open.
- The metadata file is added to the Select Metadata file panel. Click Next.
- In Specify Application parameters:
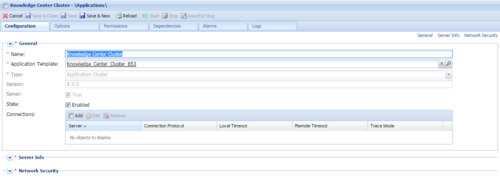
- Enter a name for your application. For instance, Knowledge Center Cluster.
- Ensure that State is checked.
- Select the Host on which the Knowledge Center Cluster load-balancer will reside.
- Click Create.
- The Results panel opens.
- Enable Open the Application details form after clicking 'Finish' and click Finish. The Knowledge Center Cluster application form opens and you can start configuring the Cluster application.
Configure the Cluster Application
- If your Knowledge Center Cluster application form is not open in Genesys Administrator, navigate to Provisioning > Environment > Applications. Select the application defined for the Knowledge Center Cluster and click Edit....
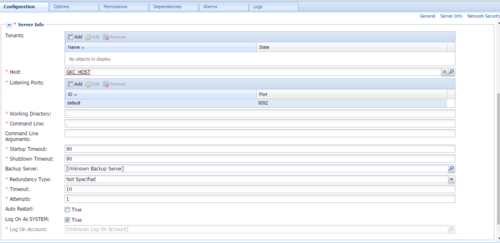
- Expand the Server Info pane.
- If your Host is not defined, click the lookup icon to browse to the host on which the Knowledge Center Cluster load-balancer will reside.
ImportantKnowledge Center Cluster serves as the entry point to all client requests sent to Knowledge Center Servers. The cluster application in Genesys Administrator needs to be configured to point to the host and port of the load balancer that will distribute these requests among your Knowledge Center Servers.
- In the Listening Ports section, create the default port by clicking Add. The Port Info dialog opens.
- Enter the port number for the Knowledge Center Cluster load-balancer, for instance, 9092.
- Choose http or "https" for the Connection Protocol.
- If you will be using a secure connection to the cluster, choose Secured for the Select Listening Mode.
- Click OK. The HTTP or HTTPS port with the default identifier appears in the list of Listening ports.
- In the Tenants section, add a working tenant by clicking Add. Browse and choose the appropriate tenant in the pop-up dialog. Click Ok.
- Ensure the Working Directory and Command Line fields contain "." (period).
- Click Save.
- The Confirmation dialog for changing the application's port opens. Click Yes.
Important
When configuring several Knowledge Center Clusters in one tenant, use the option "knowledgebaseFolder" found in the "general" section to separate the folders for your Knowledge Bases definitions in Scripts (for example, when setting different values for different clusters). This page was last edited on June 26, 2018, at 18:40.
Comments or questions about this documentation? Contact us for support!


