
Implement Load Balancing
| Purpose: Deploying for load balancing; this page defines the creation of nodes enabling load balancing. Read Load Balancing before you start your configuration. |
Contents
Install the Load Balancing Frontend and Backend Servers
![]() Purpose: Create the Load Balancing server instances.
Purpose: Create the Load Balancing server instances.
Prequisites
- You already imported templates for the Frontend and Backend Servers application;
- For this configuration example, you installed and configured Apache, version 2.2;
Start
- Create and configure the Load Balancing Frontend Server, including provisioning, as detailed in the previous steps of the Installation chapter. See Configuring the Web Engagement Frontend Server for its configuration.
- Create and install the Load Balancing Backend Server, including provisioning, as detailed in the previous steps of the Installation chapter. See Configuring the Web Engagement Backend Server for its configuration.
- Create, build, deploy and test a web engagement application as detailed in the Developer's Guide; see Develop your Web Engagement Application.
End
Next Steps
Check the Configuration for the Load Balancing Frontend and Backend Servers
![]() Purpose: To accomplish some higher-level business or configuration goal.
Purpose: To accomplish some higher-level business or configuration goal.
Prequisites
- You already created the configuration applications for the Load Balancing Frontend and Backend Servers.
Start
- In Genesys Administrator, check your Load Balancing Backend Server configuration. Select the application and click on the Edit... button.
- Open your application and select the options tab. Make sure that all the options contain the right IP addresses and port in their URLs. For instance, if the Load Balancing Backend server should be located at http://135.225.54.24:9081, make sure that this URL is used in all concerned options, such as for instance:
- the wmsg.connector.scxml.appUrl option in section service:wmsg is set to the http://135.225.54.24:9081/backend/resources /scxml/src-gen/IPD_default_FetchedWorkflow.scxml value.
- Check that the Connections section of the Configuration tab includes the following applications:
- The Load Balancing Frontend Server;
- The Interaction Workspace, to enable the display of pages and categories.
- Open your application and select the options tab. Make sure that all the options contain the right IP addresses and port in their URLs. For instance, if the Load Balancing Backend server should be located at http://135.225.54.24:9081, make sure that this URL is used in all concerned options, such as for instance:
- In Genesys Administrator, check your Load Balancing Frontend Server configuration. Select the application and click on the Edit... button.
- Check that the Connections section of the Configuration tab includes the Load Balancing Backend Server.
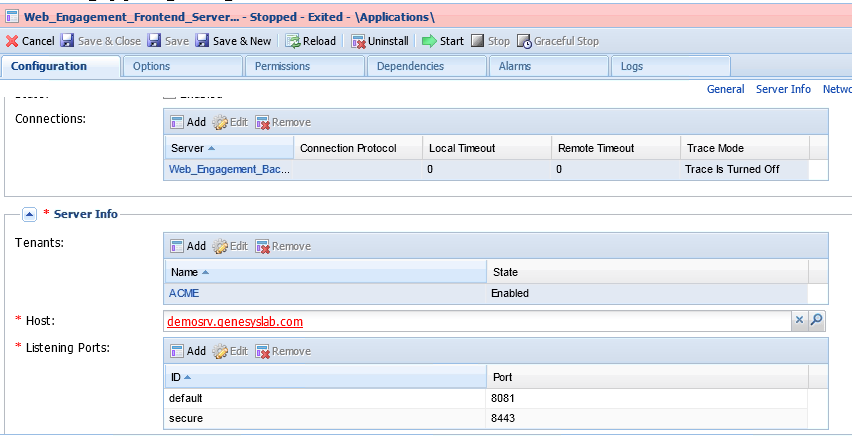 The configuration of the Load Balancing Frontend Server.
- Check that the Connections section of the Configuration tab includes the Load Balancing Backend Server.

End
Next Steps
![]() Create Server Nodes
Create Server Nodes
Create Server Nodes
![]() Purpose: Create applications for Backend and Frontend Servers used as node applications, in opposition to Load Balancing applications defined in previous steps. Note that each server node must use a hostname and a listening port value different from those used by the Load Balancing servers.
Purpose: Create applications for Backend and Frontend Servers used as node applications, in opposition to Load Balancing applications defined in previous steps. Note that each server node must use a hostname and a listening port value different from those used by the Load Balancing servers.
Prequisites
- You have created and configured the load balancing applications for the Frontend and Backend Servers;
- You have planned additional hosts for installing Backend and Frontend Servers used as application nodes.
- Each application node will use an IP address and a listening port different from the ones used by the Load Balancing Servers.
Start
- For each new node, create a new Backend Server application, including provisioning, as detailed in the previous steps of the Installation chapter. See Configure the Backend Server:
- Make sure that each server node is using a hostname and a listening port value different from those used by the Load Balancing applications. For instance, if the load balancing servers URL are http://135.225.54.24:9081 for the Backend Server, you could use the following URLs for your nodes:
- Node 1 (backend): 192.168.3.103:9083
- Node 2 (backend): 135.225.51.237:9084
- In the Connections section of your Configuration panel, do not add any connection to a Frontend Server node.
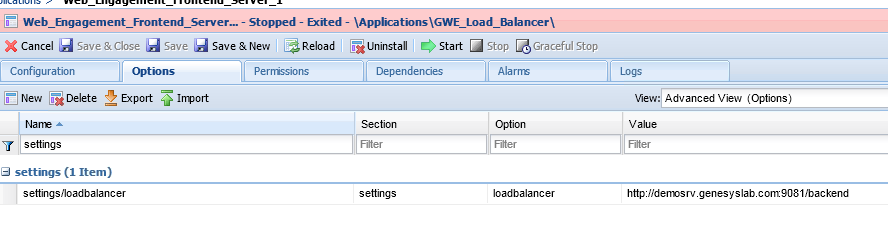
 Configuration sample for a node
 - In the settings section of the Options tab, the value of the loadbalancer option must be set to:
http://<load balancing frontend host address>:<listening port>/frontend where:- <load balancing frontend host address> is the host address for the Load Balancing Frontend Server;
- <listening port>is the listening port of the Load Balancing Frontend Server.

- For each new node, create a new Frontend Server application, including provisioning, as detailed in the previous steps of the Installation chapter. See Configure the Frontend Server.
- Make sure that each application is using a hostname and a listening port value different from those used by the Load Balancing servers. For instance, if the Load Balancing server URL is http://135.225.54.24:8081 for the Backend Server, you could use the following URLs for your nodes:
- Node 1 (Frontend): 192.168.3.103:8083
- Node 2 (Frontend): 135.225.51.237:8084
- In the Connections section of your Configuration panel, do not add any connection to a Backend Server node.
 Configuration sample for a node
 - In the settings section of the Options tab, the value of the loadbalancer option must be set to:
http://<load balancing backend host address>:<listening port>/frontend where:- <load balancing backendhost address> is the host address for the Load Balancing Backend Server;
- <listening port> is the listening port of the Load Balancing Backend Server.
- Make sure that you created and deployed a Web Engagement application, as detailed in step 3 of Install the Load Balancing Frontend and Backend Servers. Copy the application's server directories, available in the apps/servers folder of the Web Engagement Installation Directory;
- For each node:
- Paste the server to the corresponding Web Engagement server directory of your node.
- Edit the launcher.xml file (or launcher_32.xml or launcher_64.xml for Linux) and configure the webs_host, http_port, https_port variables to match the host and port that you specified previously in the node configuration.


End
Next Steps
![]() Configure Apache for the Load Balancing Frontend Server
Configure Apache for the Load Balancing Frontend Server
Configure Apache for the Load Balancing Frontend Server
![]() Purpose: Configure the default Load Balancing server used for the Web Engagement Frontend Server.
Purpose: Configure the default Load Balancing server used for the Web Engagement Frontend Server.
Prerequisites
- You must instal apache-2.2.xx-win32-x86.msi on the Load Balancing host for the Frontend Server (Apache 2.2 or higher), which enables the use of the extension mod_proxy_balancer.
- Make sure that the following modules are present in your Apache modules\ folder; upload them if they are missing:
- mod_proxy.so
- mod_proxy_balancer.so
- mod_proxy_connect.so
- mod_proxy_http.so
Start
- Open the Apache installation directory and edit the httpd.conf file with a text editor.
- Add the following text to your Apache configuration in the load modules section:
LoadModule proxy_module modules/mod_proxy.so
LoadModule proxy_balancer_module modules/mod_proxy_balancer.so
LoadModule proxy_connect_module modules/mod_proxy_connect.so
LoadModule proxy_http_module modules/mod_proxy_http.so - To implement the node-based configuration, add a balancer member for each node, as following:
- ‡‡‡‡‡‡loadbalancer configuration for GWE Frontend (sticky sessions)‡‡‡‡‡
- ProxyPass / balancer://my_cluster/
- <Proxy balancer://my_cluster>
- BalancerMember http://<Node1 IP address>:<listeningPort1> route=NodeName1
- BalancerMember http://<Node2 IP address>:<listeningPort2> route=NodeName2
- ...
- BalancerMember http://<NodeN IP address>:<listeningPortN> route=NodeNameN
- ProxySet stickysession=alias
- </Proxy>
- where:
- <Nodei IP address> is the IP address of your node, and <listeningPortN>, the associated listening port of your frontend application.
- query parameter alias for Frontend cluster sticky session.
- NodeName1 is to configuration application name
- Then, add the following lines to enable the balancer manager and make it visible at the /balancer URL:
- <Location /balancer>
- SetHandler balancer-manager
- Order Deny,Allow
- Deny from all
- Allow from all
- </Location>
- Start the Load Balancing server by running httpd.exe.
End
For example, let's consider two Frontend Server nodes, such as GWE_Frontend_103 and GWE_Frontend_52, defined in the Configuration Server:
ProxyRequests Off <Proxy balancer://mycluster/> BalancerMember http://192.168.3.103:8083/frontend route=GWE_Frontend_103 BalancerMember http://135.225.51.148:8084/frontend route=GWE_Frontend_52 ProxySet stickysession=alias </Proxy> ProxyPass /frontend/ balancer://mycluster/ ‡‡‡‡‡‡‡loadbalancer UI for checking status‡‡‡‡‡‡‡ <Location /balancer> SetHandler balancer-manager Order Deny,Allow Deny from all Allow from all </Location>
Next Steps
![]() Configure Apache for the Load Balancing Backend Server
Configure Apache for the Load Balancing Backend Server
Configure Apache for the Load Balancing Backend Server
![]() Purpose: Configure the default Load Balancing Server used for the Web Engagement Backend Server.
Purpose: Configure the default Load Balancing Server used for the Web Engagement Backend Server.
Prerequisites
- You must install apache-2.2.xx-win32-x86.msi on the Load Balancer host for the Backend Server (Apache 2.2 or higher), which enables the use of the extension mod_proxy_balancer.
- Make sure that the following modules are present in your Apache modules\ folder; upload them if they are missing:
- mod_proxy.so
- mod_proxy_balancer.so
- mod_proxy_connect.so
- mod_proxy_http.so
- mod_headers.so
Start
- Open the Apache installation directory and edit the httpd.conf file with a text editor.
- Add the following text to your Apache configuration in the load modules section:
LoadModule proxy_module modules/mod_proxy.so
LoadModule proxy_balancer_module modules/mod_proxy_balancer.so
LoadModule proxy_connect_module modules/mod_proxy_connect.so
LoadModule proxy_http_module modules/mod_proxy_http.so
LoadModule headers_module modules/mod_headers.so - To implement the node-based configuration, add a balancer member for each node, as following:
- ‡‡‡‡‡‡loadbalancer configuration for GWE backend ‡‡‡‡‡‡
- ProxyRequests Off
- Header add Set-Cookie "ROUTEID=.%{BALANCER_WORKER_ROUTE}e; path=/" env=BALANCER_ROUTE_CHANGED
- <Proxy balancer://mycluster/>
- BalancerMember http://<Node1 IP address>:<listeningPort1> route=NodeName1
- BalancerMember http://<Node2 IP address>:<listeningPort2> route=NodeName2
- ...
- BalancerMember http://<NodeN IP address>:<listeningPortN> route=NodeNameN
- ProxySet stickysession=ROUTEID
- </Proxy>
- ProxyPass /backend/ balancer://mycluster/
- ProxyPassReverse /backend/ balancer://mycluster/
- Start the load balancer. Run the httpd.exe file.
End
For testing your Load Balancing Server, you can send requests to the host/port of the Load Balancing Server, turn off one of your nodes, and verify that your requests and responses delivered correctly. The following code sample shows the configuration for two Backend Server nodes.
ProxyRequests Off
Header add Set-Cookie "ROUTEID=.%{BALANCER_WORKER_ROUTE}e; path=/" env=BALANCER_ROUTE_CHANGED
<Proxy balancer://mycluster/>
    BalancerMember http://192.168.3.103:9083/backend route=1
    BalancerMember http://135.225.51.148:9084/backend route=2
	ProxySet stickysession=ROUTEID
</Proxy>
ProxyPass /backend/ balancer://mycluster/
ProxyPassReverse /backend/ balancer://mycluster/
Next Steps
![]() Configure Cassandra Cluster
Configure Cassandra Cluster