
Configure the Frontend Server
| Purpose: Describes the configuration tasks related to the Web Engagement Frontend Server. |
Contents
Configuring the Frontend Server
![]() Purpose: Configure the application previously created for the Frontend Server.
Purpose: Configure the application previously created for the Frontend Server.
Prerequisites
- The Web Engagement Frontend Server application is created.
Start
- In Genesys Administrator, navigate to Provisioning > Environment > Applications, select the Web Engagement Frontend Server application and click the Edit... button.
- If the Backend Server has been configured, add a connection to it:
- In the Connections section, click the Add button. The Browse Applications dialog box opens.
- Select the Web Engagement Backend Server application and click OK. The Backend Server is added to the list of Connections.
- Select the Backend Server from the list of connections and click Edit. In the Connection Info window, select the default port for the ID and set the Connection protocol to http. Click OK.
- Expand the Server Info pane.
- In the Tenant section, click the Add button and select your tenant. For instance, Environment. Click OK.
- In the Listening Ports section, click the Add button. The Port Info dialog opens.
- Enter the Port. For instance, 8081.
- Choose http for the Connection Protocol.
- Click OK.
- Optionally, you can add a secure listening port for authenticated users, secured connections, and secure chat:
- Click the Add button. The Port Info dialog opens.
- Enter the ID. For instance, https.
- Enter the Port. For instance, 8443.
- Enter https for the Connection Protocol.
- Choose secured for the Listening Mode.
- Click OK.
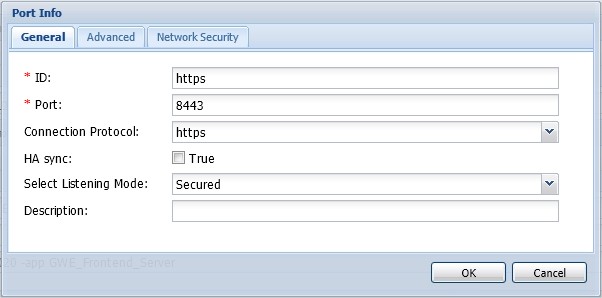 Secure listening port
- Enter a period (.) in Working Directory. The path will be filled in automatically when the new Application is installed and connects to Configuration Server;
- Enter a period (.) in Command Line. The command line will be filled in automatically when the new Application is installed and connects to Configuration Server;
- Leave Command Line Arguments blank. Any arguments will be filled in automatically when the new Application is installed and connects to Configuration Server;
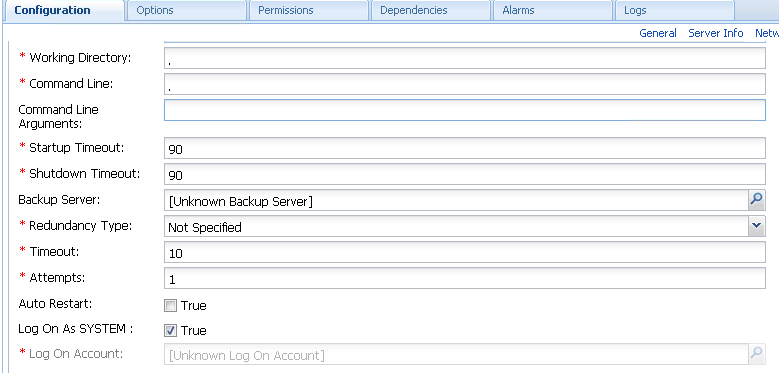 Commands for the Frontend Server.
 - Click the Save button.
- The Confirmation dialog for changing the application's port opens. Click Yes.
- (Optional) Select the Options tab. In the log section, the all option is set to stdout by default. Enter a filename if you wish to enable logging to a file. For example, you can enter stdout, c:\logs\WebEngagement\Frontend_Server to force the system to write logs in the console and in a file.
- (Optional) You need to create a webengagement annex only if your Web Engagement Frontend Server application's type is Genesys Generic Server. Click New in the Options tab. The New Option dialog opens.
- Select Annex for Location.
- Enter webengagement for Section.
- Enter type for Name.
- Enter frontendserver for Value.
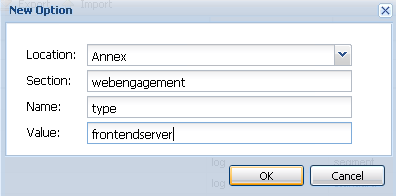 Annex for the Frontend.
 - Click OK. You can see it by selecting Advanced View (Annex) in the View selector.
- Click the Save & Close button. If the Confirmation dialog opens, click Yes.


End
Next Steps
- If you haven't configured the Backend Server, go to Configure the Backend Server.
- If you haven't added a connection to the Frontend Server on the Backend Server, go to (Optional) Add the Frontend Server Application to the Connections of the Backend Server Application.
- If you have configured the Backend Server, you can install Genesys Web Engagement:
(Optional) Add the Frontend Server Application to the Connections of the Backend Server Application
![]() Purpose: Finalize the configuration of the Backend Server application.
Purpose: Finalize the configuration of the Backend Server application.
Warning: You do not need to perform this procedure if you have already added the Frontend Server Application to the connections of the Backend Server Application.
Start
- In Genesys Administrator, navigate to Provisioning > Environment > Applications, select the Web Engagement Backend Server application, and click the Edit... button.
- Configure the connection:
- In the Connections section, click the Add button. The Browse Applications dialog opens.
- Select the Web Engagement Frontend Server application and click OK. The Frontend Server is added to the list of Connections.
- Click Save. The Confirm dialog displays the following message: The host and/or port(s) of the application will be changed. Do you want to continue? Click Yes.
- Select the Options tab. In the settings section, set event-mode to true.
- Click Save & Close.
End
Next Steps
- If you have configured the Backendend Server, you can install Genesys Web Engagement:
This page was last edited on March 4, 2014, at 17:38.
Comments or questions about this documentation? Contact us for support!