
Install on Windows
Installing Web Engagement Backend Server on the Windows operating system
Purpose
To install the deployment files for Genesys Web Engagement on the Windows web server.
|
|
Start
- On your desktop, open the Genesys Web Engagement CD/DVD or the Genesys Web Engagement IP and double-click the Setup.exe file.
You might be asked to reboot your system to delete or rename certain system files before the Installation Wizard runs.
The Genesys Installation Wizard launches and the Welcome panel is displayed. - On the Welcome panel, do one of the following:
- Click Next to begin the installation procedure.
- Click Cancel to exit the Genesys Installation Wizard.
- Click About to open the Genesys Web Engagement ReadMe file in your default browser.
If you clicked Next, the Connection Parameters to the Configuration Server window is displayed.
- Enter Connection parameters to Configuration Server:
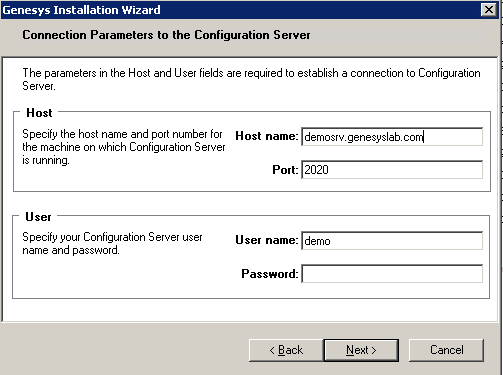 You must enter connection values to your Configuration Server.
Click Next. - In the 'Select Application' dialog, select the Web Engagement Backend Server that you created previously in Configuration Server.
- On the Choose Destination Location panel, specify the location on your web server in which Genesys Web Engagement is to be installed by doing one of the following:
- Type a location in the Destination Folder text box.
- Click Default to reset the location to the default location.
- Click Browse to navigate to a destination folder.
Note: This location must match the previous settings that you entered in Configuration Server.
- With the destination folder specified, do one of the following:
- Click Next.
- Click Back to return to the Select Options panel.
- Click Cancel to exit the Genesys Installation Wizard.
- If you clicked Next, the Ready to Install panel is displayed. Do one of the following:
- Click Install to install Genesys Web Engagement Backend Server.
- Click Back to return to the Choose Destination Location panel.
- Click Cancel to exit the Genesys Installation Wizard.
- If the Installation Complete panel is displayed, click Finish to exit the Genesys Installation Wizard.

End
Next Steps
Installing Web Engagement Frontend Server on the Windows operating system
Purpose
To install the deployment files for Genesys Web Engagement Frontend Server on the Windows web server.
|
|
Start
- On your desktop, open the Genesys Web Engagement CD/DVD or the Genesys Web Engagement IP and double-click the Setup.exe file.
You might be asked to reboot your system to delete or rename certain system files before the Installation Wizard runs.
The Genesys Installation Wizard launches and the Welcome panel is displayed. - On the Welcome panel, do one of the following:
- Click Next to begin the installation procedure.
- Click Cancel to exit the Genesys Installation Wizard.
- Click About to open the Genesys Web Engagement ReadMe file in your default browser.If you clicked Next, the Choose Destination Location panel is displayed.
- If you previously installed a Backend Server on this host, in the Select Installed Application dialog you must select the Backend Server that you installed. Click Next.
- Enter Connection parameters to the Configuration Server. Click Next.
- In the Select Application dialog, select the Web Engagement Frontend Server that you created previously in Configuration Server.
- On the Choose Destination Location panel, specify the location on your web server in which Genesys Web Engagement is to be installed by doing one of the following:
- Type a location in the Destination Folder text box.
- Click Default to reset the location to the default location.
- Click Browse to navigate to a destination folder.
- With the destination folder specified, do one of the following:
- Click Next.
- Click Back to return to the Select Options panel.
- Click Cancel to exit the Genesys Installation Wizard.
- If you clicked Next, the Ready to Install panel is displayed. Do one of the following:
- Click Install to install Genesys Web Engagement Frontend Server.
- Click Back to return to the Choose Destination Location panel.
- Click Cancel to exit the Genesys Installation Wizard.
- Click Finish to exit the Genesys Installation Wizard.
End
- Provisioning is done automatically.
Next Steps
- See Installing Plug-ins.
This page was last edited on May 21, 2013, at 19:23.
Comments or questions about this documentation? Contact us for support!