Procedure: Creating a New Training Object
This topic describes part of the functionality of Genesys Content Analyzer.
Purpose: To create an object that can be used to produce a classification model.
Prerequisites: A category tree.
- In Knowledge Manager, select a tenant and language. This determines which category trees are available. See Notes on Language for some considerations relevant to choosing a language.
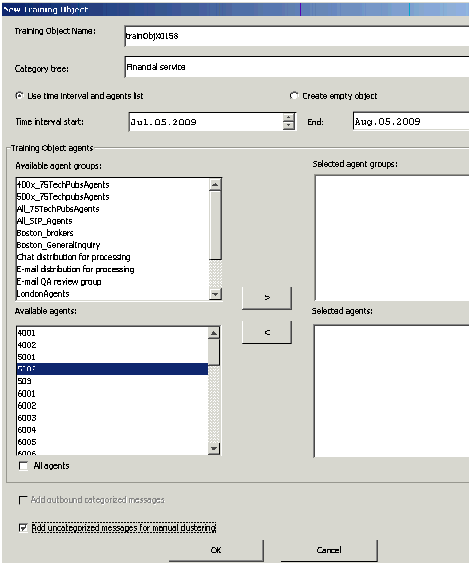
- On the Training tab, select File > New, click the New icon, or right-click anywhere and select New Training Object on the shortcut menu. The New Training Object dialog box appears, as shown in "New Training Object Dialog Box."
- Enter a name for the object (see Language and Dictionary Names for restrictions on the names of Knowledge Manager objects) and select a category structure (category tree).
- You now have two alternatives, depending on whether you already have a collection of e-mails that have been categorized:
- If you do not already have a collection of categorized e-mails, select the Create empty object radio button.
- If you already have categorized e-mails, the categories were assigned to each e-mail by the agent who handled the interaction. In adding categorized e-mails to a training object, you can simply add all e-mails categorized by any agent at any time, or you can make the following adjustments:
- Use only the e-mails that were categorized during a certain time period. You may want to exclude earlier times when agents were still learning to use the category system. To do this, set dates in the Time interval start and End fields.
- Use only the e-mails that were categorized by selected agents or groups (some agents or groups may be especially reliable in their choice of categories). To do this, use the > and < buttons to move agent names from the Available agent groups window or Available agents window to the Selected agent groups window or the Selected agents window.
Important
In defining the time interval, be careful to avoid these common errors: (1) identical start and end dates, resulting in zero e-mails in the training object; (2) too large a time span, which can result in omission of the categorization of the latest e-mails in the set; (3) time span of only a few days, which may lead to omission of the results for the last date.Important
Agent names appear in alphabetical order. For agent groups to appear in the Available agent groups box, they must be configured in the Tenant that you are creating this training object in. To move individual agents, you must first clear the All agents check box. There is a limitation on the number of SQL request parameters when creating a new training object.- Note: The limitation on the number of SQL request parameters becomes relevant when you are dealing with a large number of agents. For example, you will need a correspondingly large number of instances of the parameter Interaction.OwnerId = xxxxxx. The limitation varies with the RDBMS you are using, but it is approximately 2,100.
Important
The uncategorized e-mails added by this step are from the time interval and/or agents that you designated in the previous step. If you made no designations, the uncategorized e-mails are from your entire UCS database.Next Steps
- If you are operating Knowledge Manager with UCS 7.5, review Add Outbound Messages.
- To add more text objects, continue with Adding More Text Objects to the Training Object and Adding Uncategorized E-Mails Using the TO Data Analyzer.
- To proceed with training, continue with Schedule Training.
This page was last edited on December 17, 2013, at 18:54.
Comments or questions about this documentation? Contact us for support!

