Procedure: Creating a Screening Rule
Purpose: To create or edit a screening rule.
- Go to the Screening tab.
- Do one of the following:
-
Select New from the File menu.
- Right-click anywhere on the Screening tab and select New.
- Select an existing screening rule and double-click or select Edit from the File menu.
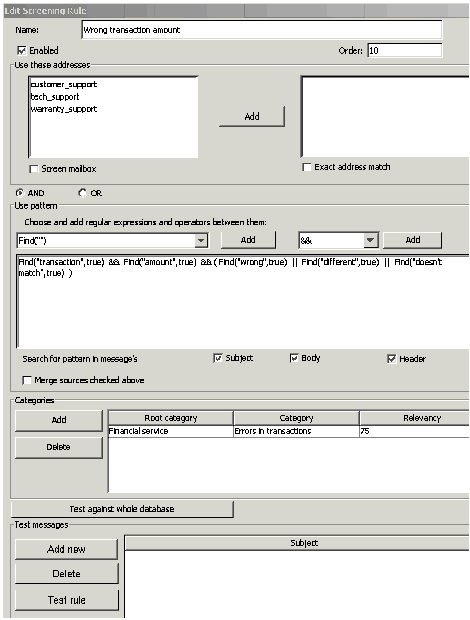
The Screening Rule Editor opens, as shown in "Screening Rule Editor." If you are creating a new screening rule, the title of the dialog box is New Screening Rule; if you are editing an existing rule, its title is Edit Screening Rule.
-
With the Exact address match box cleared, the rule looks for messages having that address as a substring of their destination address. For example, xyz@domainname.com matches abc.xyz@domainname.com and xyz@domainname.com.
-
With the Exact address match box selected, the screening rule looks for messages having that exact address as a destination. For example, xyz@domainname.com matches xyz@domainname.com but not abc.xyz@domainname.com. This match is not case sensitive.
Important
The e-mail addresses listed in the left-hand window of Use these addresses are defined in this configuration database object: Business Attributes > EmailAccounts > Attribute Values > Annex > general > address.Instead of moving addresses from the left-hand window to the right-hand, you can directly type an address in the right-hand window.
Important
For this feature to work as expected, the E-mail Server enable-same-mail-from-mailboxes option must be set to true. With this setting, E-mail Server creates a separate interaction for each address in the To field (that is, for each mailbox that it pulls the e-mail from when it creates the interaction).-
AND
—Match the addresses selected in Use these addresses and match the pattern defined in Use pattern
In the Use pattern area, compose the rule, using the drop-down lists for functions and operators. See Step 9.
-
OR
—Match the addresses selected in Use these addresses or match the pattern defined in Use pattern. In the Use pattern area, compose the rule, using the drop-down lists for functions and operators. See Step 9.
-
With multiple check boxes selected, there are two ways that a screening rule can behave. Use the Merge sources checked above checkbox as one way to control this; see Screening Rules Reference: Subject‚ Body‚ and Header for an explanation.
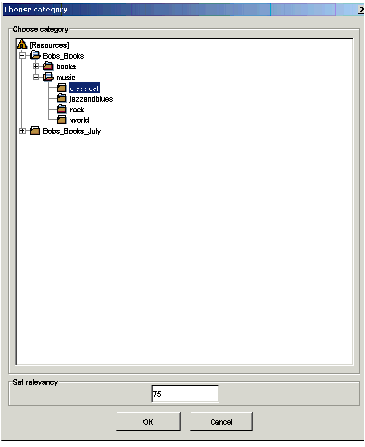
- Click Add. The Choose category dialog box appears, as shown in Choose Category.
-
When an interaction matches this screening rule, the results are similar to classifying it using Genesys Content Analyzer: it receives a category name and a confidence level. The confidence level indicates that the system is x percent confident that this interaction belongs in this category. With Content Analyzer, the system assigns the category and confidence level. But with a screening rule, it is up to you, the user, to decide what category the interaction belongs to and how confident you are of that categorization.
-
Do so as follows:
Next Steps
This page was last edited on May 20, 2014, at 18:36.
Comments or questions about this documentation? Contact us for support!


