
Procedure: Adding e-mails to a category on the Main tab
This procedure uses the TO Data Analyzer to search for uncategorized e-mails that are a likely fit for a selected category.
Prerequisites
For uncategorized e-mails to be available to the TO Data Analyzer, they must be associated with the root category of the category tree in the training object. You perform this association in either of the following ways:
- When you create the training object, select the Add uncategorized messages for manual clustering check box as described in Step 6 of Procedure: Creating a new training object.
-
In an existing training object, you can move all e-mails to the root category (before you do this it is advisable to make a backup copy of the training object):
- On the left-hand pane, select the root Training Objects node to give the two-pane view.
- On the right-hand pane, right-click a training object and select Move All Mails to Root Category, as shown in "Move All E-Mails to the Root Category."
- On the left-hand pane, select the root Training Objects node to give the two-pane view.

Move All E-Mails to the Root Category
Procedure
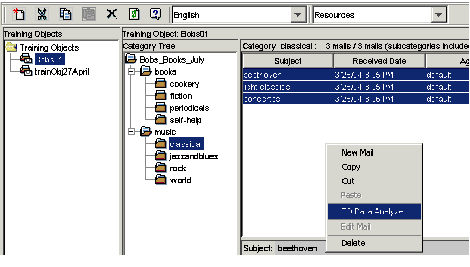
- On the Training tab, select a training object.
- On the middle pane, select a category that you want to add e-mails to.
- On the rightmost pane, select the e-mails already assigned to this category.
-
Still on the rightmost pane, right-click and select TO Data Analyzer, as shown in "Start the Training Object Data Analyzer."

Start the Training Object Data Analyzer
-
The Uncategorized Message Clustering dialog box appears with its Main tab showing, as shown in Uncategorized Message Clustering."
 Uncategorized Message Clustering
-
Note that the e-mails that you selected in Step 3 appear in the Similar messages list. These e-mails are now part of the criteria that TO Data Analyzer uses to choose e-mails to display.
-
Click Find. The system displays a candidate e-mail as shown in "Message Clustering: First Candidate":
-
The Candidate messages box shows information about the e-mail. The N is number, relevant only for the Find multiple command, described below.
-
The Subject box shows the subject of the e-mail.
- The Message box shows the e-mail body.
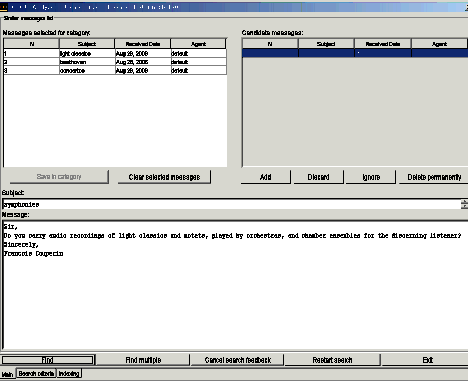
Message Clustering: First Candidate
-
As an alternative to Find, click Find multiple. The system displays the 15 e-mails that are the best candidates for the category,
as shown in "Message Clustering: Multiple Candidates."

Message Clustering: Multiple Candidates
-
The Candidate messages box shows information about the e-mail. The N is number, relevant only for the Find multiple command, described below.
-
Use the buttons at the bottom of the dialog to select one of the following actions for this candidate (or candidates, if you clicked Find multiple and
then used SHIFT-click or CTL-click to select multiple candidates):
-
Add—Add to the selected category and adjust the search accordingly (see Search Criteria Tab for more explanation).
-
Discard—Omit from the selected category and adjust the search accordingly.
-
Ignore—Omit from the selected category but do not adjust the search.
-
Delete permanently—Remove from the training object permanently. This e-mail will not appear again.
ImportantDelete permanently is useful for deleting garbage e-mails, that is,e-mails that you do not want to use anywhere in the training object. With Discard and Ignore, in contrast, the e-mail is no longer considered in the current search for the selected category, but it remains in the training object. -
Add—Add to the selected category and adjust the search accordingly (see Search Criteria Tab for more explanation).
- Click Find again, and the next candidate e-mail displays in the Subject and Message boxes. Decide whether to add, discard, or ignore this e-mail.
- Continue in the same way, repeating Step 8. Knowledge Manager continues to display e-mails in the order determined by the criteria that you have set. When there are no more uncategorized e-mails, { Mail not found } displays in the Message box.
- When you are done adding e-mails to the Similar messages list, click one of the following:
- If you click Save in category, the Choose category dialog box appears, as shown in "Choose Category Dialog Box."


Save in category—This adds the e-mails to a category, as explained in the next step.
Clear selected messages—This clears all e-mails from the Similar messages list. You can start again by clicking Find.

Choose Category Dialog Box
-
The Choose category dialog box displays the category tree that you are working with. If you selected a category in Step 2 above, that category is selected in this dialog box, but you can select another category (but not the root category). You can also click Create new category to add a new category which becomes a subcategory of the category selected in the Choose category dialog box. Click OK to add the e-mails in the Similar messages list to the selected category.
Next Steps
- Optionally, use the Search Criteria tab to specify the order that Knowledge Manager shows you the uncategorized e-mails (this page).
- Study the example of using the TO Data Analyzer.
This page was last edited on December 18, 2013, at 17:39.
Comments or questions about this documentation? Contact us for support!