Contents
Login
[Modified: 8.5.108.11, 8.5.112.08, 8.5.114.08, 8.5.138.04]
When you log in to Workspace, the application is enabled for any headsets that are plugged into your workstation. If you want to use a different headset, exit Workspace, plug in the new headset, then relaunch Workspace.
The Login view is the first view that is displayed when you launch Workspace. It enables you to identify yourself and, if required, enter additional login data, based on your role or the technical environment.
Before you start to use Workspace make sure that your phone set is working. For SIP enabled agents, plug in your USB headset.
Logging in is a two-step process—and the first time that you login you might also be required to change your password.
If you are an agent who does not always use the same phone set and workstation (sometimes referred to as roaming or hot-seating), you might have to enter extra information about your Place (phone number at your workstation) to make sure that when calls are directed to you, they ring on the phone where you are working instead of on the last phone that you logged in to.
Logging in to the Workspace application
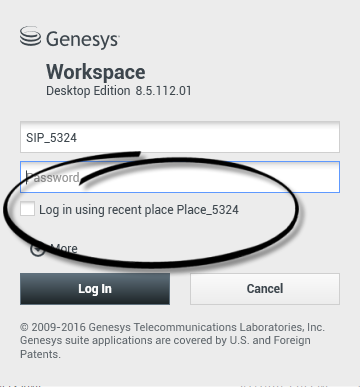
After you have launched the Workspace application, the login view opens on your desktop to enable you to identify yourself to the system. If you do not know what information to enter in the login screen or if you have multiple accounts, each for a different purpose, contact your supervisor or administrator to determine what login information to use.
- Enter your user name in the User Name field.
- Enter your password in the Password field. (Note: you might be required to change your password when you first login, at a specific interval, or for other security reasons. Refer to Changing Your Password).
- Check Log in using recent place if you are using the same phone set and workstation that you used the last time you logged in.
- If necessary, select your language from the Language drop-down list.
- Click one of the following buttons:
- Log In to authenticate yourself on the system.
- Cancel to stop logging in and close the login view.
If more information is required to authenticate you, the Advanced Login Parameters view is displayed.
Your account might be set up to specify your preferred language. To specify a different language preference, click Language, then select a language from the drop-down list.
More/Less Options
In the first login view, your account might be set up to specify additional options.
- To specify additional options, click More.
- To hide the additional options, click Less.
Options that your account might be configured to specify include the following:
- Name of the Workspace application.
- Name of the host that is running your configuration server.
- Port number of your configuration server. This port is normally 2020.
Defining Advanced Login Parameters
[Modified: 8.5.108.11, 8.5.138.04]
After you have been authenticated and logged in, a new view might open on your desktop that enables you to specify additional information, based on the tasks that you want to perform. The contents of the view are defined by your administrator; they are specific to your role. However, if no additional information is required, the Main Window view opens immediately.
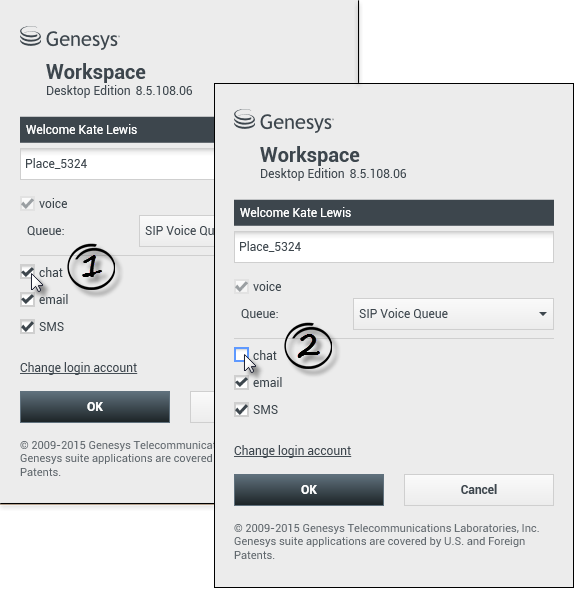
The Advanced Login Parameters view confirms your login. It might notify you that you must select one or more channels and/or provide any additional login information that is specific to those channels.
Additional information
If required, enter the following information:
- Your Place
- Your queue
- Media channels that you want to use (Voice, IM, SMS, workitems such as faxes, and so on)
- Optional phone number, if you are on a SIP Server system and login remotely.
You might have the option to check and uncheck eServices media channels, such as chat, SMS, email, social media (for example, Facebook and Twitter), and workitems (such as fax).
If you uncheck a media channel you will not be logged into that channel when Workspace starts. To use that channel later in your session, you must login to that channel manually from the My Channels view in the Main Window or the Global Status menu.
Completing the login process
After you have entered your additional parameters, do one of the following:
- Click OK to submit your information; the Main Window view opens.
- Click Cancel to close the System Parameters view and log out.
- Click Change login account to return to the first login view.
Using different phones
[Added: 8.5.138.04]
In some environments, agents have more than one Place to choose from when specifying their Place during log in. For example, they might log in from their workstation in the office one day and from their home phone or mobile the next. If this is the set up in your environment, your administrator or supervisor will give you different Place names to use depending on what phone you are using to login to Workspace. Enter the Place in the Place field of the second login window.
Remote phone number
If your company is using a SIP Server (VoIP), your account might be configured to log in by using a remote phone number at which you can be reached if you are not logged in from a phone that is on the internal phone system of your company.
If you are logging in remotely, enter the remote phone number to which your calls should be routed in the Phone Number box in the Advanced Login Parameters view. The phone number in this field might already be configured for you.
USB headset detection
Make sure that you plug in your USB headset so that you can use the SIP Voice channel. When you log in to a SIP Voice channel, Workspace checks to determine whether the USB headset that your account is configured to use is plugged in. If it is not, you will be logged in to Workspace but not into the SIP Voice channel.
Workspace detects when your USB headset is plugged in or unplugged and will set your status accordingly. If your USB headset is not plugged in a warning message is displayed.
The volume settings for the USB headset that you used the last time you logged out are retained the next time that you log in. You can adjust the volume of your USB headset by using the volume control on the Voice interaction window.
Ready/Not Ready State
Your system administrator specifies what your status is for each channel when you log in. If your account is configured to be Not Ready for one or more channels, your system administrator might specify a Not Ready Reason for the channel. To start receiving interactions on a Not Ready channel, you must change the status to Ready.Logging in to a Place Group
[Added: 8.5.114.08]
In some contact centers, agents and other workers share a pool of Places, called Place Groups, instead of each having their own Place.
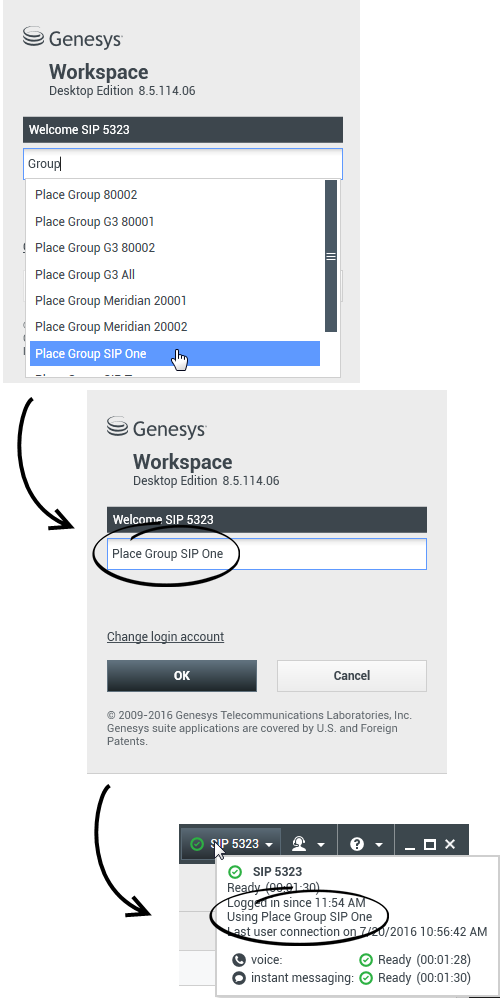
If your contact center uses Place Groups, instead of entering your Place in the Login window, enter the name of your Place Group and a Place is selected for your automatically.
In the second (advanced) Login window, type the name of your Place Group.
If you can choose from more than one Place Group, type one or more words from the name of the Place Groups, such as "Group", into the Place Group search field to see a drop-down list off available Place Groups.
Select the name of the Place Group from the list then click OK to complete the login process.
When the Workspace Main Window is displayed, you can confirm which Place Group you are logged in on by hovering your mouse pointer over the Status menu.
You might have the option of entering either your Place or a Place Group name.
Changing Your Password
There are a number of reasons why you might have to or want to change your Workspace login password. For reasons that are related to the security of your company, your account might be configured so that your password expires automatically after a specified number of days. Your account might also be configured to require you to change your password after an inactivity time-out. For your personal security, your account might be configured with a temporary password when the account is assigned to you, and you might be required by your system administrator to change your temporary password before you can login to Workspace for the first time. You might also want to change your Workspace login password for other reasons — for example, your company might not have a specific policy about how often your password should be changed or you might have accidentally revealed your password to an unauthorized person.
In all of these scenarios, use the Workspace Change Password dialog box to change your password.
To manually change your password, from the Main Menu, select Change Password. The Change Password dialog box is displayed. Perform the following steps:
- Enter your current password in the Old Password field.
- Enter your new password in the New Password field.
- Enter your new password again in the Confirm Password field.
- Click OK to change your password or click Cancel to close the dialog box without changing your password. If you made any errors, after you click OK you are asked to re-enter the information. If you entered all of the information correctly, your password is changed to the new specified password.
If you are required to change your password by your administrator, the Change Password dialog box is displayed automatically. Perform the following steps:
- Enter your new password in the New Password field.
- Enter your new password again in the Confirm Password field.
- Click OK to change your password or click Cancel to close the dialog box without changing your password. If you made any errors, after you click OK you are asked to re-enter the information. If you entered all of the information correctly, your password is changed to the new specified password.
Remote and Virtual Desktop Environments
You might work in an environment that uses Virtual Desktop Infrastructure (VDI) to run Workspace. This means that when you start Workspace, the application is displayed on your screen, but it is not actually running on your workstation, it is running on a remote machine.
In VDI environments, your administrator installed the Workspace Standalone SIP Endpoint on your workstation before you logged in, or, you were instructed to install it by clicking on an installation hyperlink in an email or other document.
When you start your workstation, the Workspace Standalone SIP Endpoint automatically launches and the Workspace SIP Endpoint icon (![]() ) is displayed in your system tray. Until you log in to Workspace, this icon is grey.
) is displayed in your system tray. Until you log in to Workspace, this icon is grey.
After you launch Workspace, the Workspace SIP Endpoint icon turns red (![]() ) to indicate that it is active.
) to indicate that it is active.
Troubleshooting Workspace SIP Endpoint
In the event that your Workspace environment loses connection to the Workspace SIP Endpoint, a message might be displayed asking you to start the Workspace SIP Endpoint application. You can start the Workspace SIP Endpoint by selecting the Workspace SIP Endpoint application in the Start menu of your workstation.
If you are instructed to do so, you can stop the Workspace SIP Endpoint by right-clicking on the icon in the system tray and then selecting Exit from the pop-up menu.Login in a Single-Sign On Environment
Related Resources
The Workspace Desktop Edition User's Guide (English only) provides detailed lessons for using all the features of Workspace. You might find the following lessons useful:


