Contents
Case Information
[Modified: 8.5.117.18, 8.5.118.10., 8.5.121.03]
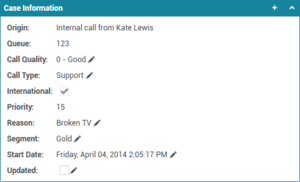
The Case Information (also known as case data or attached data) view provides information about an interaction—for example, an account number or type of service. Your system administrator configures which attached data is displayed.
The following are examples of the type of critical information that the Case Information view provides about the active interaction:
- Contact name
- Contact type
- Call type
- Account information
- Subject
The Case Information view is part of the Interaction view and the History tab of the Contact Directory view.
Hyperlinks
Some case data might be a URL (website address). If your account is set up to preview the URL target, you can place your mouse pointer over the URL to display a preview of the target. Your account might also be set up to enable you to click active URLs in the Case Information view to open the target in the interaction window. A URL might be displayed as the title of the web page, as an anchor, or as a URL. If the URL is active, it is displayed as blue text.
URLs and Security
[Added: 8.5.121.03] Sometimes URLs (links to websites) are included in case data. URLs in the Case Information view might be plain text or they might be hyperlinked text. Preview the URL before clicking it by hovering your mouse pointer over the URL to display a tooltip that lets you review the address.
Editing Case Data or Adding Missing Fields
[Modified: 8.5.117.18, 8.5.118.10]
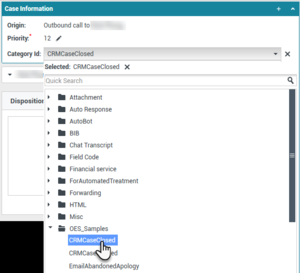
Your account might be set up to enable you to edit one or more entries in the Case Information view. Any field that can be edited displays a Pencil icon when you place your mouse pointer over it. Click the field to edit the content. Press the Enter key or click away from the field to commit your change. Editable fields might have text fields that you can enter text or numbers, check boxes, calendars, or drop-down lists. Some drop-down lists might contain a set of folders and entries (selectable valid value for the field), like in the picture below, that you select (use the Quick Search field to find a specific entry).
Mandatory fields: Your administrator might have made some editable fields mandatory to be edited before you can mark done, send, or close an interaction. Mandatory fields are indicated by a red asterisk. If you attempt to mark done, send, or close an interaction without editing a mandatory field an error message is displayed, and you are prevented from marking done, sending, or closing the interaction [Added: 8.5.117.18]
Missing Case Data Fields
Sometimes, not all of the case data is available. There might be fields missing. If you are allowed to add missing fields, the Add Field (![]() ) button is displayed in the Case Data toolbar.
) button is displayed in the Case Data toolbar.
- Click Add Field to display a drop-down list of fields.
- Select a missing field to display the field in the Case Information view. You can edit the added field.
- Enter the missing case data. For certain types of data, what you enter might be restricted to a certain number of characters or certain types and combinations of characters. For example, if you have to enter a credit card number, then the field might only allow certain numbers for a particular type of credit card.
If one of the characters that you type is invalid or the maximum number of characters that is allowed is reached, then nothing will be entered in the text field.
If what you have typed does not match what Workspace is expecting you to enter, an error icon appears to warn you that you must check what you have entered and correct it.
ImportantIncorrect format: If you do not correct incorrectly formatted entries before you attempt to mark done, transfer, move the interaction to a workbin, or any other action that transfers ownership of the interaction, a warning message is displayed asking you to either discard your changes or proceed with the action. If you cancel your action, you can correct the entry. If the entry is mandatory, you must set the correct value before you can close the interaction.
If what you have entered is correct, then do one of the following actions:
- Press Enter to add the case data to the case information for the interaction.
- Click X to remove the field.
Related Resources
The Workspace Desktop Edition User's Guide (English only) provides detailed lessons for using all the features of Workspace. You might find the following lessons useful:


