Manage Your Status
[Modified: 8.5.108.11, 8.5.139.06]
In this lesson, you will learn how to manage your status in the Main Window. This lesson contains the following section:
- Inactivity Timeout: You might be locked out of Workspace and have your status set to Not Ready if you do not use your keyboard or mouse for an inactivity period that is defined by your administrator. If you are locked out of Workspace, you must reauthenticate and reset your status to Ready to receive new interaction. For more information, see the Inactivity Timeout topic in the Workspace 8.5 Help.
- Locking your workstation: If you lock your workstation with or without first setting your status to Not Ready, your administrator might have set up your account to automatically change to Not Ready, with or without a Not Ready Reason. When you unlock your workstation, your status will remain in the Not Ready state until you set it to Ready. [Added: 8.5.139.06]
Going Ready
To begin accepting interactions, you must set your status to Ready. The following procedure describes how to set your status to Ready, so that you can receive interactions.
Lesson: Going Ready in the Workspace Main window
Purpose: To set your status to Ready, so that you can receive interactions.
Prerequisites
- You are logged in to Workspace (see Lesson: Logging in to Workspace).
- (SIP only) Plug in your USB headset. If you login to a SIP Voice channel, Workspace checks to determine whether the USB headset that you are configured to use is plugged in. If it is not, you will be logged in to Workspace but not to the SIP Voice channel. Ensure that you plug in your USB Headset to use the SIP Voice channel.
Workspace detects when your USB headset is plugged in or unplugged and will set your status accordingly. If your USB headset is not plugged in a message will be displayed.
Start
- If your status is configured to be set to Ready by default, you receive interactions that are routed to you as soon as you log in.
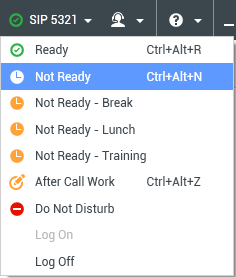
- Otherwise, click the Status icon to change your status to Ready (see the Example of a Status menu figure), so that inbound interactions can be routed to you.
You can also choose to set your status to a different Not Ready Reason, such as:
- Not Ready
- Not Ready - Lunch
- Not Ready - Break
- After Call Work
The Not Ready Reasons that are displayed in your Global Status menu depend on how this menu has been configured by your system administrator. In most cases, if you have set your status to one of the Not Ready states, inbound interactions cannot be routed to you.
WarningWhen you are handling an interaction, the system interrupts the display of the amount of time that you are in the current state. Warning: If, while you are handling an interaction for a given channel, you set your status to either Not Ready, Not Ready - <reason>, or After Call Work (ACW), the system does not display the amount of time that you are in that state until the interaction is complete. This feature enables your break or ACW time to be displayed according to recorded statistics. - You can check your ready status by placing your mouse pointer over the Status icon (see the Status Summary ToolTip figure).
The status summary includes your login name, Place, channels, and channel status.
If you are logged in to more than one channel, detailed status for each channel is displayed; otherwise, only your ready status is displayed. You can use the Global Status menu to log on to all channels that are logged off, or to log off from all channels without logging out.
If you are participating in an Outbound Campaign and are waiting for authorization to logout, you can check the status of your request in the Status Summary ToolTip. - If you are logged in to more than one channel, you can manage the ready status of each channel individually by using the My Channels tab in the Workspace of the Main Window.
- In the Main Window, click the Access and use Workspace supporting views button (
 ) to display the Supporting Views menu, then select My Channels.
- You can use the My Channels tab to log on and log off individual channels (Note: This feature might not be available in your environment). Right-click the channel that you want to update, and set your status by using the Status menu for that channel, similar to what you did in Step 2.
To see what channels are logged on or off, either open the My Channels tab or hover your mouse pointer over the Global Status icon.
- In the Main Window, click the Access and use Workspace supporting views button (
End


