Transfer A Voice Call
In this lesson, you will learn how to use the Team Communicator feature to transfer a voice call to an internal target or to a contact. The Team Communicator enables you to find an internal target or a contact, send an Instant Message (IM) to an internal target, call a contact or an internal target, initiate a conference, or transfer a call. This lesson contains the following sections:
Transferring a Voice Call
The Workspace Voice Interaction window enables you to transfer your current voice call to another party. In a consultation transfer, the current call is put on hold while you talk to the transfer target. In an instant transfer, the call is transferred as soon as the other party accepts the interaction. This section contains the following procedures:
- Lesson: Starting a voice transfer
- Lesson: Receiving a transferred call
- Lesson: Transfer to an active consultation
Lesson: Starting a voice transfer
Purpose: To transfer your current interaction to an internal target or a contact.
Prerequisites
- You are logged in to Workspace (see Lesson: Logging in to Workspace).
- You have an active interaction with a contact (see Receiving a Voice Interaction).
Start
- In the active voice interaction, click the Instant Voice Transfer button to open the Team Communicator (see the Finding an internal target for a voice transfer in the active Voice Interaction window figure) to find the internal target to whom you want to transfer the current interaction (see the Lesson: Using the Team Communicator feature to find an internal target).
- Click the Action Menu drop-down list that is displayed next to the name of the internal target to whom you want to transfer the interaction and select Instant Voice Transfer. The contact is put on hold. When the internal target accepts the interaction request, the interaction is instantly transferred to the transfer target. The interaction window on your desktop closes. If the transfer target does not accept your request, the transfer request is released, but your contact is still on hold. You must click the Resume Call button to take your contact off hold.
- Complete your after-call work.
- Set your status to Ready.
End
Lesson: Receiving a transferred call
Purpose: To receive an invitation to a accept a transferred call from another agent, to provide assistance to that agent in completing an active interaction.
Prerequisites
- You are logged in to Workspace (see Lesson: Logging in to Workspace).
Start
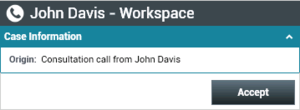
- If another agent wants to transfer a voice interaction to you, they can choose between an instant transfer and a transfer from a consultation. You are notified of the consultation request by the Workspace Interaction Preview interactive notification (see the Interaction Preview interactive notification, informing you of a transfer request figure).
TipIf you are using a screen reader, your system might be configured to give the focus to the Interaction Preview window. In this scenario, your screen reader will automatically read the window title to you. Navigate to the content area to have your screen reader read the Interaction Preview content. However, if your system is not configured to give the focus to the Interaction Preview window, to have your screen reader read the contents of the Interaction Preview window, you must use screen navigation to give the focus to the Interaction Preview. (Added: 8.5.101.14)
Click Accept to accept the transfer or to consult first with the calling agent:
- If the calling agent initiated an instant transfer, the call is immediately transferred to you. Go to Step 3.
- If the calling agent initiated a consultation transfer, the Workspace Voice Interaction window is displayed (see the Voice Interaction window, displaying your status as connected to the calling agent figure). It shows your status as connected to the calling agent.
- If the transferring agent used a consultation transfer, the Workspace Voice Interaction window enables you to perform the following functions while you are speaking to the calling agent, before you accept the transferred call:
- Speak privately with the calling agent about the call, before the call is transferred to you.
- End the call--This function ends your participation in the consultation call; the call is not transferred to you.
- Put the call on hold and retrieve the call.
- Send DTMF by using the keypad.
- Conference the call.
- Transfer the call.
- For SIP enabled agents, additional call actions are available:
- Record the call (see Lesson: Record Interactions).
- Mute and unmute the call.
- Adjust the microphone and speaker volumes.
For information about how to use the functionality in the interaction window, see the Workspace 8.5 Help.
- If the calling agent completes the transfer to you, the Workspace Voice Interaction window is updated to display the status of the party to whom you are talking. The status changes to Connected (see the Voice Interaction window, displaying your status as connected to the transferred contact figure). The Workspace Voice Interaction window enables you to use all the functionality of an inbound call (see Step 3 of Lesson: Handling an inbound voice interaction).
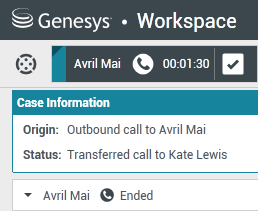
- Click End Call to terminate your connection to the call. The Workspace Voice Interaction window is updated to display the status of the call as Ended (see the Voice Interaction window, displaying the status at the end of a conference call figure). If required by your configuration, specify a disposition code that qualifies the outcome of the interaction by selecting an outcome from the Disposition Code drop-down list or radio-button list in the Disposition Code view (see Assigning Disposition Codes).
- Click Mark Done.
- Close the Voice Interaction window.
- Complete your after-call work.
- Set your status to Ready.
End
Transferring an Interaction to an Active Consultation
You can transfer your current interaction to your consultation target. You can also transfer a voice interaction to other types of consultation, such as IM, by following the same steps that are presented in the following procedure, beginning at Step 2.
Lesson: Transfer to an active consultation
Purpose: To transfer the current interaction to a party with whom you are already consulting.
Prerequisites
- You are logged in to Workspace (see Lesson: Logging in to Workspace).
- You have an active interaction with a contact (see Receiving a Voice Interaction).
- You have an active consultation with another party (see Lesson: Starting a voice consultation).
Start
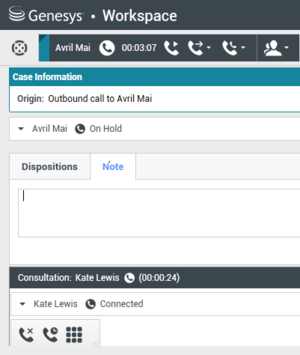
- During your active consultation (see the Voice Interaction window, displaying a consultation call that is connected to the internal target while the contact party is on hold figure), you can perform any of the following functions by using the Voice Consult toolbar.
- Alternate (toggle) between the contact and the internal target by clicking the Resume Call button alternately on the toolbar for the respective call. The other party is put on hold until you toggle back or complete the conference.
- End the call to the internal target and resume the call with the contact.
- Send DTMF to the internal target.
- For SIP-enabled agents, additional call actions are available:
- Record the call (see Record Interactions).
- Mute and unmute the call.
- Adjust the microphone and speaker volumes.
For information about how to use the functionality in the interaction window, see the Workspace 8.5 Help.
- To transfer your active interaction to your consultation target, click the Instant Transfer button. The Team Communicator is displayed showing a list of your active consultations (see the Voice Interaction window, displaying an instant voice transfer from a consultation call figure).
- Complete the transfer by clicking the Instant Voice Transfer button that is beside the name of the target to whom you want to transfer the interaction. The contact is transferred to the consulting target. The call status changes to Ended (see the Voice Interaction window, displaying status as Ended figure).
- After a call is released, one or more of the following actions might be available to you, depending on your assigned role:
- Click Mark Done to close the Voice Interaction window.
- Select a disposition (see Assigning Disposition Codes).
Note: Your system might be configured so that you cannot click Mark Done until you have selected a disposition code.
- Close the Voice Interaction window.
- Complete your after-call work.
- Set your status to Ready.
End


