
Handle Callback Interactions
[Added: 8.5.111.21]
In this lesson, you will learn how to accept a callback voice interaction by using Workspace. This lesson contains the following sections:
Receiving a Callback Interaction
A callback interaction is initiated when a contact visits your company's web site or calls your company from a mobile phone and submits a request for an agent to telephone the contact at a time that the contact specifies.
If you are the selected internal target for a callback interaction, you receive a notice on your workstation desktop. You can decide to accept or reject the interaction. If you accept it (answer it), the interaction window is displayed. The interaction window contains information about the call and the controls that you need to complete the interaction.
The Callback Interaction window is similar to the Voice Interaction window (refer to Receiving a Voice Interaction). It enables you to view all the information that is necessary to handle a callback interaction with a contact who has requested a callback.
Lesson: Handling a callback interaction
Purpose: To handle a callback voice interaction properly.
Prerequisites
- You are logged in to Workspace (see Lesson: Logging in to Workspace).
- Your status is Ready for the voice channel (see Lesson: Going Ready in the Workspace Main window).
- You are the internal target for the Callback interaction.
Start
- Your hard phone or soft phone rings, and a preview of the inbound interaction is displayed on your workstation desktop in an interactive-notification view (see the Callback Interaction Preview interactive notification figure).
The Interaction Preview contains a summary of call information, including contact information and call metrics. The Interaction Preview might also contain Case Information, which is part of the case data regarding the call. The case data might include information that the contact entered in a form on your company's web page, or on their mobile device, or through an IVR.
TipIf you are using a screen reader, your system might be configured to give the focus to the Interaction Preview window. In this scenario, your screen reader will automatically read the window title to you. Navigate to the content area to have your screen reader read the Interaction Preview content. However, if your system is not configured to give the focus to the Interaction Preview window, to have your screen reader read the contents of the Interaction Preview window, you must use screen navigation to give the focus to the Interaction Preview.If your account is configured for auto-answer, the Interaction Preview is not displayed and the call is answered automatically unless your account is configured to enable you to preview the case information before the interaction is auto-answered. In this case, when you receive an auto-answer interaction, the Interaction Preview is displayed on your desktop. A timer that counts down the number of seconds until you are connected to the contact is displayed in the Accept button (refer to the following figure). You can click Accept before the timer runs out or wait for the timer to run out. The Reject button might also be displayed if your administrator wants you to have the option of rejecting an interaction before it is auto-answered.

- You can choose to accept or reject the interaction in the Interaction Preview by performing one of the followings steps:
- Click Accept to answer the interaction.
- Click Reject to return the interaction to the queue.
- Do nothing. The interaction will timeout and be redirected.
- If you accept the interaction, the Callback interaction window is displayed on your desktop. The window contains Case Information and Callback Information.
- When your are connected to the contact, the Callback Voice Interaction window is displayed on your desktop. The window contains Case Information, call controls, and Callback Information
If you connect with the contact successfully You can do any of the following:
- Terminate the call (see Step 6).
- Put the call on hold and retrieve the call. The call status changes to On Hold, and then back to Connected when you retrieve the call.
- Use the keypad to send DTMF to the contact.
- Start a voice or IM consultation.
- Conference the call (see Starting a Voice Conference).
- Transfer the call (see Transferring a Voice Call).
- View and read standard responses (see Lesson: Using The Standard Response Library).
- For SIP-enabled agents, additional call actions are available:
- Record the call (see Record Interactions).
- Mute and unmute the call.
- Adjust the microphone and speaker volumes.
Note: For information about how to use the functionality in the interaction window, see the Workspace 8.5 Help.
You can also use the Callback Interaction window to do the following:
- View contact records. See Lesson: Finding and viewing an interaction in the contact database.
- View contact history. See Managing Contact History.
- Launch the Team Communicator. See Starting a Voice Conference, Transferring a Voice Call, and Blending a voice consultation with an IM consultation.
- Reschedule a different callback time. See the Lesson: Scheduling a callback interaction.
- Set a disposition code. See Assigning Disposition Codes.
- Use the Note to add information about the interaction to the interaction history. See Managing Contact History.
- View and edit the case information for the interaction. See Managing Contact History.
- Link to a web page from a hyperlink in the Case Information view. The case information might contain a hyperlink to enable you to view a web page that is related to the interaction, such as customer records. Click the hyperlink in the Case Information view to open a new browser window and view the link. Place your mouse pointer over the hyperlink to preview the web page from the Case Information view. The hyperlink might be a URL or highlighted anchor text.
If there are interactions in progress for the current contact, the number of interactions is displayed beside the connection status of the interaction (see the Dynamic Contact History Matrix displaying the number and type of interactions in progress for the current contact figure). Place your mouse pointer over the icon to display the number and type of interactions in progress (except voice interactions) for the current contact.
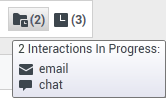 Dynamic Contact History Matrix displaying the number and type of interactions in progress for the current contact
Your account might be configured to notify you if there are recent interactions for the current contact; if so, the number of recent interactions is displayed beside the connection status of the interaction (see the Recent interactions matrix displaying the list of interactions with the current contact within the last day figure). Place your mouse pointer over the icon to display the number and type of recent interactions for the current contact. If you click the icon, the Contact view is opened and the History tab is displayed. Your system administrator defines the contents as interactions during the last-specified number of days.
 Recent interactions matrix displaying the list of interactions with the current contact within the last day
 - When the interaction is complete, either you or the contact can end the call.
If you want to terminate the call, click the End Call button. The call status returns to Ready to Call. - If required by your configuration, specify a disposition code that qualifies the outcome of the interaction by selecting an outcome from the disposition code drop-down list or radio button list in the Disposition Code view (see Assigning Disposition Codes).
- Click Done.
- If the Callback Interaction window does not close automatically, close the Callback Interaction window after you have clicked Done for each of the active interactions.
- Complete your after-call work.


End
Next Steps
- Set your status to Ready. See Lesson: Going Ready in the Workspace Main window.
Scheduling a Callback Interaction
There are three ways that you can schedule Callback interactions for a contact:
- From an active interaction
- From the Team Communicator
- From the current callback interaction
These three methods open either the Reschedule Callback view or the New Callback dialog box which enable you to choose a date and time for when the contact will receive a callback interaction from your company.
Lesson: Scheduling a callback interaction
Purpose: To schedule a callback voice interaction properly.
Prerequisites
- You are logged in to Workspace (see Lesson: Logging in to Workspace).
- You have the correct permissions to schedule callback interactions.
Start
- Use one of the following three methods to schedule a callback interaction:
- From a current interaction of other types, such as voice calls, email, or chat, click Schedule Callback (
 ) to open the New Callback view.
 - From Team Communicator, find a contact, then from the Action Menu, choose New Callback to open the New Callback view.
- From your current callback interaction, in the Interaction Toolbar, click Reschedule a Callback (
 ) to open the Reschedule Callback view.
- From a current interaction of other types, such as voice calls, email, or chat, click Schedule Callback (
- Depending on how you started the callback interaction:
- In the New Callback dialog box, first make the following selections:
- Choose a Callback Type from the drop-down list. If your contact center does not support different callback types, this menu is not displayed.
- Specify the time zone of your contact. This will be selected automatically if this information is available in your contact database.
- Choose a date from the calendar picker.
- In the Reschedule Callback view, first make the following selections:
- Check Reschedule Callback.
- Specify the time zone of your contact. This will be selected automatically if this information is available in your contact database.
- Choose a date from the calendar picker.
- In the New Callback dialog box, first make the following selections:
- After you select a date, the schedule grid becomes active. Use the schedule grid to find a time slot that is shown as available. Available time slots are highlighted in blue when you place your mouse pointer over them. A tooltip indicates the time range and the number of callback appointments that are available in the time slot.
- Select or enter an alternate phone number if necessary.
- Add instructions for the agent who will handle the callback in the Instructions field.
- To commit the callback to the system, do one of the following:
- In the New Callback dialog box, click OK.
- In the Reschedule Callback view, ensure that the Reschedule Callback checkbox is selected, then click anywhere outside of the view.


End
Next Steps
- Set your status to Ready. See Lesson: Going Ready in the Workspace Main window.